Automation and technology are amazing, modern advances allow us to automate almost everything in our daily lives, before we get into this post, here is an end-2-end example of this solution, enjoy.
So now you know what we will be building, lets get in to it.
There are almost no systems in my house that have not been integrated into my Home Automation platform. But in life, we seldom get it right the first time round. I am a huge believer in building reliable and durable systems, and as a result of this I always prefer cabled communications over wireless, powered systems over battery powered systems and micro-controller-based systems (PLC / Arduino) over microprocessor-based systems (Home Assistant).
As builders we need to pick the right tool for the job. The other last rule I apply is my house needs to look like a normal house. That means all the switch mechanisms need to look and feel the same all throughout my house. I don’t want Wifi/Zigbee/Bluetooth buttons that look out of place. I am in Australia and that means Clipsal mechanisms.
If you walk into my house, sure there are a few tell tail signs such as HID external card readers and commercial electrical strikes and a telco rack in the garage, but by and large it flies past the science experiment radar and looks like normal house.
The problem is achieving these ideals can be hard work. Is the juice worth the squeeze, especially when you don’t plan for them? I have in the last few years ran cables between floors, it can be a day’s work in some cases. It took an entire day for the cable runs to control my 8 electric roller shutters via DPST relays.
There has been almost 10 posts on this site that talk to the virtues of MQTT as a protocol, I first introduced my house to MQTT in the post A Journey in to MQTT With Roller Shutters, Mosquitto, HomeAssistant & Low Powered Micro-Controllers and since then everything in my house is MQTT based.
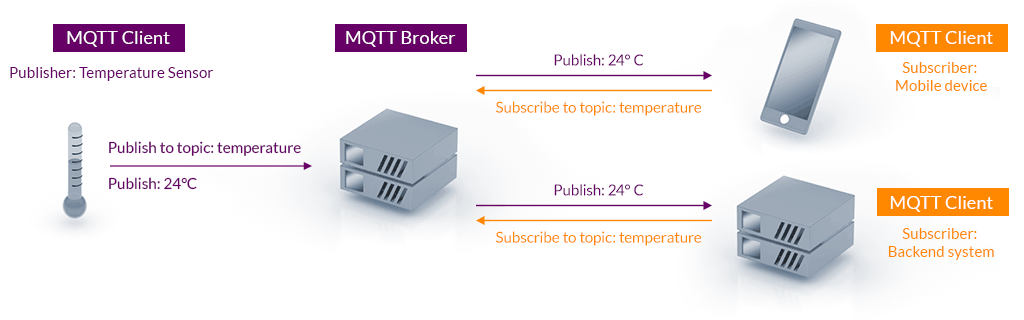
MQTT brings us the concept of publishers and subscribers. This decoupled nature brings many things. It brings interoperability as MQTT is an OASIS standard. It also means we are now able to, given its publisher / subscriber model have a ‘thing’ do something when it’s not physically connected.
My Problems Statement
All things come back in fashion. Have you noticed in society that we have made the shift in eradicating buttons, to using touch screens, to now be shifting back to using buttons? Think of Volkswagen in the latest MK8 Golfs (touch buttons universally hated), Honda in their new FK8 Civic going back to buttons. There are times where that tactical / always on nature is just easier.
What do cars have to do with this? I will bring it back to my house. This is second place where I have used this pattern, but I want to tell you about my roller shutters.
Today my rollers shutters (all 8 of them) are driven by an Arduino Mega (located in my rack), which drives low voltage relays, where those relays then switch 240vAC. All of this control is exposed as MQTT topics.
      command_topic: "cmnd/ARDUINO_Roller_[Insert Roller Number]/POWER"
      payload_on: "mesh-off | mesh-on | off | on | half-on | half off"
Being its MQTT and based on the blog post above I had 3 ways (we now have 4 ways) to control these blinds. HomeAssistant, PLC and Amazon Alexa (Via HA Bridge emulating a Phillips Hue device).
My family is my biggest supporter and biggest critic. The rules for my roller shutters are as follows. All of this is orchestrated by the PLC, you guessed it this happens by publishing a MQTT message(s) to which the Arduino Mega 2560 is a subscriber of
- Close when the house is armed.
- Close when its sunset (based on an external PE Cell).
- Close when its > 25C outside.
- Open 2 hours after sunrise in months of Day Light Savings otherwise 1 hour after sunrise.
- Open to mesh mode at 9PM if the temperature > 15C outside.
There is a manual mode (feature flag) exposed via MQTT to which the above is ignored and can be set on a room-by-room basis.
It’s complex, but it usually works. However, there are times when it may be too hard to ask Alexa to open up a roller shutter or to inconvenient to user your phone to open Home Assistant. A typical example is sometimes my wife wakes early on a weekend (choosing my language carefully) and either and doesn’t want to wait for the roller shutters to open based or Alexa is too inconvenient.
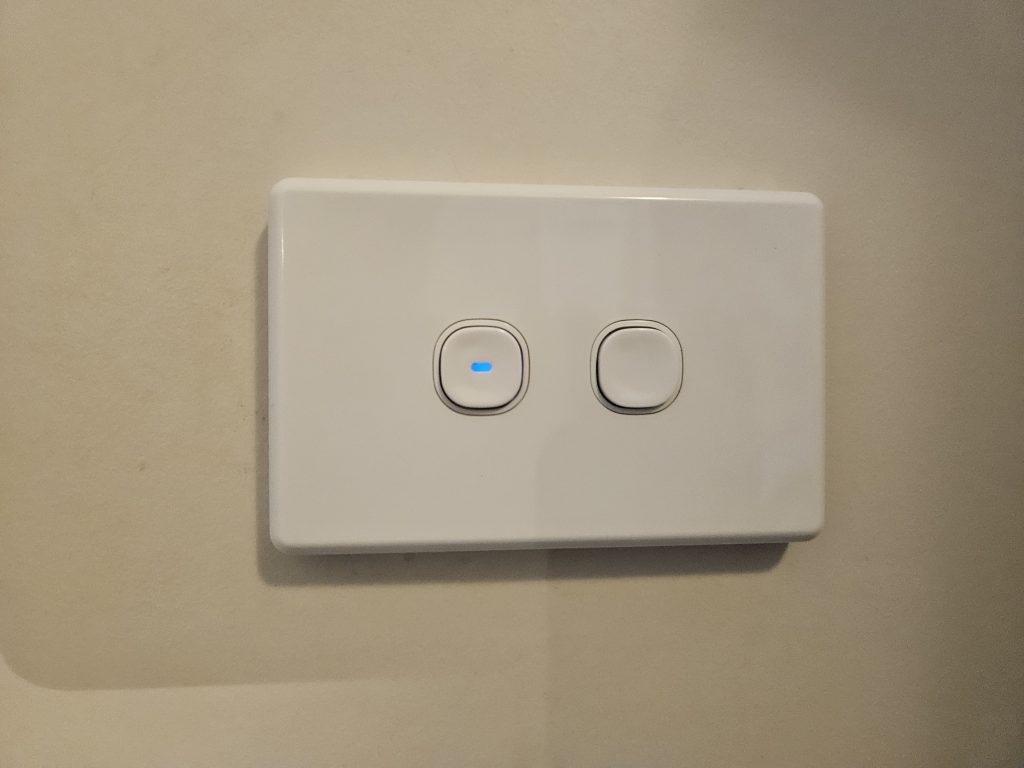
I made the conscious choice to not mount any control mechanisms to my walls when I installed these. I strive for that ‘clean’ look. I didn’t want anything looking out of place, but with guests staying from time to time, children and the changing ad hoc needs of the family a manual control mehcanism is needed.
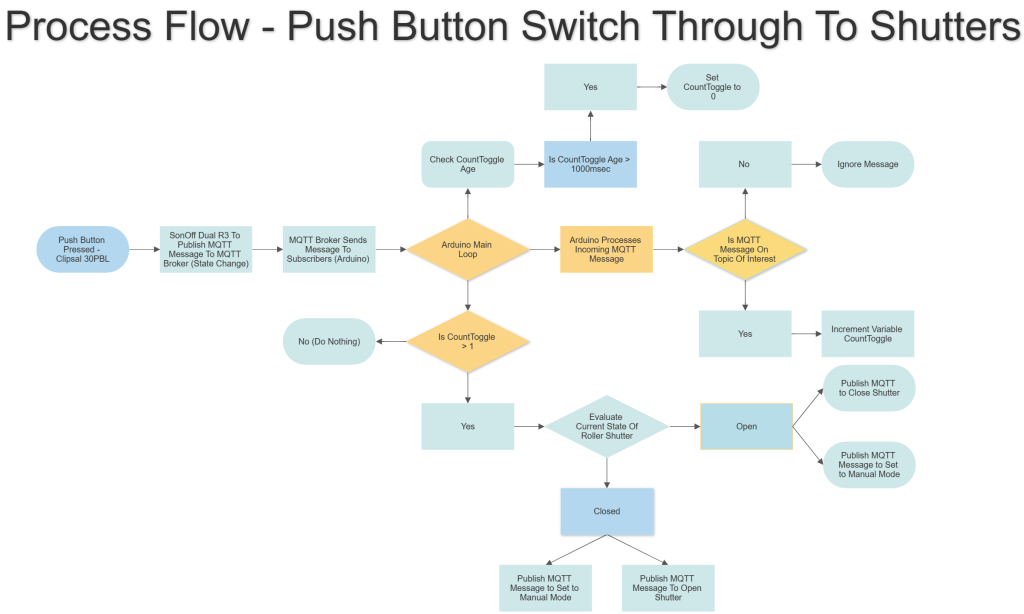
So how can I add a manual control mechanism with the same look and feel as the other control systems, that is reliable, not prone to false positives? If we look at this process flow, this is what I am going to walk you through.
The Solution – The Physical
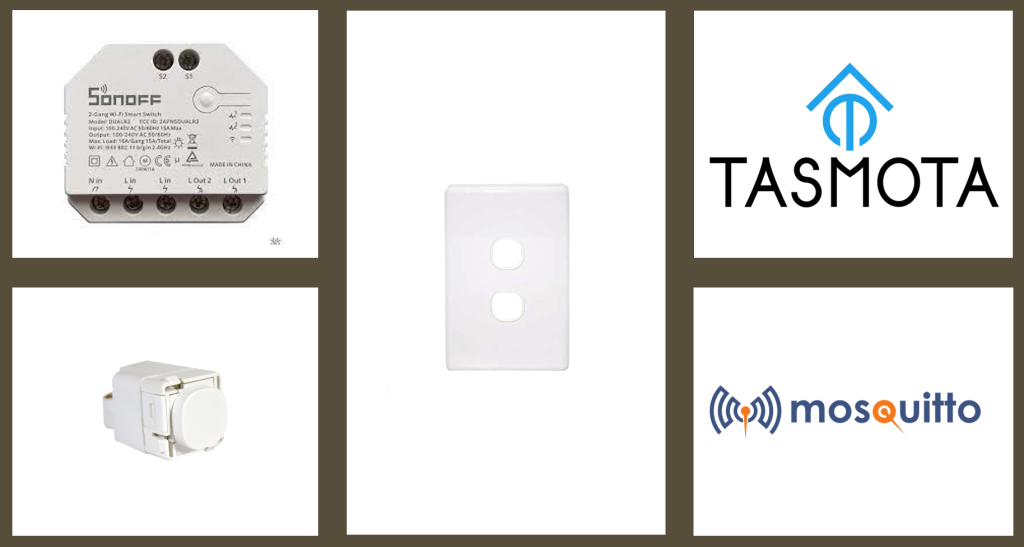
My solution is to use a standard Clipsal 30PB – Push Button Switch Mechanism in conjunction with a Sonoff Dual R3 (You could use a Shelly or any MQTT based appliance module) and Tasmota Firmware.
The summary of my solution is to connect this additional switch to the appliance module, but instead of typically driving a load as per how these modules are designed, I am not driving any form of electrical load, I am publishing the output state change over MQTT and having the Arduino subscribe to this change. From this button press I can embed my own decisioning logic and ultimately cause the shutters to change state.
Think of this as another means to call an API, but in this case the API is the publishing of a MQTT message to change the state of the roller shutter.
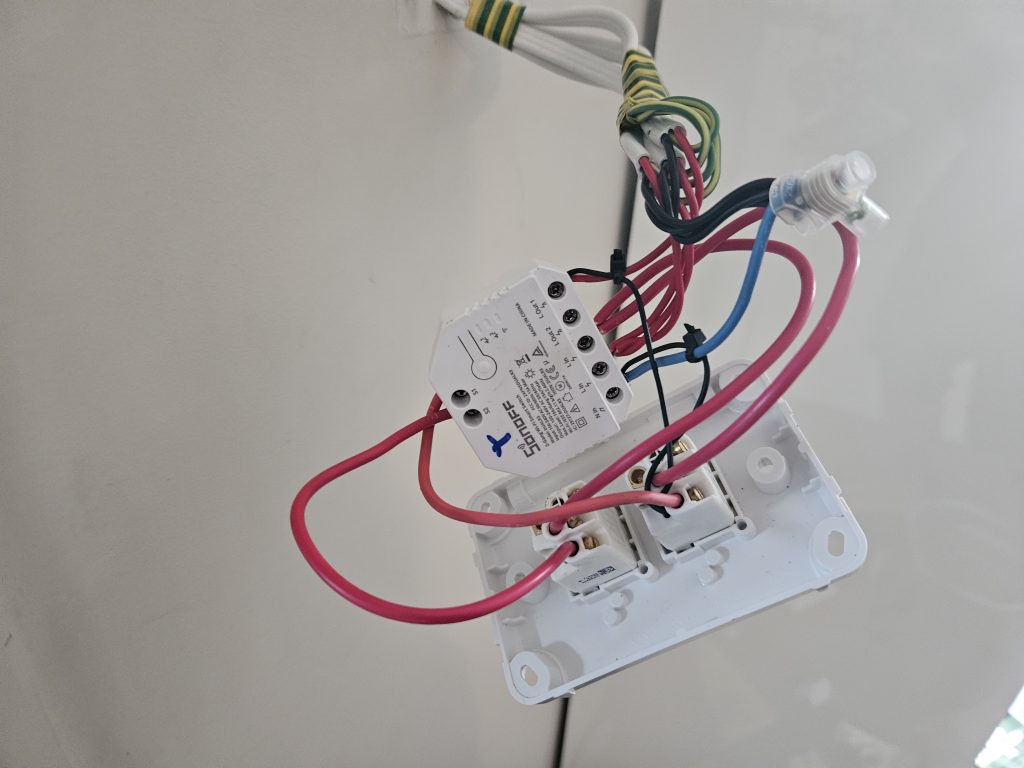
In terms of wiring, ensure your RCD (Residual Current Device) for the circuit is off. Have an RCD lock in place and test with a multimeter before getting started. In Australia always use a qualified electrician, your country may differ. AC power can be lethal.
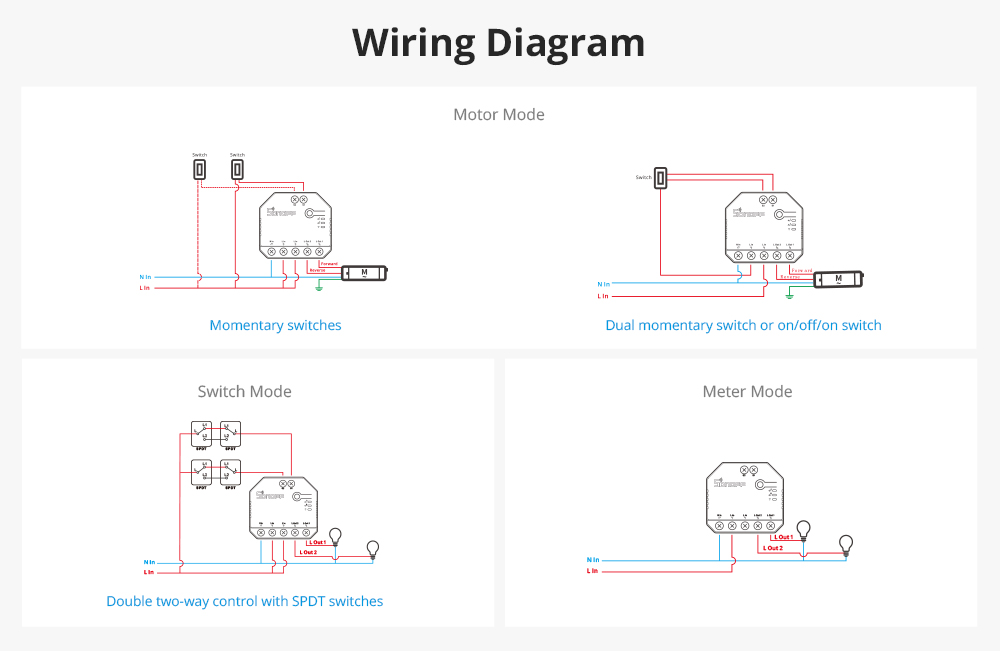
Wire this up according to your appliance module. The Clipsal 30PB series are a SPDT (Single Pole Dual Throw) switch and as such my wiring is per the bottom right, with the exception of there being no switched load for this Clipsal 30PB switch.
The Solution – The Logical
I am using a Sonoff Dual R3. Sonoff products run their own firmware and you will use eWeLink to control these or their private REST API. This proprietary method does not play nicely with others, therefore I flash all Sonoff devices that are ESP based with Tasmota, you can read more about this process in this blog post.
Tasmota brings MQTT, you can alternatively use other appliance modules that provide MQTT functionality such as the Shelly 2.5.
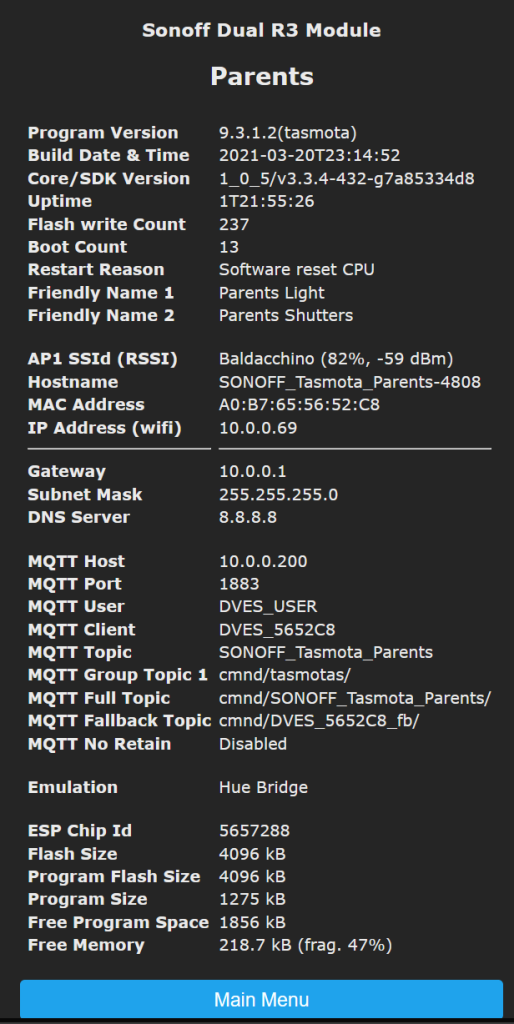
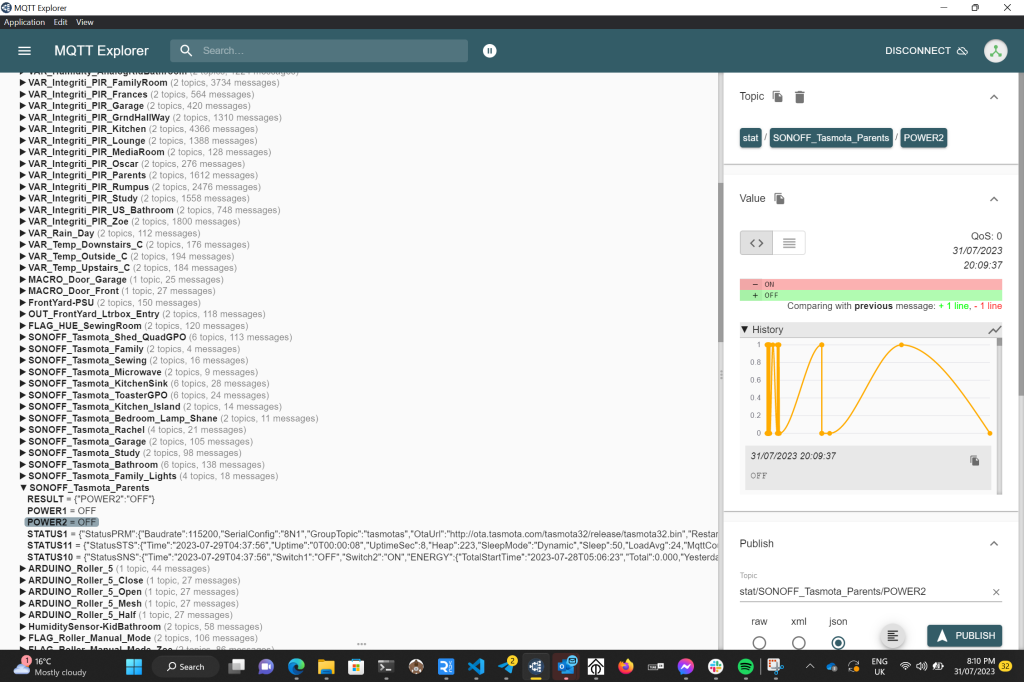
In my example I have messages being published to the 10.0.0.200 MQTT Broker on the path /stat/SONOFF_Tasmota_Parents
Each channel will extend the base path with POWER1 and POWER2 for their respective channels and you can see in the MQTT explorer image below. This means our new additional switch in this example will have a status and payload defined at /stat/SONOFF_Tasmota_Parents/POWER2
That’s all that needs to be done on the Sonoff Dual R3, we are publishing messages to our MQTT broker. I am now going to move into the Arduino IDE and show you the C++ code I needed to add to my sketch.
Timers for timing – We need timers because Arduino’s run a RTOS and any blocking in the form of sleep states will cause the Arduino to pause, which may not be so bad for simple tasks, but in my situation, it would mean the system would not be able to accept incoming MQTT messages whilst sleeping. I have created two additional variables per roller shutter. Given the Arduino does not contain an RTC (Real Time Clock) we store the current value of millis() in the variable Last_CountTooggle_Name, which is a reference point when the Clipsal button was last pressed. Millis() is a that increments based on the number milliseconds the system has been online.
    unsigned long Last_CountToggle_Parents = 0;
    unsigned long countToggle_Parents = 0;
    unsigned long Last_CountToggle_Zoe = 0;
    unsigned long countToggle_Zoe = 0;
    unsigned long Last_CountToggle_Frances = 0;
    unsigned long countToggle_Frances = 0;
MQTT subscriptions – This should be self-explanatory; we need to have the Arduino subscribe to the MQTT messages bent sent by the Sonoff Dual R3.
      client2.subscribe("cmnd/ARDUINO_MQTT_Status/POWER");
      client2.subscribe("stat/SONOFF_Tasmota_Parents/POWER2");
      client2.subscribe("cmnd/ARDUINO_Roller_Parents");
      client2.subscribe("stat/SONOFF_Tasmota_Zoe/POWER2");
      client2.subscribe("cmnd/ARDUINO_Roller_Zoe");
      client2.subscribe("stat/SONOFF_Tasmota_Frances/POWER2");
      client2.subscribe("cmnd/ARDUINO_Roller_Frances");
Functions to check switch timers – These functions reset the value of countToggle is the last time the button was pressed is greater than 1000msec. This means a button needs to be double clicked.
void checkLast_CountToggle_Parents () {
    if ((millis() - Last_CountToggle_Parents)  > 1000) {
        countToggle_Parents = 0;
       ;
    }
}

void checkLast_CountToggle_Zoe () {
    if ((millis() - Last_CountToggle_Zoe)  > 1000) {
        countToggle_Zoe = 0;
       ;
    }
}

void checkLast_CountToggle_Frances () {
    if ((millis() - Last_CountToggle_Frances)  > 1000) {
        countToggle_Frances = 0;
       ;
    }
}
The Man Loop – Additional code has been added to the main loop to check the Last Toggles of the Clipsal 30PB buttons by calling the above functions, plus I added code to interpret the incoming MQTT messages. Note there is a MQTT receive function (not shown) which places the MQTT topic and MQTT payload in variables.
    checkLast_CountToggle_Parents();
    checkLast_CountToggle_Zoe();
    checkLast_CountToggle_Frances();
    //ZOE TOGGLE SWITCH
    if (MQTTTopic.indexOf("SONOFF_Tasmota_Zoe") > 0) {
      if (countToggle_Zoe > 0) {
        if (millis() - lastToggle_Zoe  > relayDelay ) {
          lastToggle_Zoe = millis();
          //MQTT PUBLISH AN UPDATE BACK
          client2.publish("cmnd/ARDUINO_Roller_Zoe","toggle");
          countToggle_Zoe = 0;
          MQTTTopic = "";

        }
      }
      if (countToggle_Zoe < 1) {
          countToggle_Zoe = countToggle_Zoe + 1;
          Last_CountToggle_Zoe = millis();
          MQTTTopic = "";
      }
    }

    //ZOE TOGGLE - RESPONSE - BASED OFF ROLLER 7
    if (MQTTTopic.indexOf("ARDUINO_Roller_Zoe") > 0) {
      if (MQTTPayload == "toggle" && MQTT_Roller_7 == "off")  {
        //MQTT PUBLISH AN UPDATE BACK
        client2.publish("cmnd/ARDUINO_Roller_7/POWER","on");
        client2.publish("cmnd/FLAG_Roller_Manual_Mode_Zoe/POWER","Set");
      }
      if (MQTTPayload == "toggle" && MQTT_Roller_7 == "on")  {
        //MQTT PUBLISH AN UPDATE BACK
        client2.publish("cmnd/ARDUINO_Roller_7/POWER","off");
        client2.publish("cmnd/FLAG_Roller_Manual_Mode_Zoe/POWER","Set");
      }
    }
Summary
Wrapping this up, it may seem complex, but it really isn’t. We are simply using MQTT to act a mechanism to control physically disconnected systems. This a pattern that allows you to add additional control planes without physical cables saving you both time and money. It also allows you to throw away those out of place buttons and switches and use something that looks and feels like your existing switches and buttons.
Physical control planes are a great addition in this digital world. Tasmota and MQTT are fast becoming my Swiss army knife pattern. Whilst not as simple architecturally as a cable, they have proven themselves to be reliable. Mosquitto and Tasmota just work. If you have yet to jump in to the MQTT bandwagon, the best time to start is yesterday.
Keep On Building
Shane
Hi Shane, Thanks a lot for sharing the wealth of knowledge — really appreciate it. I had few questions which I thought of asking to help me make better decisions. I noticed you’re mostly using Sonoff relay withs Wifi, even in your product store selling the same. Is there any particular reason to prefer Wifi over Zigbee? I’m bit concerned about having too many wifi devices might overload the router.
Also, how do you handle things when you need to reset the access point? Do you have to reconfigure each Sonoff device manually, or does restoring the AP from a backup config get everything working again?
One more thing—have you ever had any issues with Sonoff relays overheating? Living in Australia with mostly wooden structures, fire safety is definitely a big concern for me.
Cheers,
SP
Hey SP,
Appreciate the comment. I use Sonoff relays for a few reasons. Firstly they are cheap, but whilst cheap, they are not ideal until you flash Tasmota on these. Tasmota brings these devices to life with MQTT.
I do run a few Zigbee devices in my house but there have been challenges. Zigbee use 2.4ghz also. I have had a few issues. I have in my house 4 x Cisco 3702i (https://automation.baldacchino.net/cisco-lightweight-to-autonmous-mode/) and have approx 130 Tasmota devices (2.4gh) and no issue.
Tamsota needs as a foundation great Wifi. Zigbee will build a mesh but there can be convergence issues. Personally I am not a fan, but I am also not vested in to it that much (maybe 20 devices).
Never had a Sonoff relay fail, even through our 40+ degree summers (I am in Australia) but please take that in to consideration, ensuring you size accordingly with GPO’s using 16AMP modules and lights using 10AMP’s.
Your question on access points and needing to reset devices.
All of my devices run Tasmota with each Sonoff device runs a webserver. I can configure my MQTT broker within this web interface. Very simple but the reality is I am never changing my broker IP address or fully qualified domain name.
Tasmota is pretty easy to flash on, but if you dont want to down that path, Shelly units natively speak MQTT and may be an easier path to start with.
Happy to help as much as I can.
Thanks a lot Shane it helps, especially 16AMP GPO modules which definitely would have missed..
I’ll get Cisco AP as you suggested and play around. With Zigbee I am facing some challenges. Might be time to explore another horizon.
Cool, there may be even better AP’s than my 3702i’s that are equally as cheap.