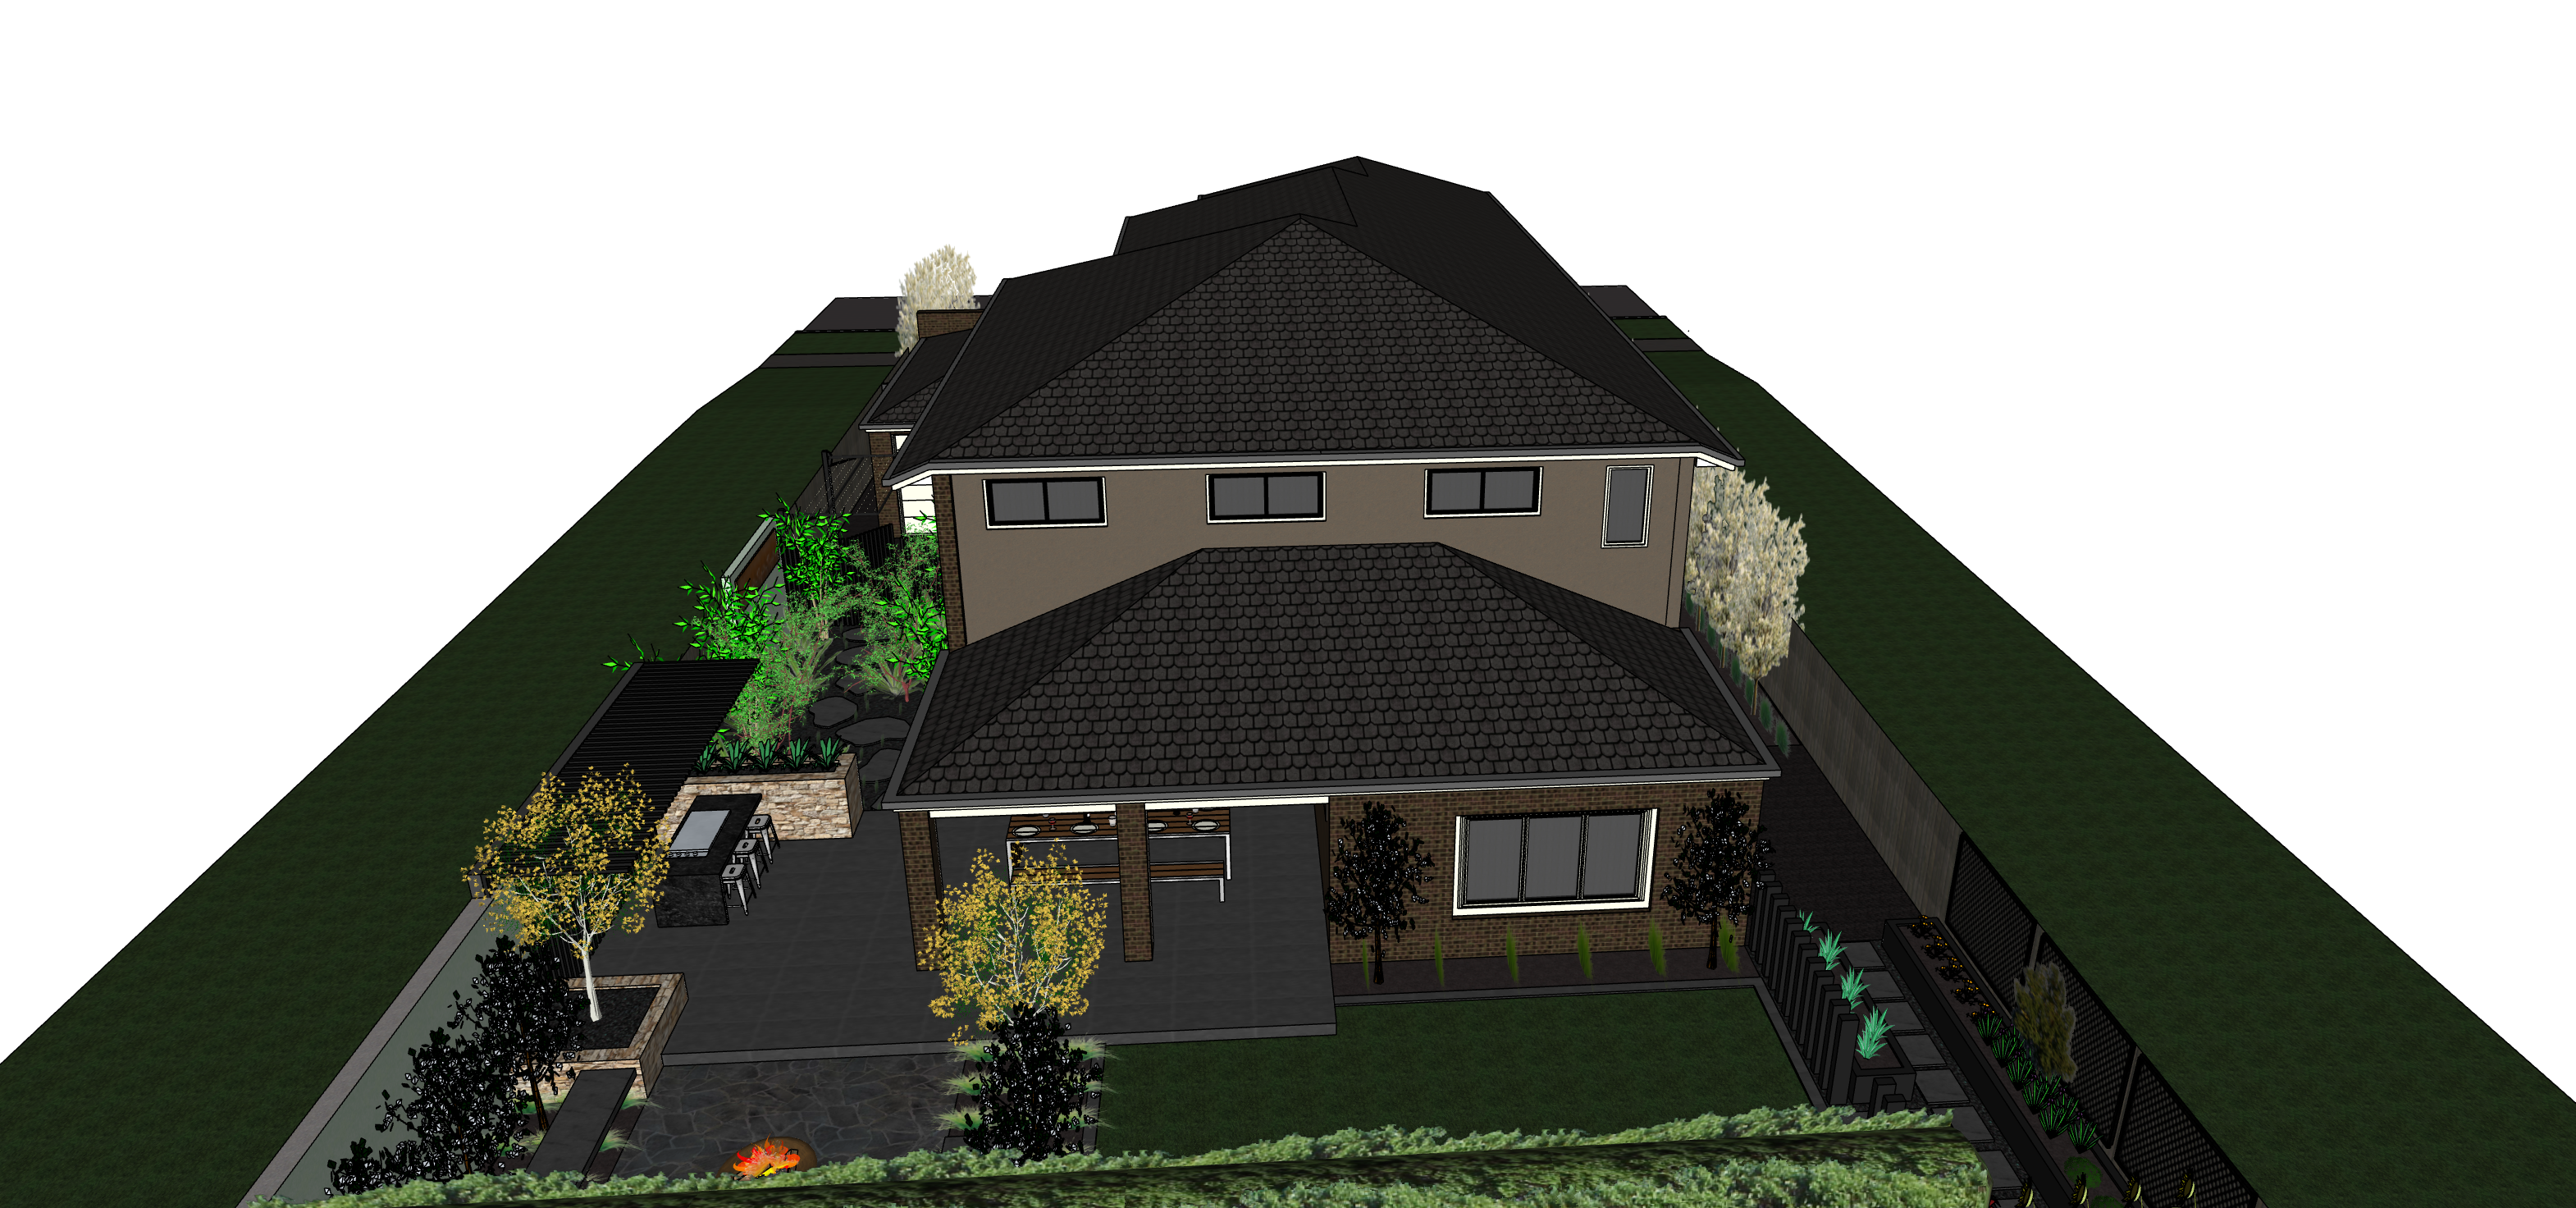
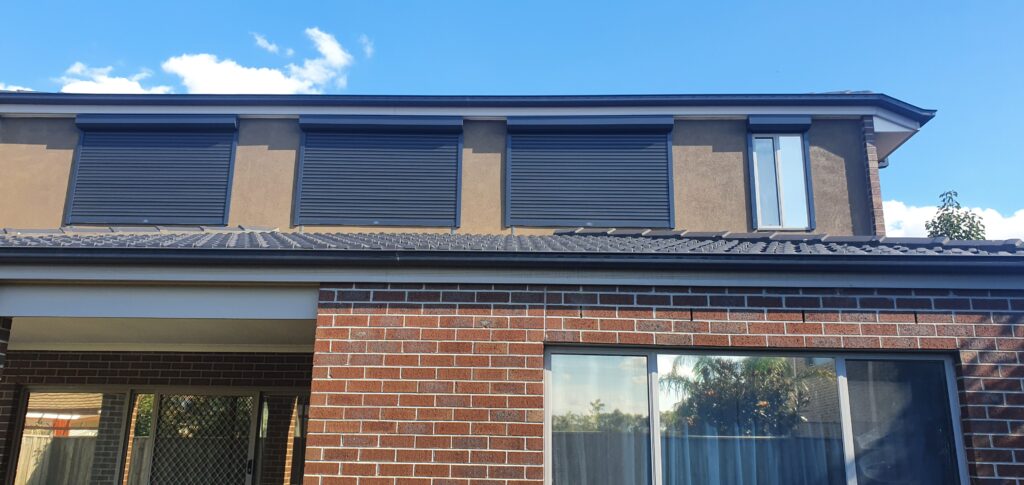
Its been a journey over the last 10 years in driving heat out of the top story of my house. From double glazing, heavy drapes and window film, keeping temperatures cool and the house dark in summer has been a challenge for our north facing windows (the master bedroom).
Near 6 months ago I decided I would install external roller shutters to our property. Getting someone to come in to integrate with a PLC is always a challenge so in this scenario I decided to install these myself and purchased these from EzyFit Roller Shutters. A great experience and they really guide you through this process, and hey I am always up for buying new tools.
Lets start by showing you this in action and then working backwards in my journey.
So now you have seen it all in action. Whilst doing this I have been on this constant march, to modernize the control protocols of my house. With near 80 digital I/O, it’s not tenable to be tied to a single PLC. From cost (PLC I/O is expensive) but also from an integration point of view, the closed echo system is somewhat limiting.
Enter MQTT!
In this post I will illustrate how I implemented distributed I/O using MQTT as a transport using nothing more than an Arduino Mega 2560, MQTT C++ library, some docker containers and integrated this with an existing PLC and Home Assistant
Enough about this, lets get started.
Bill of Materials
– 4 x Roller Shutters ($3000)
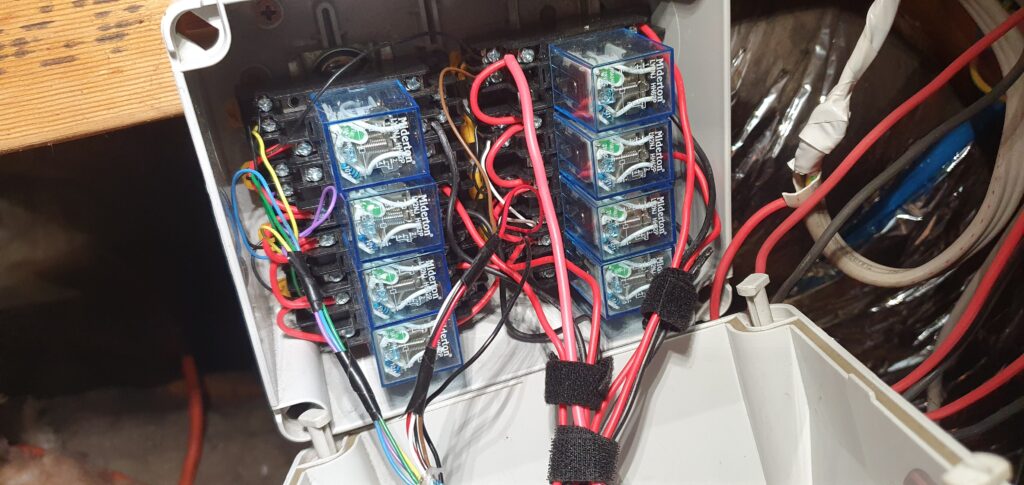
– 1 x 8 Channel Relay Board ($30)
– 8 x Omron DPST Relays ($70)
– 1 x Large Electrical Junction Box O-Ring Sealed ($50)
– 1 x 30m 8 Core Cable + 1 x 30m Single Core Cable + 15m x 3 phase power cable ($150)
– Electrical miscellaneous connectors – Din Rail, connector blocks, etc ($40)
Tools used
– Hand Tools (Pliers, Cable Strippers, Screw Drivers)
– Electric Tools (Drill, Impact Driver)
– Ladders and Platforms
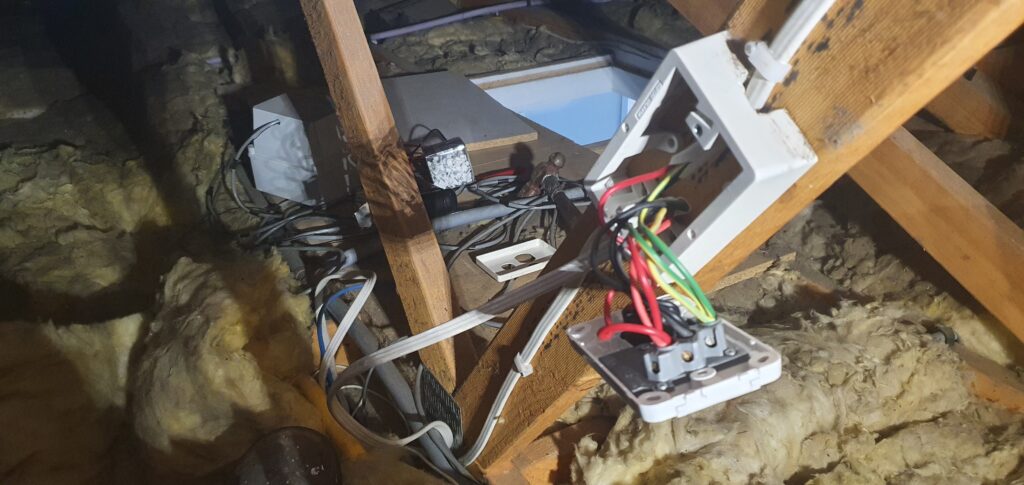
Step 1: Power – Run & Rough In
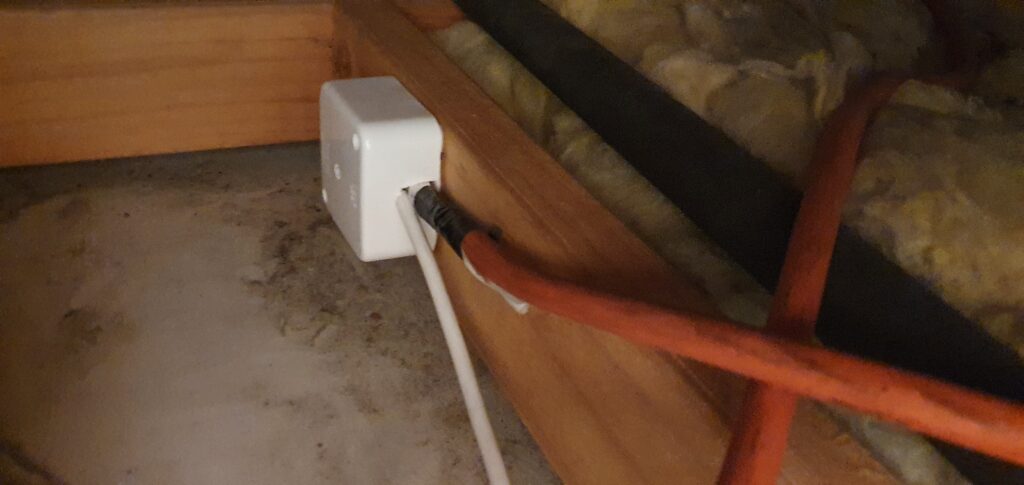
The roller shutters are based on 240v AC motors and hence need power. So how do you provide power to each window? My solution was to extend an existing power circuit by piggy backing from a power point in my roof for my gas heater and running power to an electrical junction box to which I will then switch the active to the relevant shutter and for the correct direction, up or down.
Step 2: Prepare The Switching Logic
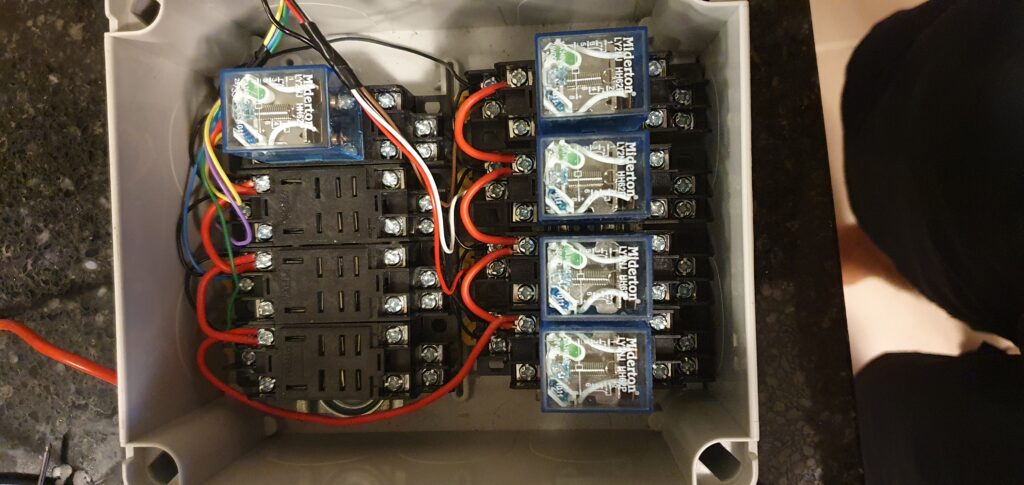
Each roller shutter using a twin active control mechanism where there is a common ground. One active for up and another active for down. Simple right? Well kind of. I use a dual relay switching logic where one low voltage relay (12vDC) on the microcontroller side switches another relay which again is another low voltage relay (12vDC) which switches the high voltage (240vAC).
So with 2 relays for up and 2 relays for down, is that it? The challenge is creating an interlock.
How do you prevent both up and down being driven at the same time? More so how do you ensure when the Arduino power cycles that both relays aren’t driven before the main loop initalises?
My solution is to use hardware and software to create this interlock. As a relay has two positions, I alternate between how I switch the active between NO (Normally Open) and NC (Normally Closed).
Up is NO and down is NC. By doing this it means it is not possible on the hardware to drive both up and down before the main loop initalises.
So lets talk about this main loop. I know in hardware I can’t drive up and down without code but in terms of code anything is possible.
Here is where an interlock comes in to play. Before we ask to go up, the first thing we do is stop all down requests.
   //ROLLER SHUTTER 1
    if (MQTTTopic.indexOf("Roller_1") > 0) {
      if (MQTTPayload == "off") {
        digitalWrite(RELAY_CH9, LOW);
        digitalWrite(RELAY_CH10, LOW);
        lastRelayCH9Time = millis();
        //MQTT PUBLISH AN UPDATE BACK
        client2.publish("stat/ARDUINO_Roller_1/POWER","off");
      }
      if (MQTTPayload == "on") {
         digitalWrite(RELAY_CH10, HIGH);
         digitalWrite(RELAY_CH9, HIGH);

        lastRelayCH10Time = millis();
        //MQTT PUBLISH AN UPDATE BACK
        client2.publish("stat/ARDUINO_Roller_1/POWER","on");
      }
      MQTTPayload = "";
      MQTTTopic = "";
    }
A software interlock which prohibits up and down being driven at the same time is coupled with a hardware interlock, which is achieved by how I physically wire these relays.
Step 3 :You mentioned MQTT
I did indeed. So my house is made up of many discrete systems. From serial, X-10, TCP/IP, 1 Wire, Phillips Hue and more, how do you get systems to talk to each other and maintain a common understanding of state between systems? It is a challenge.
Whilst most of my I/O comes back to my PLC, it poses challenges in a decentralised world. More so it can be costly. A 16 channel I/O board will cost > $500 where as an Arduino Mega 2560 with 54 digital I/O costs $50.
Whilst I had thoughts of using an Arduino as an i2C slave to the main PLC, I settled years ago on a HTTP interface but it posed challenges in maintaining state between systems. It became a challenge at scale.
You can read more about MQTT but it’s an OASIS standard messaging protocol. It is designed as an extremely lightweight publish/subscribe messaging transport that is ideal for connecting remote devices with a small code footprint and minimal network bandwidth.
As an Arduino Mega has 32KB of RAM its this small code footprint that is ideal for such a device.
Both Microsoft Azure and Amazon Web Services have IoT Services (read MQTT Broker) so I can synchronise what is happening in my house to the cloud.
- Bi-directional communications allows messaging between device and broker, and even the cloud in a 1(publisher):many(subscribers)
- Reliable messaging. There is QoS for MQTT and ensures messages are delivered if there are issues in communications. Not such an issue on a wired LAN but what if the broker is offline. The QoS capabilities see to ensuring messages will always be delivered.

The above is achieved this via a publish, subscribe model where devices can be both a publisher and a subscriber via a broker.
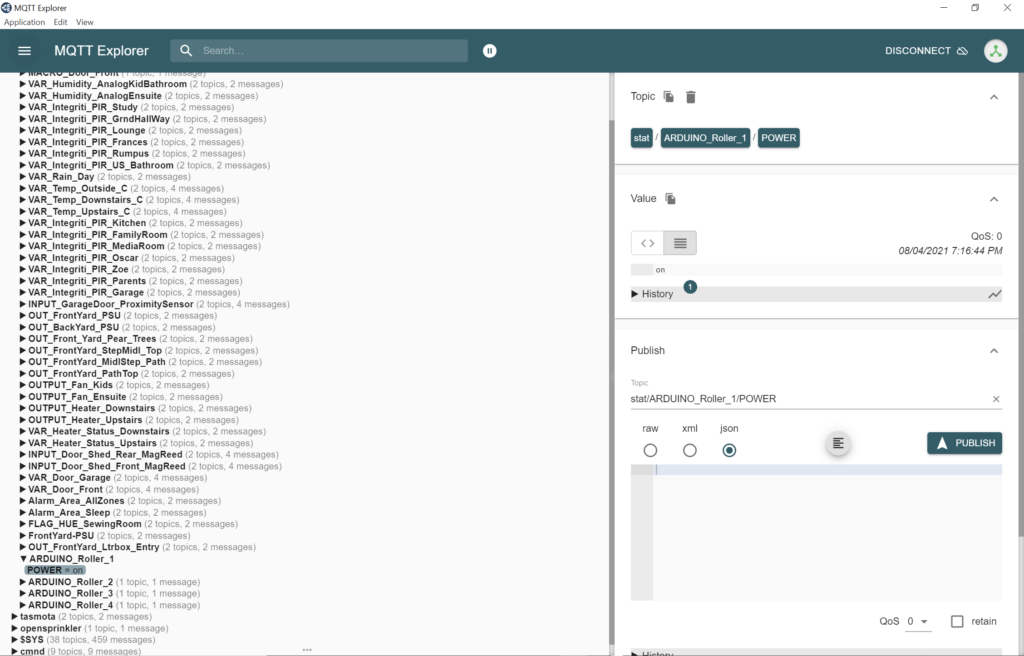
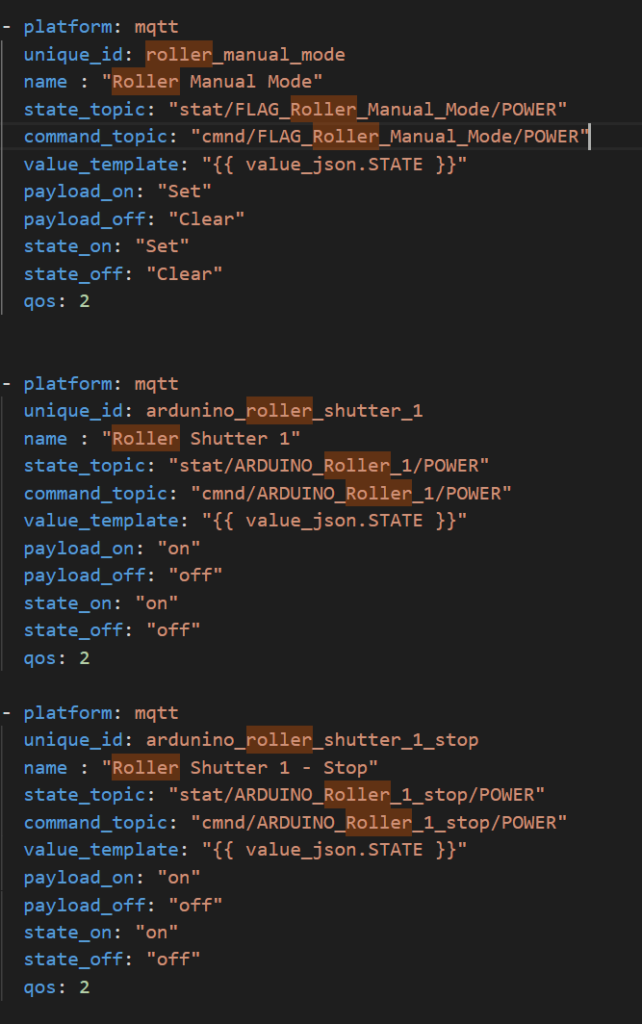
The Arduino is acting as publisher of messages to the broker but also it subscribes to listen for requests to change its state. Both Home Assistant and my PLC subscribe to the same topics, so it can send instructions on when to open and close roller shutters and at the same they can maintain their own state by listening for updates.
I am using Elcipse Mosquitto running in a docker container as my MQTT Broker and its tiny with a memory footprint of 2MB of RAM
$ docker stats

CONTAINER ID        NAME           CPU %        MEM USAGE / LIMIT
b95a83497c91        mosquitto      0.28%        1.629MiB / 1.952GiB
Below you see the active statuses of MQTT topics in my house since I connected MQTT Explorer. MQTT is hierarchical with status updates being published to “/stat” and commands to “/cmnd”
Step 4: Installing The Roller Shutters.
I wont spend to much time on this but the process of installing roller shutters is really not that hard. The included instructions were spot on. In short its a 3 step process
- Determine the finished height
- Mount the supporting C Frame
- Attach the roller shutter and secure
- Feed through power to the wall and connect
Step 5: Adding Logic And Wiring it All Up
Whilst electrically all sound this doesnt make my shutters go up and down. There is no physical control options, they are driven by relays
The Arduino needs to know what to do. I thought about explaining this but I think for those techincally inclined the code speaks volume below but in essence we are
- Establishing an IP connection
- Connecting to the MQTT Broker, Mosquitto
- Subscribing to topics
- Listening for MQTT messages
- Taking action on received messages
- Publishing updates to MQTT broker on state change
  // **************************************************
  // * Author - Shane Baldacchino                     *
  // * Version - 0.15                                 *
  // * Email - shane@baldacchino.net                  *
  // * File Name - Mega2560v5.ino                     *
  // * Script Language - Arduino C                    *
  // * Creation Date - Tuesday 9th February 2021      *
  // ***************************************************
  //
  //
  // *** DEFINE SYSTEM VARIABLES ***

    //Timers for timing
    unsigned long ShedDoor_Rear_startMillis;
    unsigned long ShedDoor_Front_startMillis;
    unsigned long lastRelayCH9Time = 0;
    unsigned long lastRelayCH10Time = 0;
    unsigned long lastRelayCH11Time = 0;
    unsigned long lastRelayCH12Time = 0;
    unsigned long lastRelayCH13Time = 0;
    unsigned long lastRelayCH14Time = 0;
    unsigned long lastRelayCH15Time = 0;
    unsigned long lastRelayCH16Time = 0;
    unsigned long Roller_1_Full_Up_Time = 0;
    unsigned long Roller_1_Full_Down_Time = 0;
    unsigned long relayDelay = 20000;

    //Variable used to set known state on startup of roller shutters
    int initalise = 0;


    //Shed Door Movement Protection (eg 3 clicks within 2 seconds causing two state changes, we want to prevent this)
    unsigned long ShedDoor_Rear_Protection_startMillis;
    unsigned long ShedDoor_Front_Protection_startMillis;

    //Shed door timers for intervals
    unsigned long ShedDoor_Rear_currentMillis;
    unsigned long ShedDoor_Front_currentMillis;


  // INCLUDE SYSTEM LIBRARIES  #include <util.h>
    #include <Ethernet2.h>
    #include <SPI.h>
    #include <PubSubClient.h>

    //Setup Ethernet Controller
    byte mac[] = { 0x90, 0xA2, 0xDA, 0x10, 0XD0, 0x66 };
    byte gateway[] = { 10, 0, 0, 1 };
    byte subnet[] = { 255, 255, 255, 0 };
    IPAddress ip(10, 0, 0, 50 );

    // Initialize the Ethernet server library
    // with the IP address and port you want to use
    // (port 80 is defaudlt for HTTP):
    EthernetServer server(80);

    //Used by HTTP Server for Query String
    String readString;
    String MQTTTopic;
    String MQTTPayload;

    //Setup Relays And Define Pins

    //Shed Garage Doors - 2 Relays Per Door
    #define RELAY_CH1  2
    #define RELAY_CH2  3
    #define RELAY_CH3  4
    #define RELAY_CH4  5


    //Roller Shutters - 1 Relay Per Up / Down (4 Roller Shutters)
    // --- Shutter 1
    // ------- UP
    #define RELAY_CH9  22
    // ------- DOWN
    #define RELAY_CH10  23
    // --- Shutter 2
    // ------- UP
    #define RELAY_CH11  24
    // ------- DOWNN
    #define RELAY_CH12  25
    // --- Shutter 3
    // ------- UP
    #define RELAY_CH13  26
    // ------- DOWNN
    #define RELAY_CH14  27
    // --- Shutter 4
    // ------- UP
    #define RELAY_CH15  28
    // ------- DOWNN
    #define RELAY_CH16  29

  //MQTT callback
    void callback(char* topic, byte* payload, unsigned int length) {

      MQTTTopic = String(topic);
      MQTTPayload = "";
      Serial.println("MQTT topic is [" + MQTTTopic +"]");
      for (int i=0;i<length;i++) {
          MQTTPayload = String(MQTTPayload + (char)payload[i]);
      }
      Serial.println("MQTT payload is [" + MQTTPayload + "]");

    }


//Start MQTT in establishment of HTTP
//IP Address of MQTT Server
IPAddress MQTTserver(10, 0, 0, 200);
// MQTT
EthernetClient ethClient2;
PubSubClient client2(ethClient2);


void reconnect() {
  // Loop until we're reconnected
  while (!client2.connected()) {
    Serial.print("Attempting MQTT connection...");
    // Attempt to connect
    if (client2.connect("arduinoClient")) {
      Serial.println("connected");
      // Once connected, publish an announcement...
      client2.publish("stat/ARDUINO/IP_Address","10.0.0.50");
      // ... and resubscribe
      client2.subscribe("cmnd/ARDUINO_Roller_1/POWER");
      client2.subscribe("cmnd/ARDUINO_Roller_2/POWER");
      client2.subscribe("cmnd/ARDUINO_Roller_3/POWER");
      client2.subscribe("cmnd/ARDUINO_Roller_4/POWER");

    } else {
      Serial.print("failed, rc=");
      Serial.print(client2.state());
      Serial.println(" try again in 5 seconds");
      // Wait 5 seconds before retrying
      delay(5000);
    }
  }
}

  void setup() {

    client2.setServer(MQTTserver, 1883);
    client2.setCallback(callback);

    // *** DEFINE SETUP ***
    Serial.begin(9600); // set the baud rate
    Serial.println("Serial Port Ready"); // print "Ready" once
    Serial.flush();

    //Shed Door Rear
    pinMode(RELAY_CH1, OUTPUT);
    pinMode(RELAY_CH2, OUTPUT);
    digitalWrite(RELAY_CH1, HIGH);
    digitalWrite(RELAY_CH2, HIGH);
    ShedDoor_Rear_currentMillis = millis();

    //Shed Door Front
    pinMode(RELAY_CH3, OUTPUT);
    pinMode(RELAY_CH4, OUTPUT);
    digitalWrite(RELAY_CH3, HIGH);
    digitalWrite(RELAY_CH4, HIGH);
    ShedDoor_Front_currentMillis = millis();

    //Roller Shutter - Initialise High and Low Every Pair To Have One NO/NC
    pinMode(RELAY_CH9, OUTPUT);
    pinMode(RELAY_CH10, OUTPUT);
    pinMode(RELAY_CH11, OUTPUT);
    pinMode(RELAY_CH12, OUTPUT);
    pinMode(RELAY_CH13, OUTPUT);
    pinMode(RELAY_CH14, OUTPUT);
    pinMode(RELAY_CH15, OUTPUT);
    pinMode(RELAY_CH16, OUTPUT);
    //This is the state the roller shutter relays need to be to OFF
    digitalWrite(RELAY_CH9, HIGH);
    digitalWrite(RELAY_CH10, LOW);
    digitalWrite(RELAY_CH11, HIGH);
    digitalWrite(RELAY_CH12, LOW);
    digitalWrite(RELAY_CH13, LOW);
    digitalWrite(RELAY_CH14, HIGH);
    digitalWrite(RELAY_CH15, HIGH);
    digitalWrite(RELAY_CH16, LOW);

    //Start Time for Timers Is Equal To millis
    ShedDoor_Rear_startMillis = millis();
    ShedDoor_Front_startMillis = millis();

    // start the Ethernet connection and the server:
    Ethernet.begin(mac, ip, subnet, gateway);
    server.begin();
    Serial.print("HTTP Server has started and is running on IPV4 : ");
    Serial.println(Ethernet.localIP());
    // Wait 45 seconds for TCP/IP and MQTT
    delay(5000);

  }

// Functions to check if relays need to be switched LOW for Roller Shutters
// If relay is HIGH, stop it when timer is ringing is reached
void checkRelayCH9 () {
    if (lastRelayCH9Time  == 0) {
        return;
    }
    if ((millis() - lastRelayCH9Time)  > relayDelay) {
          digitalWrite(RELAY_CH9, HIGH);
          lastRelayCH9Time = 0;
    }
}

void checkRelayCH10 () {
    if (lastRelayCH10Time  == 0) {
        return;
    }
    if ((millis() - lastRelayCH10Time)  > relayDelay) {
        digitalWrite(RELAY_CH10, LOW);
        lastRelayCH10Time = 0;
       ;
    }
}

void checkRelayCH11 () {
    if (lastRelayCH11Time  == 0) {
        return;
    }
    if ((millis() - lastRelayCH11Time)  > relayDelay) {
        digitalWrite(RELAY_CH11, HIGH);
        lastRelayCH11Time = 0;
       ;
    }
}

void checkRelayCH12 () {
    if (lastRelayCH12Time  == 0) {
        return;
    }
    if ((millis() - lastRelayCH12Time)  > relayDelay) {
        digitalWrite(RELAY_CH12, LOW);
        lastRelayCH12Time = 0;
       ;
    }
}

void checkRelayCH13 () {
    if (lastRelayCH13Time  == 0) {
        return;
    }
    if ((millis() - lastRelayCH13Time)  > relayDelay) {
        digitalWrite(RELAY_CH13, LOW);
        lastRelayCH13Time = 0;
       ;
    }
}

void checkRelayCH14 () {
    if (lastRelayCH14Time  == 0) {
        return;
    }
    if ((millis() - lastRelayCH14Time)  > relayDelay) {
        digitalWrite(RELAY_CH14, HIGH);
        lastRelayCH14Time = 0;
       ;
    }
}

void checkRelayCH15 () {
    if (lastRelayCH15Time  == 0) {
        return;
    }
    if ((millis() - lastRelayCH15Time)  > relayDelay) {
        digitalWrite(RELAY_CH15, HIGH);
        lastRelayCH15Time = 0;
       ;
    }
}

void checkRelayCH16 () {
    if (lastRelayCH16Time  == 0) {
        return;
    }
    if ((millis() - lastRelayCH16Time)  > relayDelay) {
        digitalWrite(RELAY_CH16, LOW);
        lastRelayCH16Time = 0;
       ;
    }
}

  void loop() {
    // Send Data To Serial Port
    char inByte = ' ';
    if(Serial.available()){ // only send data back if data has been sent
      char inByte = Serial.read(); // read the incoming data
      Serial.println(inByte); // send the data back in a new line so that it is not all one long line
    }


    //check if we need to toggle relays for shutters

    checkRelayCH9();
    checkRelayCH10();
    checkRelayCH11();
    checkRelayCH12();
    checkRelayCH13();
    checkRelayCH14();
    checkRelayCH15();
    checkRelayCH16();


    //MQTT - Connect and Subcribe to Topics
    if (!client2.connected()) {
    reconnect();
    }
    if (initalise != 1) {
      // Set a known state, close all shutters on initilisation

      Serial.print("Closing all shutters, to set known state ");


      //Roller 1
      digitalWrite(RELAY_CH9, HIGH);
      digitalWrite(RELAY_CH10, HIGH);
      lastRelayCH9Time = millis();
      //MQTT PUBLISH AN UPDATE BACK
      client2.publish("stat/ARDUINO_Roller_1/POWER","on");

      //Roller 2
      digitalWrite(RELAY_CH12, HIGH);
      digitalWrite(RELAY_CH11, HIGH);
      lastRelayCH11Time = millis();
      //MQTT PUBLISH AN UPDATE BACK
      client2.publish("stat/ARDUINO_Roller_2/POWER","on");

      //Roller 3
      digitalWrite(RELAY_CH13, LOW);
      digitalWrite(RELAY_CH14, LOW);
      lastRelayCH13Time = millis();
      //MQTT PUBLISH AN UPDATE BACK
      client2.publish("stat/ARDUINO_Roller_3/POWER","on");

      //Roller 4
      digitalWrite(RELAY_CH15, LOW);
      digitalWrite(RELAY_CH16, LOW);
      lastRelayCH15Time = millis();
      //MQTT PUBLISH AN UPDATE BACK
      client2.publish("stat/ARDUINO_Roller_4/POWER","on");


      // Set to 1 so this only runs once to provide a known state
      initalise = 1;
    }
    client2.loop();

    // In-Bound HTTP GET's To Arduino
    EthernetClient client = server.available();


    //ROLLER SHUTTER 1
    if (MQTTTopic.indexOf("Roller_1") > 0) {
      if (MQTTPayload == "off") {
        digitalWrite(RELAY_CH9, LOW);
        digitalWrite(RELAY_CH10, LOW);
        lastRelayCH9Time = millis();
        //MQTT PUBLISH AN UPDATE BACK
        client2.publish("stat/ARDUINO_Roller_1/POWER","off");
      }
      if (MQTTPayload == "on") {
         digitalWrite(RELAY_CH10, HIGH);
         digitalWrite(RELAY_CH9, HIGH);

        lastRelayCH10Time = millis();
        //MQTT PUBLISH AN UPDATE BACK
        client2.publish("stat/ARDUINO_Roller_1/POWER","on");
      }
      MQTTPayload = "";
      MQTTTopic = "";
    }


    //ROLLER SHUTTER 2
    if (MQTTTopic.indexOf("Roller_2") > 0) {
      if (MQTTPayload == "on") {
        digitalWrite(RELAY_CH12, HIGH);
        digitalWrite(RELAY_CH11, HIGH);
        lastRelayCH11Time = millis();
        //MQTT PUBLISH AN UPDATE BACK
        client2.publish("stat/ARDUINO_Roller_2/POWER","on");
      }
      if (MQTTPayload == "off") {
        digitalWrite(RELAY_CH11, LOW);
        digitalWrite(RELAY_CH12, LOW);
        lastRelayCH12Time = millis();
        //MQTT PUBLISH AN UPDATE BACK
        client2.publish("stat/ARDUINO_Roller_2/POWER","off");
      }
      MQTTPayload = "";
      MQTTTopic = "";
    }

    //ROLLER SHUTTER 3
    if (MQTTTopic.indexOf("Roller_3") > 0) {
      if (MQTTPayload == "off") {
        digitalWrite(RELAY_CH13, HIGH);
        digitalWrite(RELAY_CH14, HIGH);
        lastRelayCH13Time = millis();
        //MQTT PUBLISH AN UPDATE BACK
        client2.publish("stat/ARDUINO_Roller_3/POWER","off");
      }
      if (MQTTPayload == "on") {
        digitalWrite(RELAY_CH14, LOW);
        digitalWrite(RELAY_CH13, LOW);
        lastRelayCH14Time = millis();
        //MQTT PUBLISH AN UPDATE BACK
        client2.publish("stat/ARDUINO_Roller_3/POWER","on");
      }
      MQTTPayload = "";
      MQTTTopic = "";
    }

    //ROLLER SHUTTER 4
    if (MQTTTopic.indexOf("Roller_4") > 0) {
      if (MQTTPayload == "on") {
        digitalWrite(RELAY_CH15, LOW);
        digitalWrite(RELAY_CH16, LOW);
        lastRelayCH15Time = millis();
        //MQTT PUBLISH AN UPDATE BACK
        client2.publish("stat/ARDUINO_Roller_4/POWER","on");
      }
      if (MQTTPayload == "off") {
        digitalWrite(RELAY_CH15, HIGH);
        digitalWrite(RELAY_CH16, HIGH);
        lastRelayCH16Time = millis();
        //MQTT PUBLISH AN UPDATE BACK
        client2.publish("stat/ARDUINO_Roller_4/POWER","off");
      }
      MQTTPayload = "";
      MQTTTopic = "";
    }


    if (client) {

      //Start MQTT in establishment of HTTP
      //IP Address of MQTT Server
      IPAddress MQTTserver(10, 0, 0, 200);
      // MQTT
      EthernetClient ethClient2;
      PubSubClient client2(ethClient2);
      client2.setServer(MQTTserver, 1883);
      client2.setCallback(callback);

      boolean currentLineIsBlank = true;
      while (client.connected()) {

        if (client.available()) {
          char c = client.read();
          if (readString.length() < 100) {
            //store characters to string
            readString += c;      //Serial.print(c);
          }
          Serial.write(c);
          if (c == '\n' && currentLineIsBlank) {

           // Shed Door - Rear Toogle
             if (readString.indexOf("?shed_rear_door_toggle") > 0)
            {
                if (millis() - ShedDoor_Rear_Protection_startMillis > 10000)  //10 seconds to door opentest whether the period has elapsed
                  {
                    digitalWrite(RELAY_CH1, HIGH);
                    digitalWrite(RELAY_CH2, LOW);
                    delay(250);
                    digitalWrite(RELAY_CH1, LOW);
                    digitalWrite(RELAY_CH2, HIGH);
                    Serial.println("Toggling SheedDoor_Rear State");
                    Serial.println("Toggle Relay 1 High");
                    Serial.println("Toggle Relay 2 Low");
                    client.println("Shed Rear Door Has Been Toggled");
                    ShedDoor_Rear_Protection_startMillis = millis();
                  }
                  else {

                    Serial.print("Shed Rear - Needs to be 10 seconds between cycles");
                    client.println("Shed Rear - Needs to be 10 seconds between cycles");
                  }
            }

            // Shed Door - Front Toogle
             if (readString.indexOf("?shed_front_door_toggle") > 0)
            {
                if (millis() - ShedDoor_Front_Protection_startMillis > 10000)  //10 seconds to door opentest whether the period has elapsed
                  {
                    digitalWrite(RELAY_CH3, HIGH);
                    digitalWrite(RELAY_CH4, LOW);
                    delay(250);
                    digitalWrite(RELAY_CH3, LOW);
                    digitalWrite(RELAY_CH4, HIGH);
                    Serial.println("Toggling SheedDoor_Front State");
                    Serial.println("Toggle Relay 3 High");
                    Serial.println("Toggle Relay 4 Low");
                    client.println("Shed Front Door Has Been Toggled");
                    ShedDoor_Front_Protection_startMillis = millis();
                  }
                  else {

                    Serial.print("Shed Front - Needs to be 10 seconds between cycles");
                    client.println("Shed Front - Needs to be 10 seconds between cycles");
                  }
            }

            // Roller_1_up
             if (readString.indexOf("?roller_1_up") > 0)
            {
                //MQTT PUBLISH AN UPDATE BACK
                client2.publish("cmnd/ARDUINO_Roller_1/POWER","off");
                Serial.print("HTTP - Roller Shutter 1 Up");
                client.println("HTTP - Roller Shutter 1 Up");
            }


               // Roller_1_down
             if (readString.indexOf("?roller_1_down") > 0)
            {
                //MQTT PUBLISH AN UPDATE BACK
                client2.publish("cmnd/ARDUINO_Roller_1/POWER","on");
                Serial.print("HTTP - Roller Shutter 1 Down");
                client.println("HTTP - Roller Shutter 1 Down");

            }


            // Roller_2_up
             if (readString.indexOf("?roller_2_up") > 0)
            {
                //MQTT PUBLISH AN UPDATE BACK
                client2.publish("cmnd/ARDUINO_Roller_2/POWER","off");
                Serial.print("HTTP - Roller Shutter 2 Up");
                client.println("HTTP - Roller Shutter 2 Up");
            }


               // Roller_2_down
             if (readString.indexOf("?roller_2_down") > 0)
            {
                //MQTT PUBLISH AN UPDATE BACK
                client2.publish("cmnd/ARDUINO_Roller_2/POWER","on");
                Serial.print("HTTP - Roller Shutter 2 Down");
                client.println("HTTP - Roller Shutter 2 Down");

            }


            // Roller_3_up
             if (readString.indexOf("?roller_3_up") > 0)
            {
              //MQTT PUBLISH AN UPDATE BACK
              client2.publish("cmnd/ARDUINO_Roller_3/POWER","off");
              Serial.print("HTTP - Roller Shutter 3 Up");
              client.println("HTTP - Roller Shutter 3 Up");
            }


             // Roller_3_down
             if (readString.indexOf("?roller_3_down") > 0)
            {
              //MQTT PUBLISH AN UPDATE BACK
              client2.publish("cmnd/ARDUINO_Roller_3/POWER","on");
              Serial.print("HTTP - Roller Shutter 3 Down");
              client.println("HTTP - Roller Shutter 3 Down");

            }


          // Roller_4_up
             if (readString.indexOf("?roller_4_up") > 0)
            {
              //MQTT PUBLISH AN UPDATE BACK
              client2.publish("cmnd/ARDUINO_Roller_4/POWER","off");
              Serial.print("HTTP - Roller Shutter 4 Up");
              client.println("HTTP - Roller Shutter 4 Up");

            }


             // Roller_4_down
             if (readString.indexOf("?roller_4_down") > 0)
            {

              //MQTT PUBLISH AN UPDATE BACK
              client2.publish("cmnd/ARDUINO_Roller_4/POWER","on");
              Serial.print("HTTP - Roller Shutter 4 Down");
              client.println("HTTP - Roller Shutter 4 Down");

            }
   readString = "";


            break;
          }// if ( c == \n )


          if (c == '\n') {
            // you're starting a new line
            currentLineIsBlank = true;
          }
          else if (c != '\r') {
            // you've gotten a character on the current line
            currentLineIsBlank = false;
          }

        }
      }

      // give the web browser time to receive the data
      delay(1);


      // close the connection:
      client.stop();
      client.flush();
      Serial.println("client disconnected");

    }

  }//Loop
We need to add control logic and mechanisms. And for that I built in 3 control options.
- PLC based control.
This is main control mechanism They just look after themselves and this is driven by the PLC
Open 90 minutes after sunrise of weekdays, 2 hours on weekends. Open after an alarm disarm event
Close when night time, close when weather is >25c, close when house is alarmed.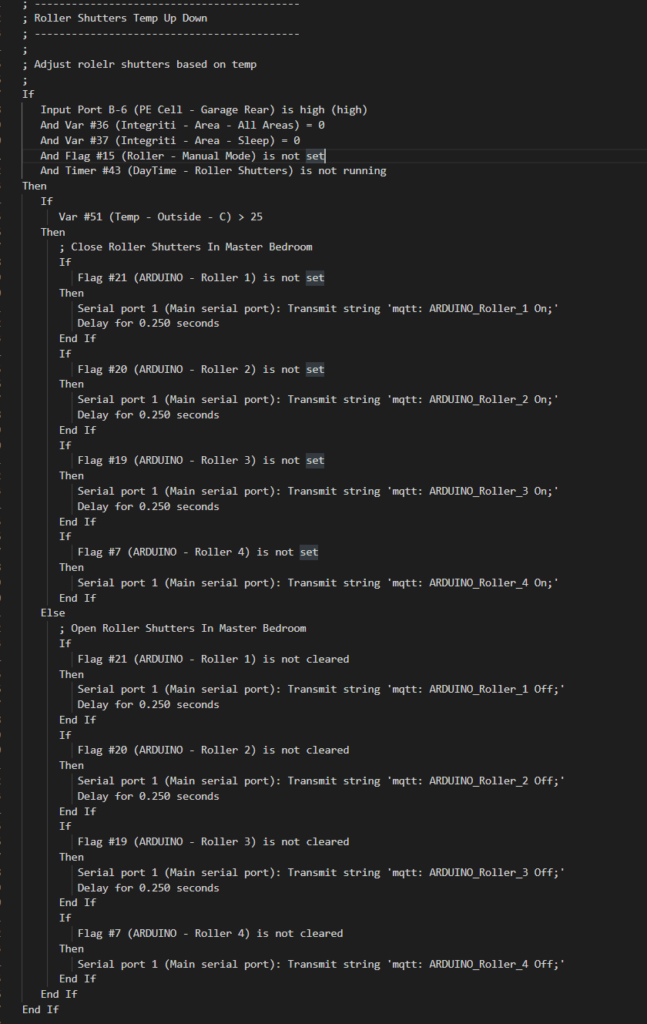
- Controlled by HomeAssistant
Home Assistant is the defacto control mechanism in this house for non-automatic actions. The reality here is if you need to close the rollers shutters and its during the day time you will need Home Assistant to set a manual flag which is a MQTT call out of Home Assistant to the PLC.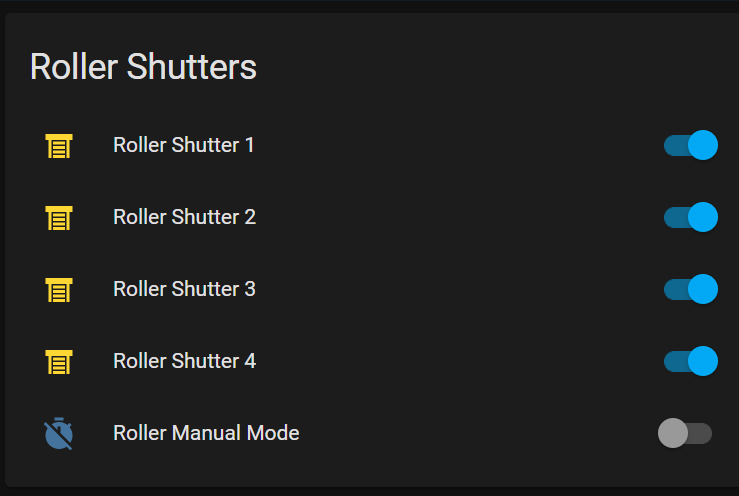
- Alexa
Alexa ‘Turn On Roller Shutter 4’. Yes that’s what we say. Using a combination of HA-Bridge as I documented here each Roller Shutter is presented as a Phillips Hue device to Alexa. Ha-Bridge is just publishing MQTT messages, and the Arduino is a subscriber to the messages to which it takes action, and its action is to manipulate those relays to make the blinds go up and down, its actually really simple.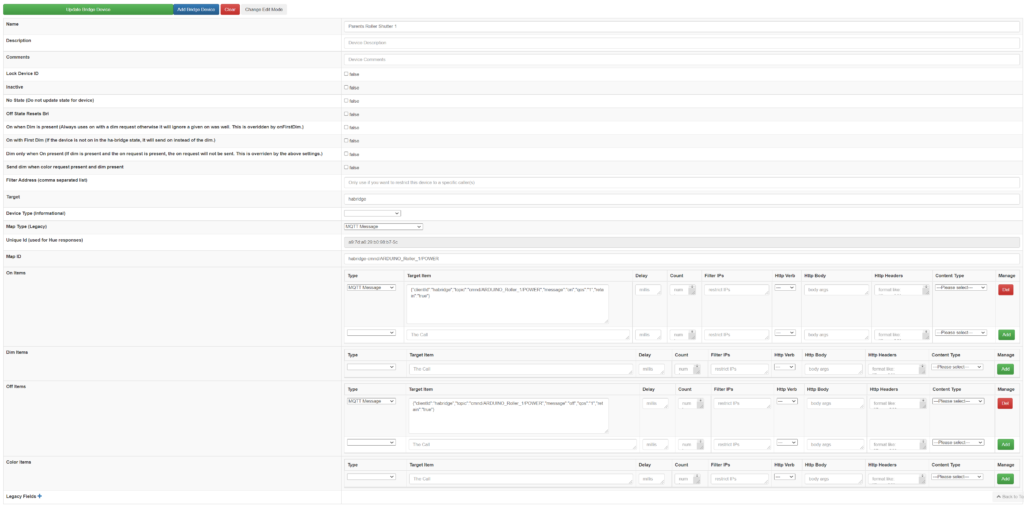
Conclusion
Automation is journey, and whilst this article covers the high level steps there as always be many challenges along the way.
The Arduino being low powered and running MQTT is not able to process messages super fast, just one challenge I faced and of course there was many many more.
The control mechanisms here are part of a pattern that my house uses for fans, doors, lights etc and with MQTT this is scalable from PLCs through to Tasmota based devices and everything in between.
So, some videos.
Happy automating.
I work for @Microsoft but opinions expressed are my own
1 thought on “A Journey in to MQTT With Roller Shutters, Mosquitto, HomeAssistant & Low Powered Micro-Controllers”