AI is changing the world, it’s disrupting industries, deriving business value and reducing the barrier to entry to many fields of work. Like many of you reading this, I too am a regular user of ChatGPT, Bing’s CoPilot (Free GPT 4) and have also used GitHub Co Pilot.
Before we get started, here is a quick end-2-end demo of what we will cover and build in this blog post.
AI is useful and helps super charge my productivity, it may not remove the need for developers and builders, but it’s clear to me is impacting software development, and you know what. That’s a good thing. High value versus low value, and enables all of us to focus on what counts.
The most polished commercial offering is GitHub’s AI Co-Pilot. GitHub recently released results of a survey, which aligns with my personal experiences.
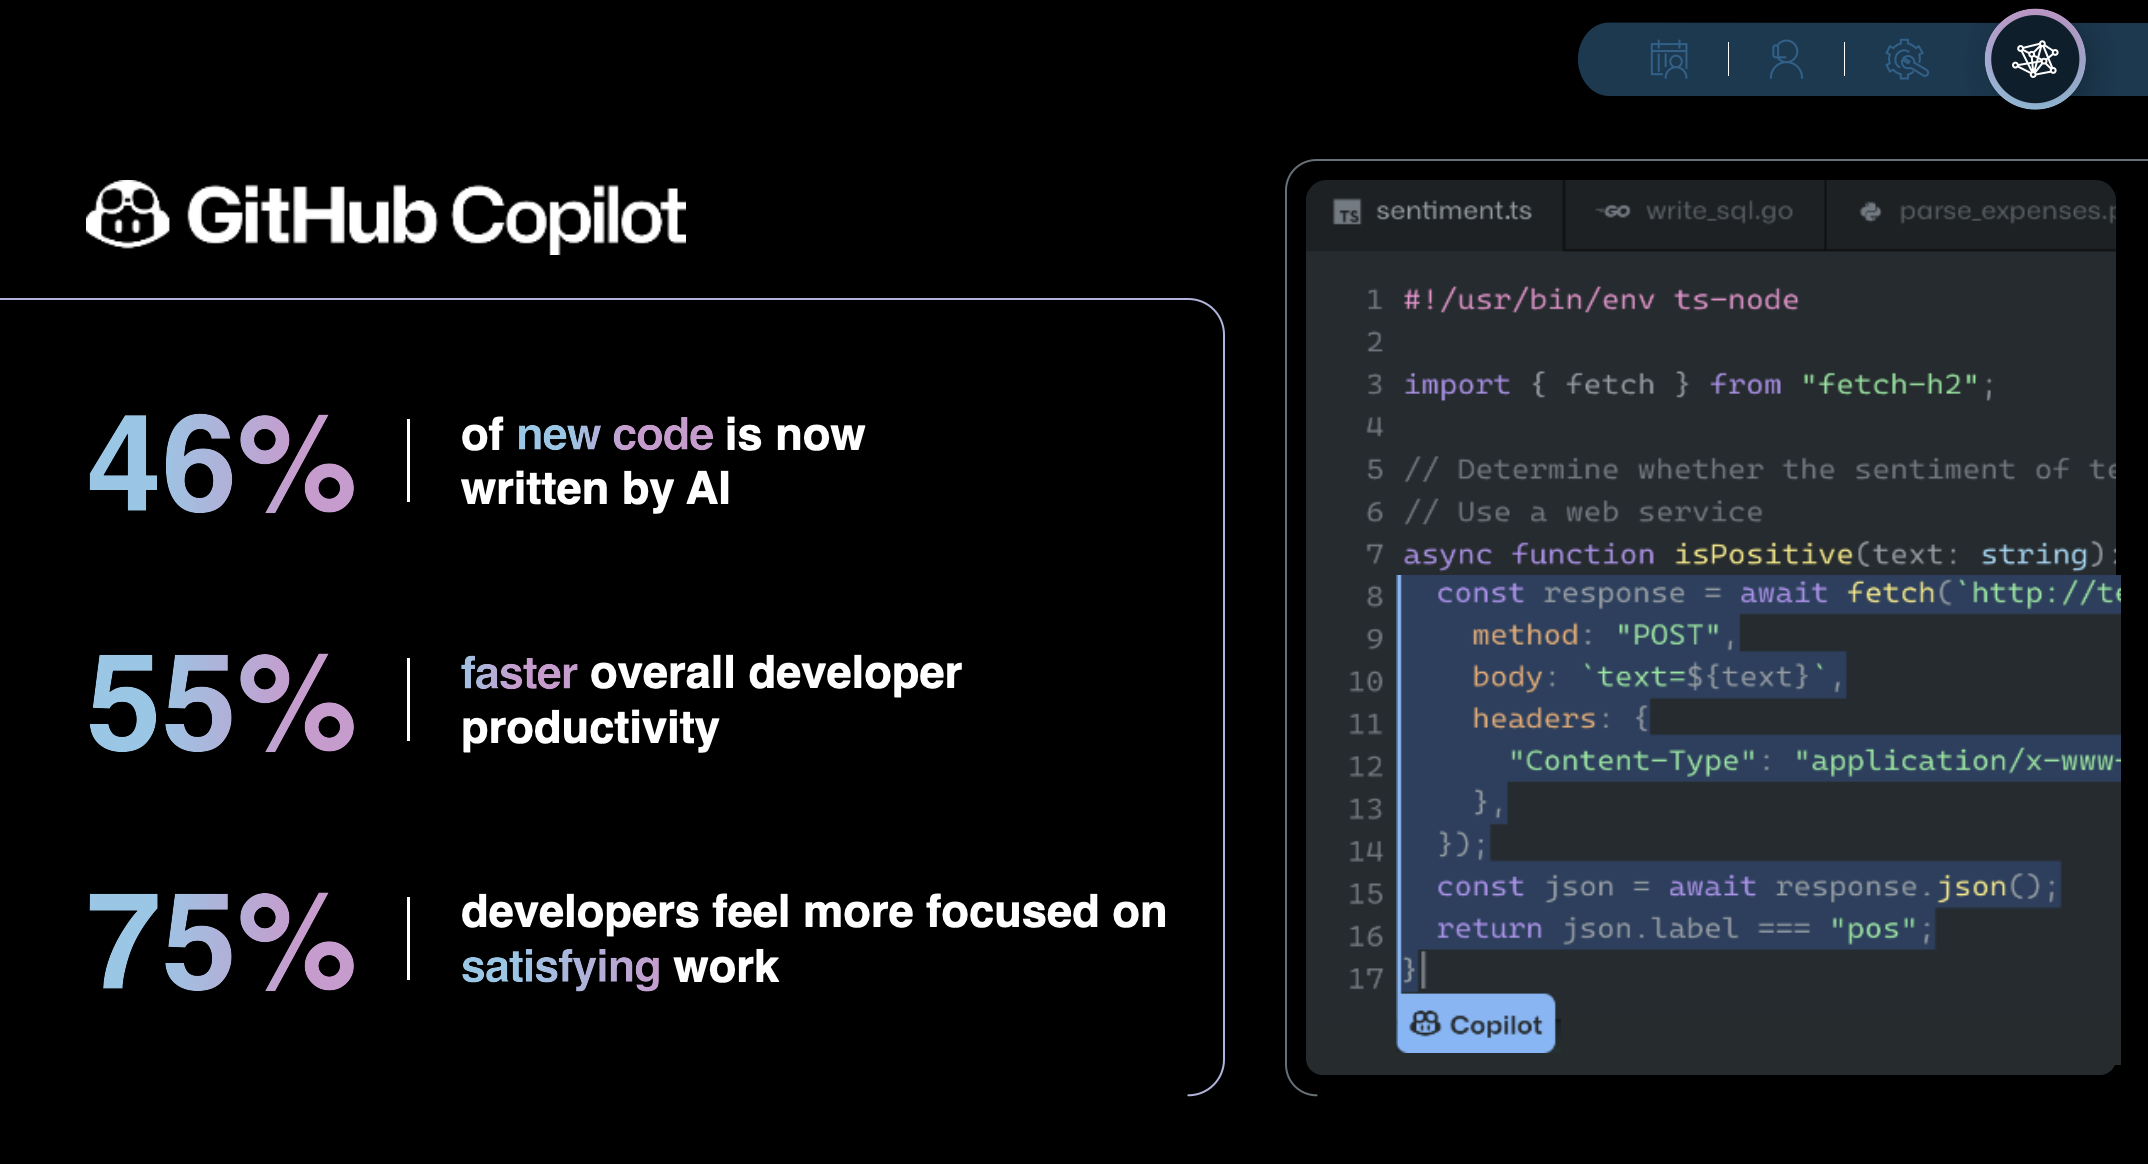
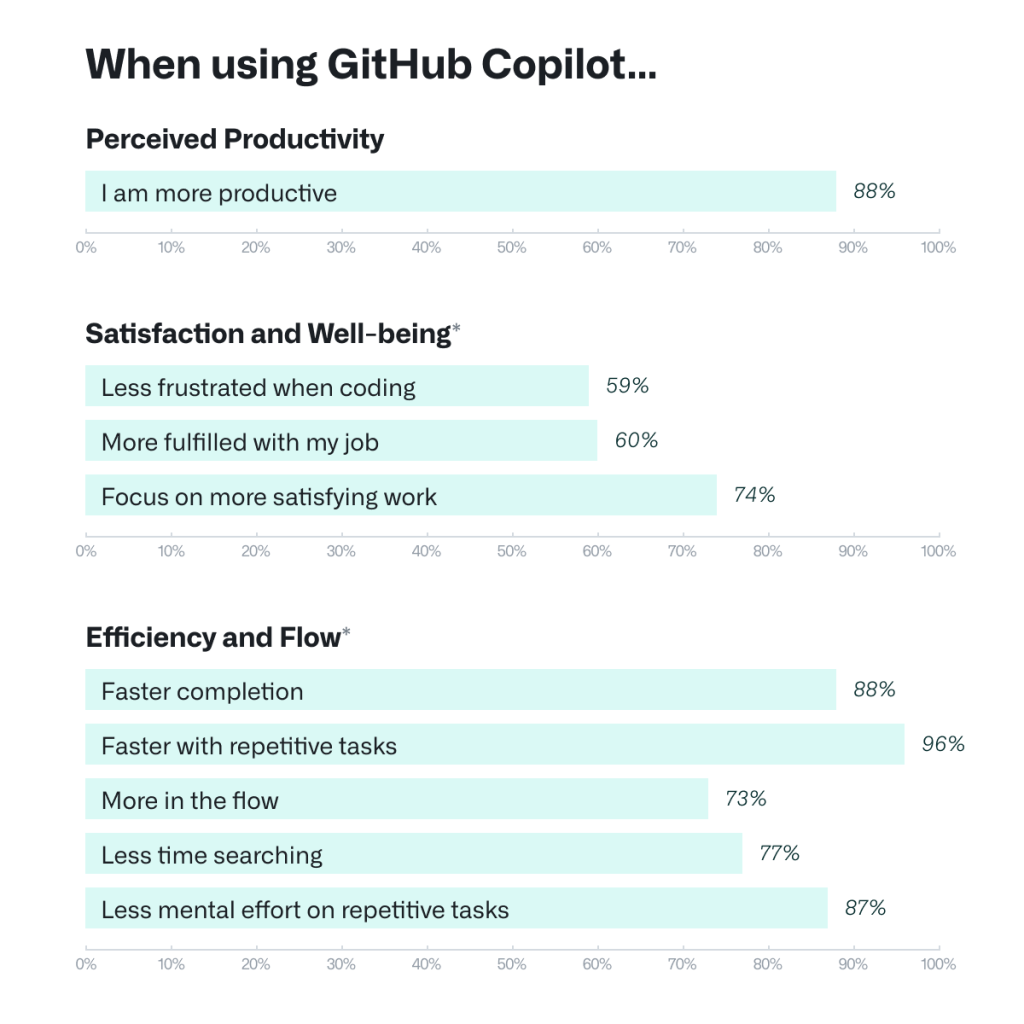
The quote that I took away from this survey was
Developers who used GitHub Copilot completed the task significantly faster–55% faster than the developers who didn’t use GitHub Copilot
https://visualstudiomagazine.com/articles/2024/01/25/copilot-research.aspx
It’s a claim from a vendor, so your mileage may vary depending if you are a battle hardened developer, or someone early in your journey. You know what, for myself, being not a classically trained developer, I believe this. It has helped bridge the gaps in my development skills.
Of course you need to know the basics in order to drive the AI, but if you have a grasp of the basics, most of the heavy lifting can be performed by the AI.
Whilst I think GitHub CoPilot is a great solution, the builder in me wanted to taste and sample other LLM (Large Language Models), for a few reasons
- Specific LLMs can be more be-spoke, StarCoder2, Wizard-Coder-13b & CodeLlama should deliver better outcomes? A LLM that is all about Python coding, should be better than GitHub CoPilot for pure Python, right?
- My data is my data, certain versions of GitHub Co Pilot will use your data for training purposes. Business and Enterprise exclude your data from training
- Cost, prices for versions of CoPilot I would want to use range from $19US to $39US per month.
- Green IT – LLM’s by and large are all very capable. Inference does not need to occur in the cloud (training yes), but local inference is fast becoming a thing. From sheer speed, through to reducing the cost and carbon emissions. Even Microsoft’s Scott Hanselman talks about the benefits of local inference and has a demo of this running. The fact is, running LLM’s in the cloud is akin to a sledge hammer to crack a walnut. Whilst you need large amounts of compute train a model, the compute requirements for inference are far more modest.
It would be naive of me to discount GitHub Co Pilot, plenty of business benefits and biggest one that stands out to me (where my CTO hat) is IP Indemnity. You can read more about it at https://resources.github.com/learn/pathways/copilot/essentials/establishing-trust-in-using-github-copilot/ but the short of this link is this
“Both GitHub and Microsoft provide indemnity for their Copilot products. This means that if you use GitHub Copilot, you’re backed by a contractual commitment: If any suggestion made by GitHub Copilot is challenged as infringing on third-party intellectual property (IP) rights and you have enabled the duplicate detection filter, Microsoft will assume legal liability.”
For many organisations, especially whilst AI and the legalities that pertain are still in its infant stage, $19US – $39US per developer, per month could be looked upon as cheap insurance.
Enter Open Source
Moving past this, functionally, what you can achieve with other LLM’s and Visual Studio Code plugins has a huge overlap to GitHub CoPilot, to the point for my use (spoiler), I see little functional difference. I say ‘my’ use, as my usage primarily consists of
- Chatting with my code
- Commenting existing code
- Debugging my code
- Writing new code functions
So in this blog post I am going to demonstrate how you can run your own LLM locally on Apple Silicon and configure Visual Studio Code to query this LLM.
Apple Silicon
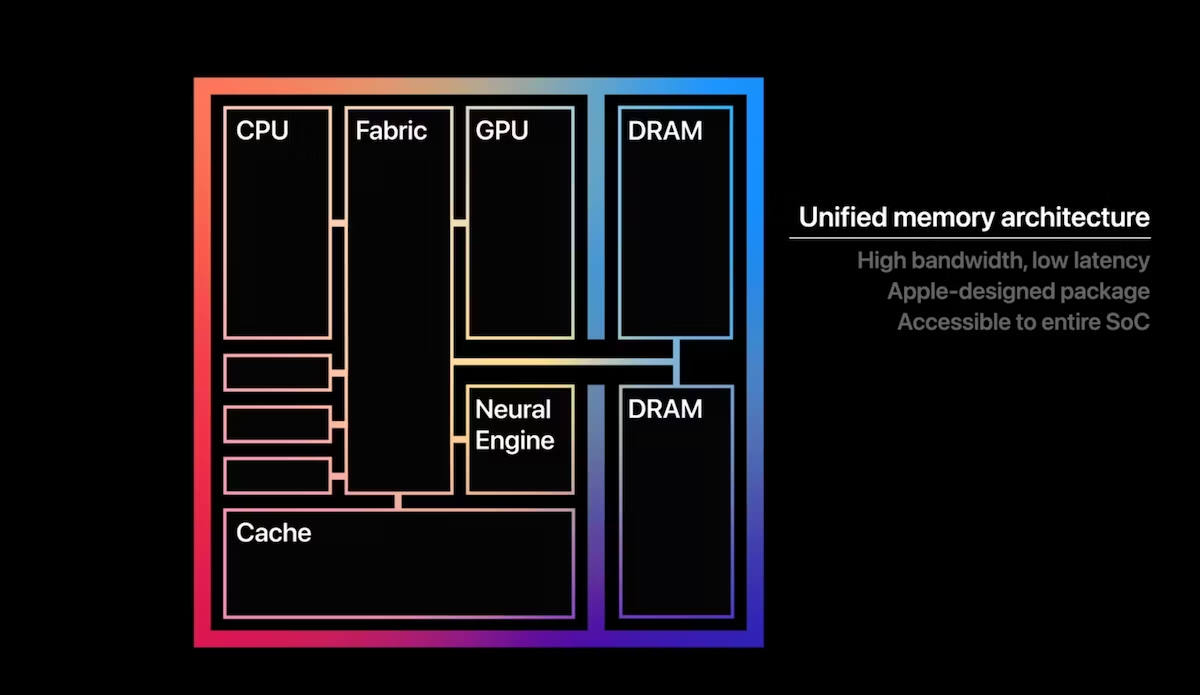
Why Apple Silicon you ask, why not a PC? PC’s with a discrete GPU have separate memory for the CPU and GPU. You will have your memory for your CPU and memory for your GPU. Apple Silicon Macs combine DRAM accessible to to the CPU and GPU in to a single system on a chip, or SoC. Building everything into one chip gives the system a unified memory architecture. This means that the GPU and CPU are working over the same memory.
The benefit of this is, you dont need a $2000+ discrete GPU, your MAC will be able to run these LLM’s. Until companies start building comparable integrated units for Windows laptops, then your only option is a MAC or a decent Nvidia or AMD GPU (12GB+ RAM ideally 16GB or more, this means Nvidia 4080 RTX and AMD 7700XT and above)
Our Software Stack
To build our GitHub CoPilot we need two pieces of software and a plugin LM Studio and Ollama. LMStudio will feed our VS Code plugin Continue and Ollama will provide that ‘tab’ autocomplete function.

LM Studio – Installation
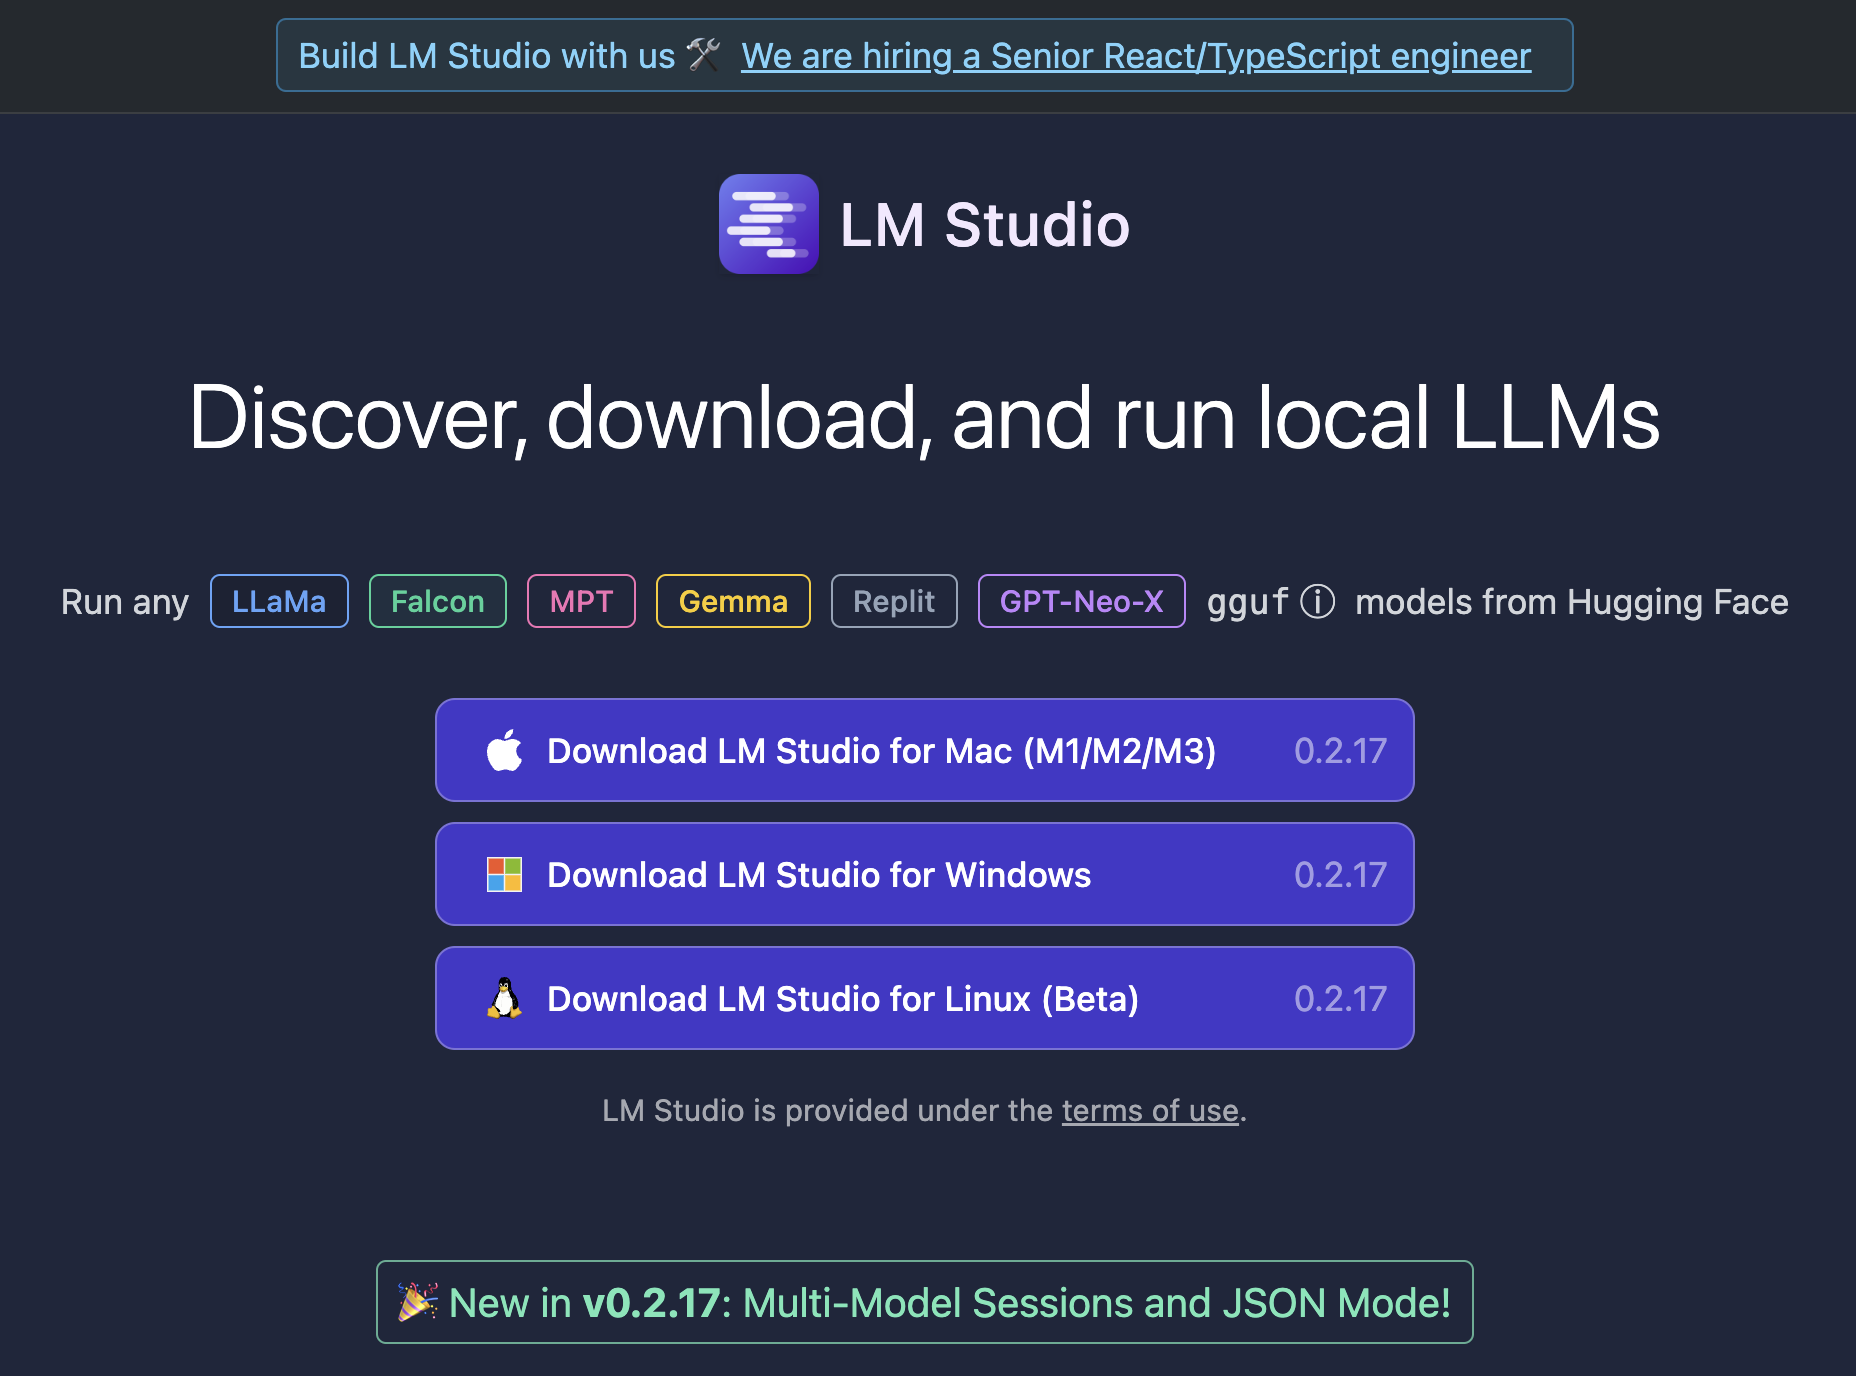
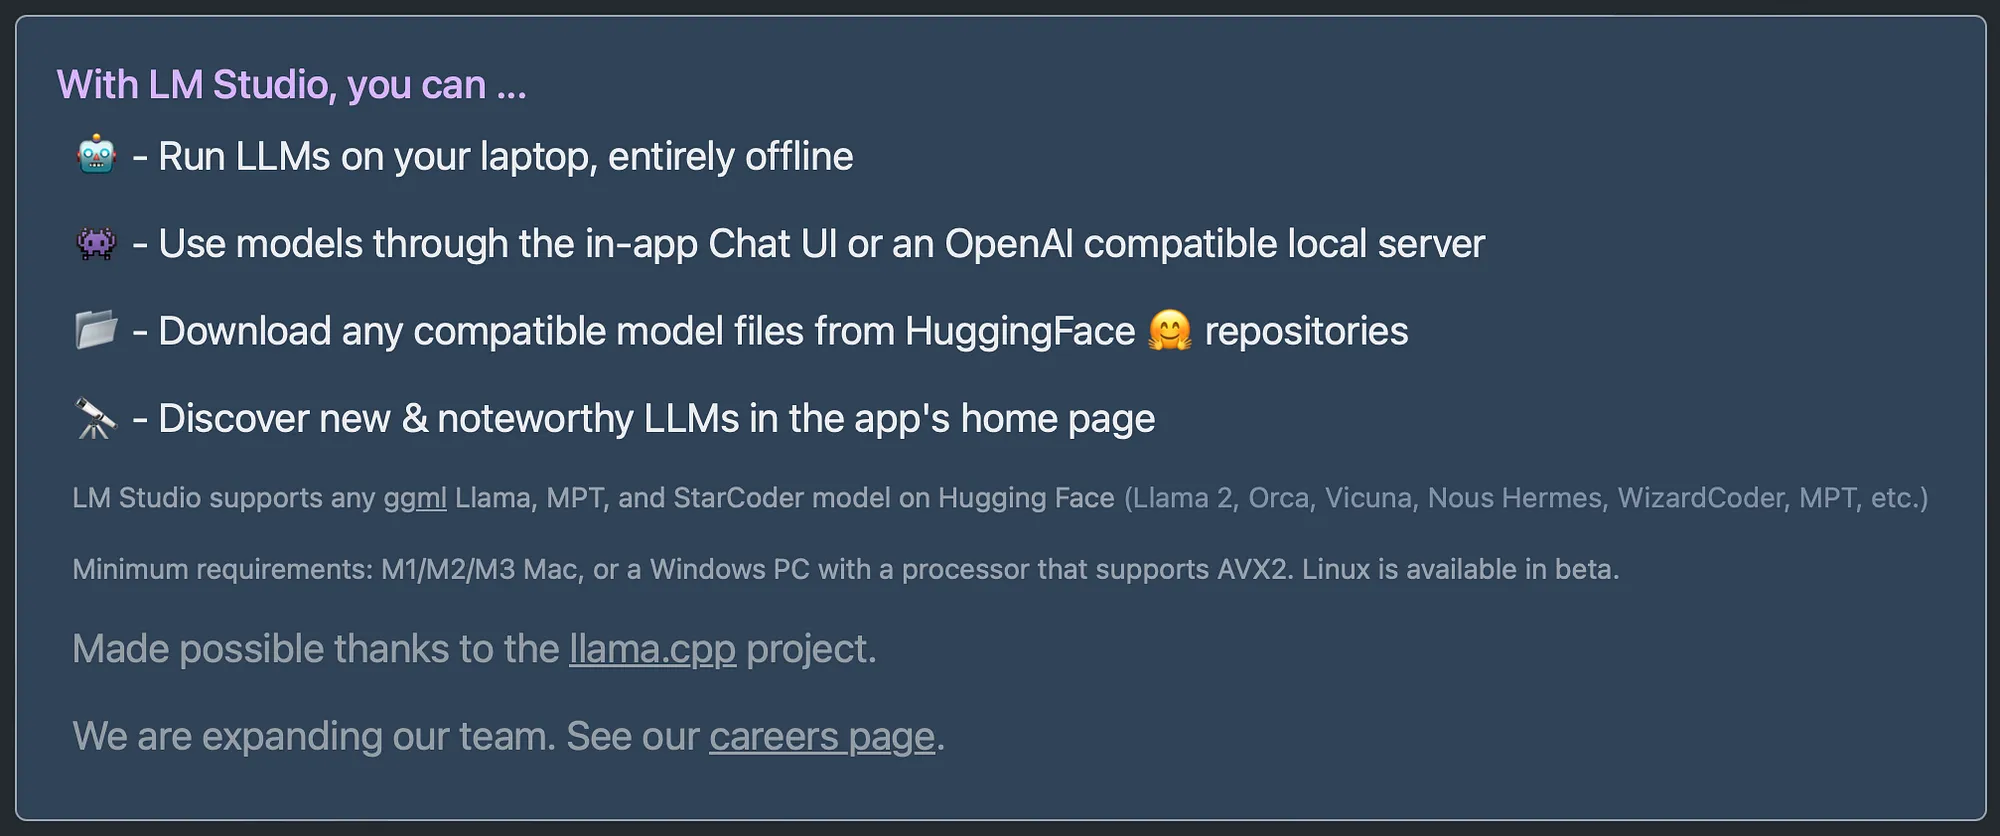
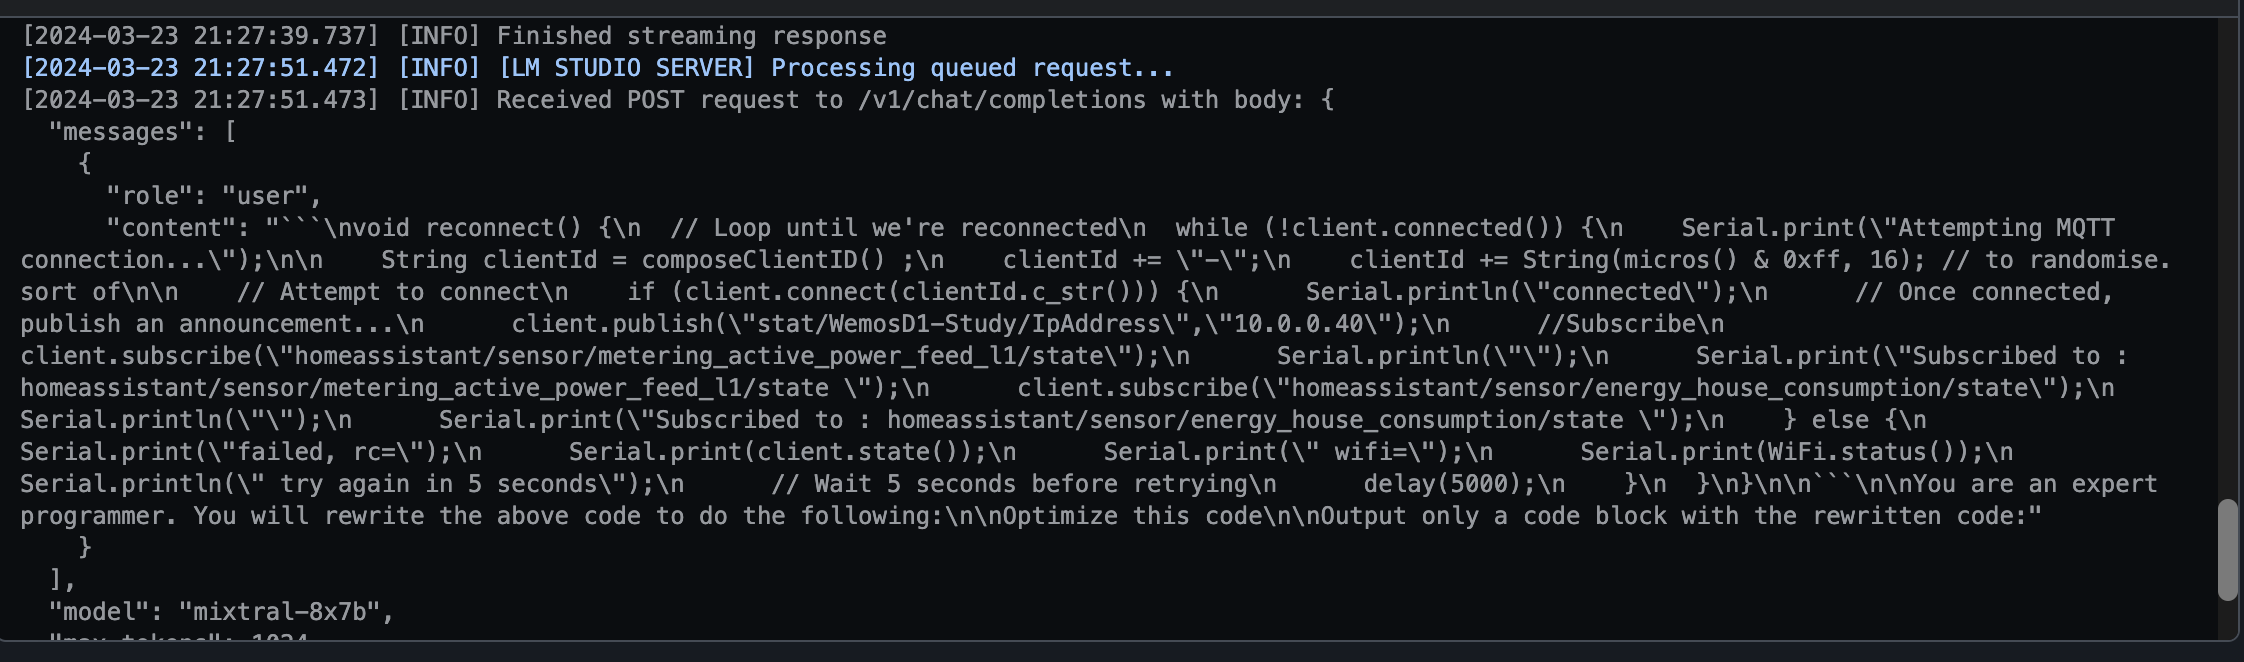
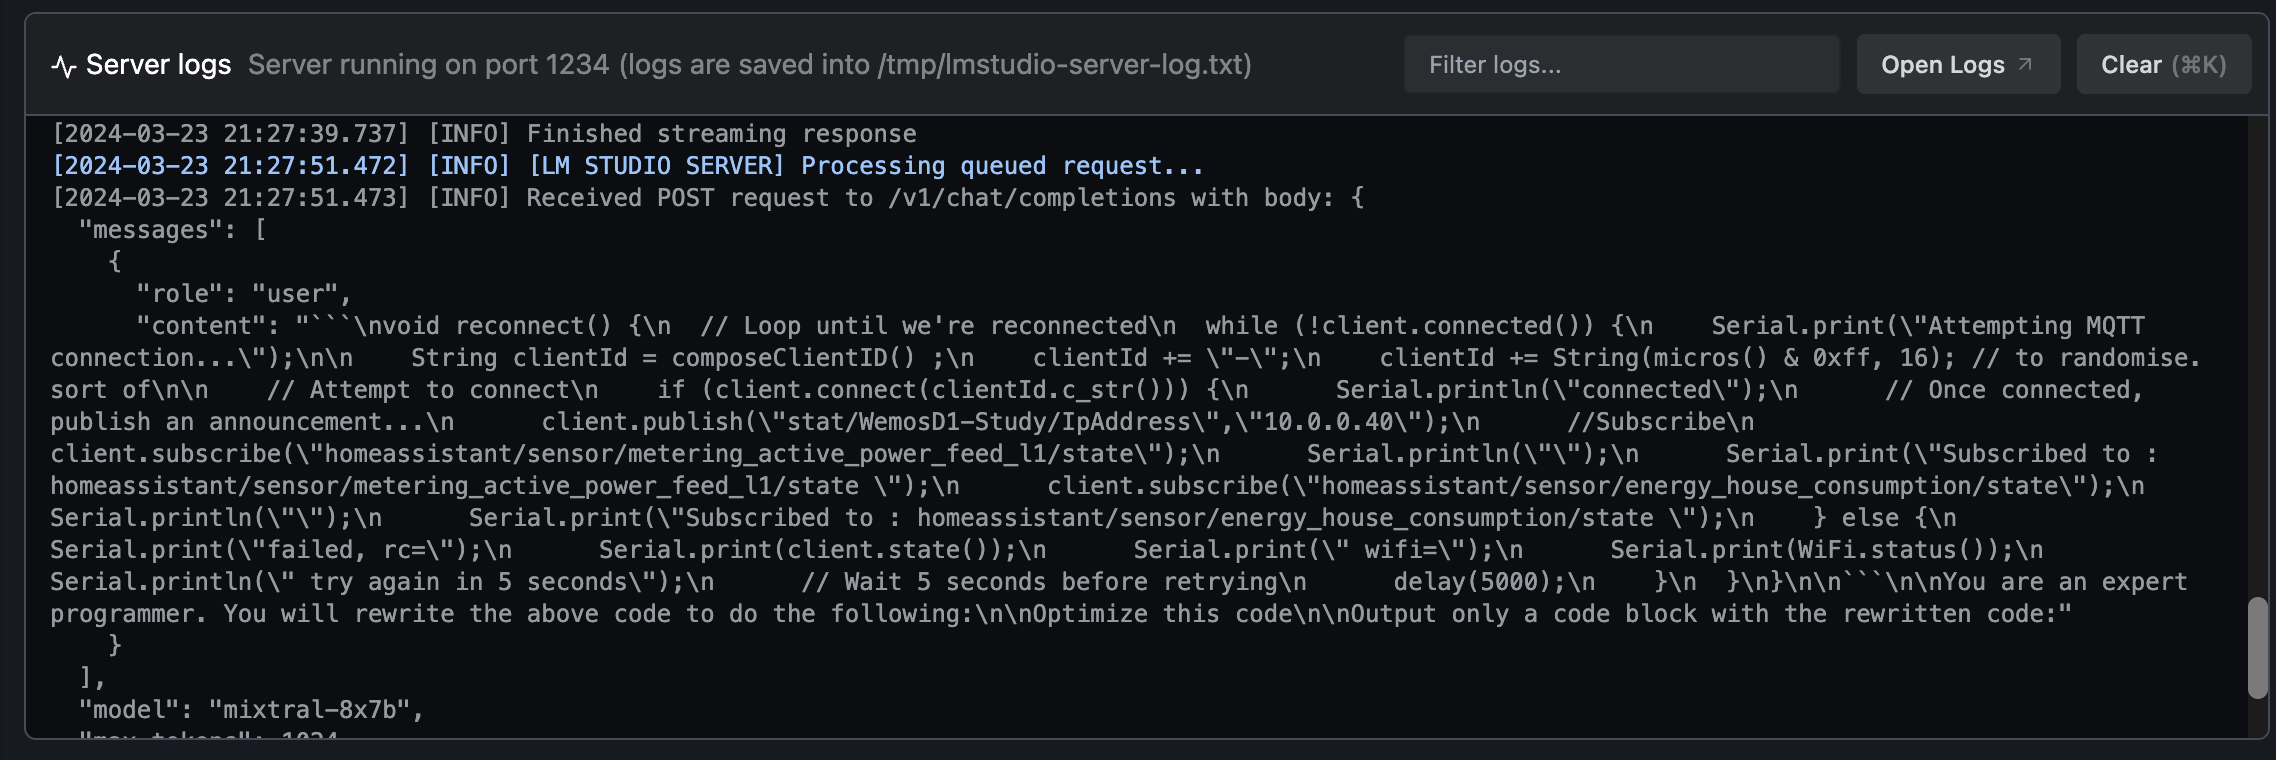
To get started we will be using LM Studio. This is an application you can use to run local, open source models on your computer. It provides a Local Inference Server, based on the OpenAI specification, which allows you to use any model running on LM Studio as a drop-in replacement for the OpenAI API. Regardless if you are running CodeLlama, Mistral, StarCoder2 or any LLM, plugins that are designed for OpenAI, think they are leveraging Open AI. If you have built against OpenAI or Azure OpenAI, you will realise how familiar this structure is
[2024-03-21 20:55:52.061] [INFO] [LM STUDIO SERVER] Verbose server logs are ENABLED
[2024-03-21 20:55:52.064] [INFO] [LM STUDIO SERVER] Success! HTTP server listening on port 1234
[2024-03-21 20:55:52.064] [INFO] [LM STUDIO SERVER] Supported endpoints:
[2024-03-21 20:55:52.065] [INFO] [LM STUDIO SERVER] ->	GET  http://localhost:1234/v1/models
[2024-03-21 20:55:52.065] [INFO] [LM STUDIO SERVER] ->	POST http://localhost:1234/v1/chat/completions
[2024-03-21 20:55:52.065] [INFO] [LM STUDIO SERVER] ->	POST http://localhost:1234/v1/completions
[2024-03-21 20:55:52.065] [INFO] [LM STUDIO SERVER] Logs are saved into /tmp/lmstudio-server-log.txt
This also means if you are a builder you can simply enter
pip3 install openai
And your python code will think its looking at and talking to OpenAI.
The first thing we need to do is install LM Studio and you can download LM Studio from https://lmstudio.ai/. Download the DMG, you will notice its only for ARM64 (No Intel Macs) and follow the prompts to install
LM Studio – Model Selection
There is no perfect hardware platform, everything has compromises. Whilst I talk about the virtues of Apple Silicon above, depending on who you speak to is a blessing or curse.
Con, no upgradeable memory. Pro, its on the same die as part of the SOC and can be leveraged by the GPU function of the SOC. A huge tick.
However, there are some models that require specific processor extensions, such as AVX-512. Apple Silicon being ARM64 based and RISC (Reduced Instruction Set Computing) will not allow these models. Whilst most models will work on your MAC, the broadest compatibility will be with an X86-X64 / Nvidia GPU.
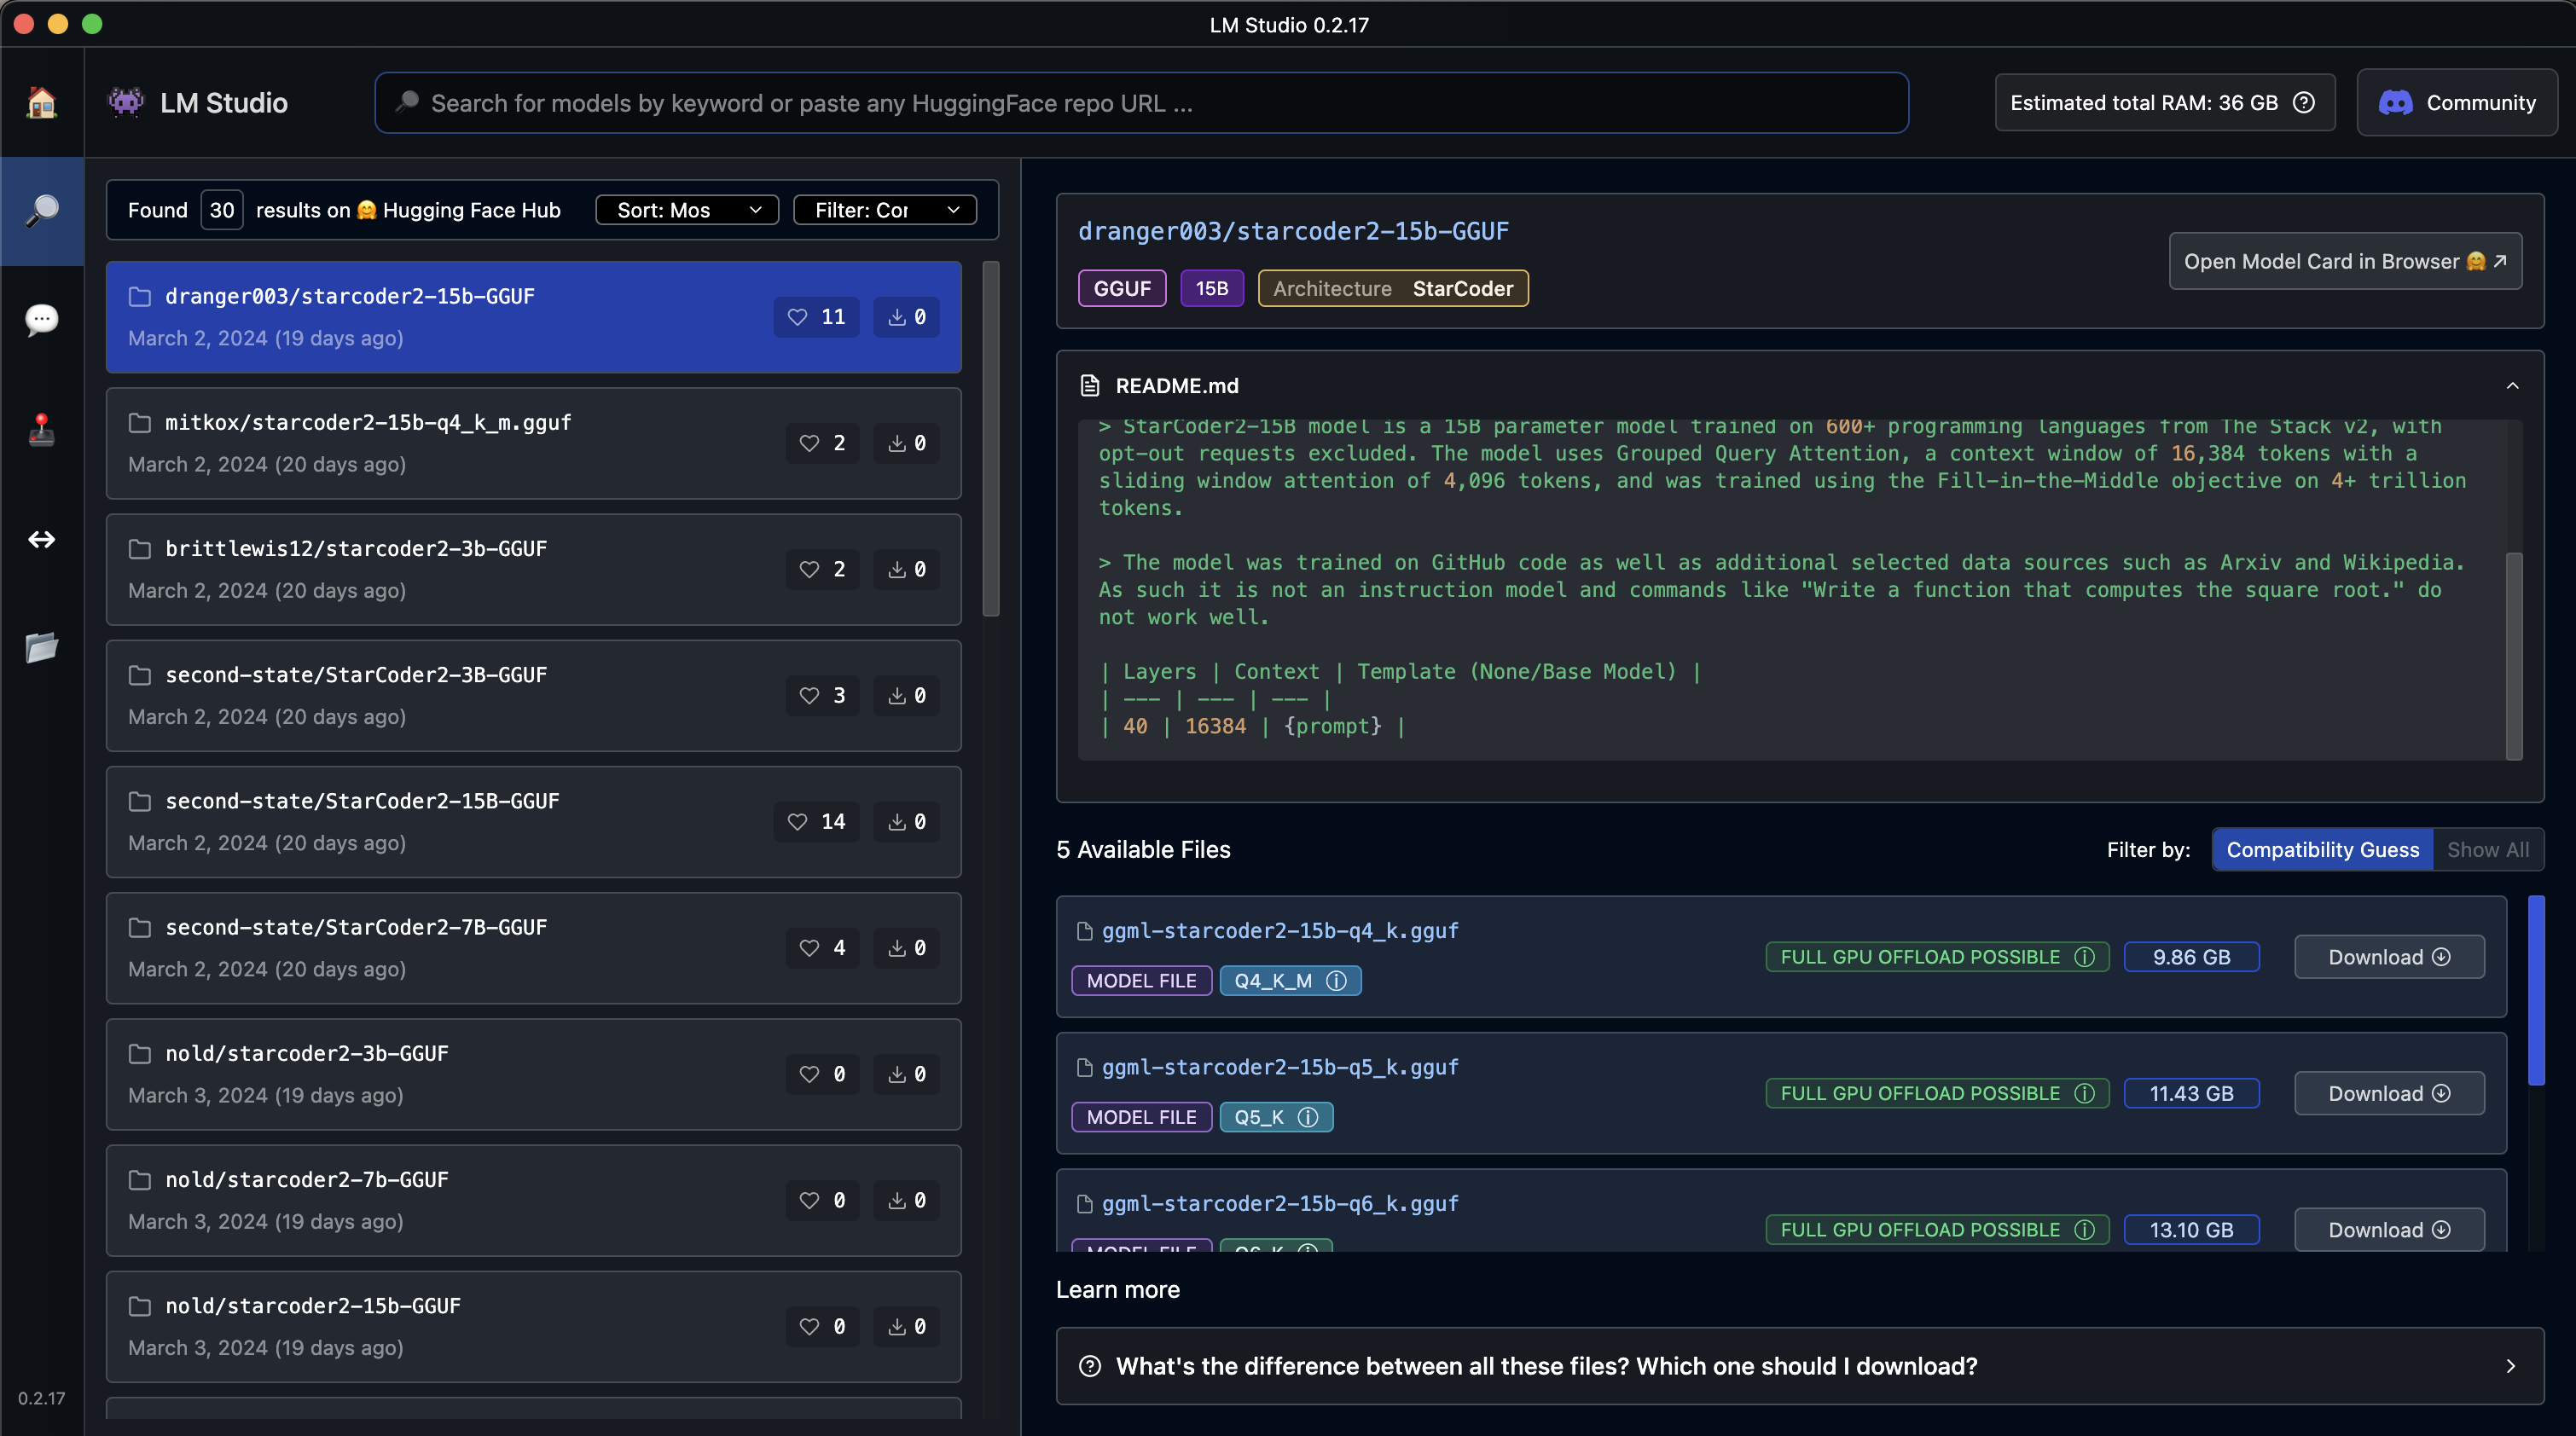
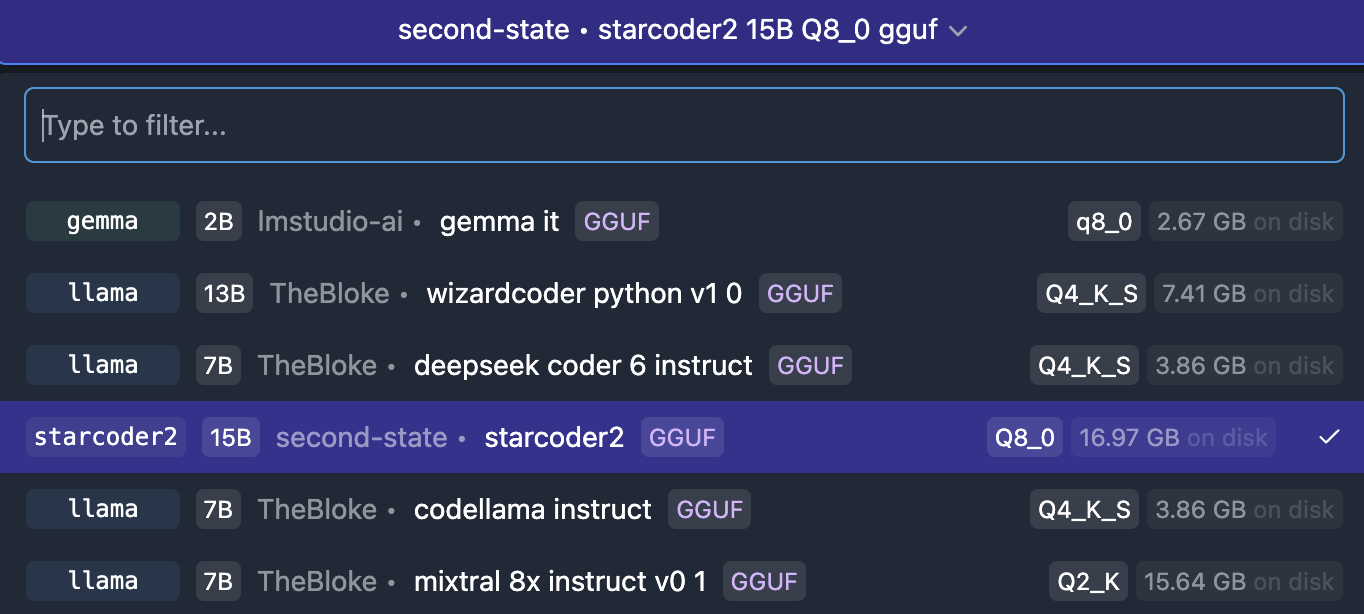
Search for models, and then click download. Note most downloads per model are between 5GB and 20GB in size. I have close to 50GB of models on my laptop.

LM Studio – Performing Local Chat
One downloaded, at the vertical bar on the left has a few areas your should explore. The chat icon allows you to load models, so you chat with them (ChatGPT style). Use this a means to play and test your LLM.
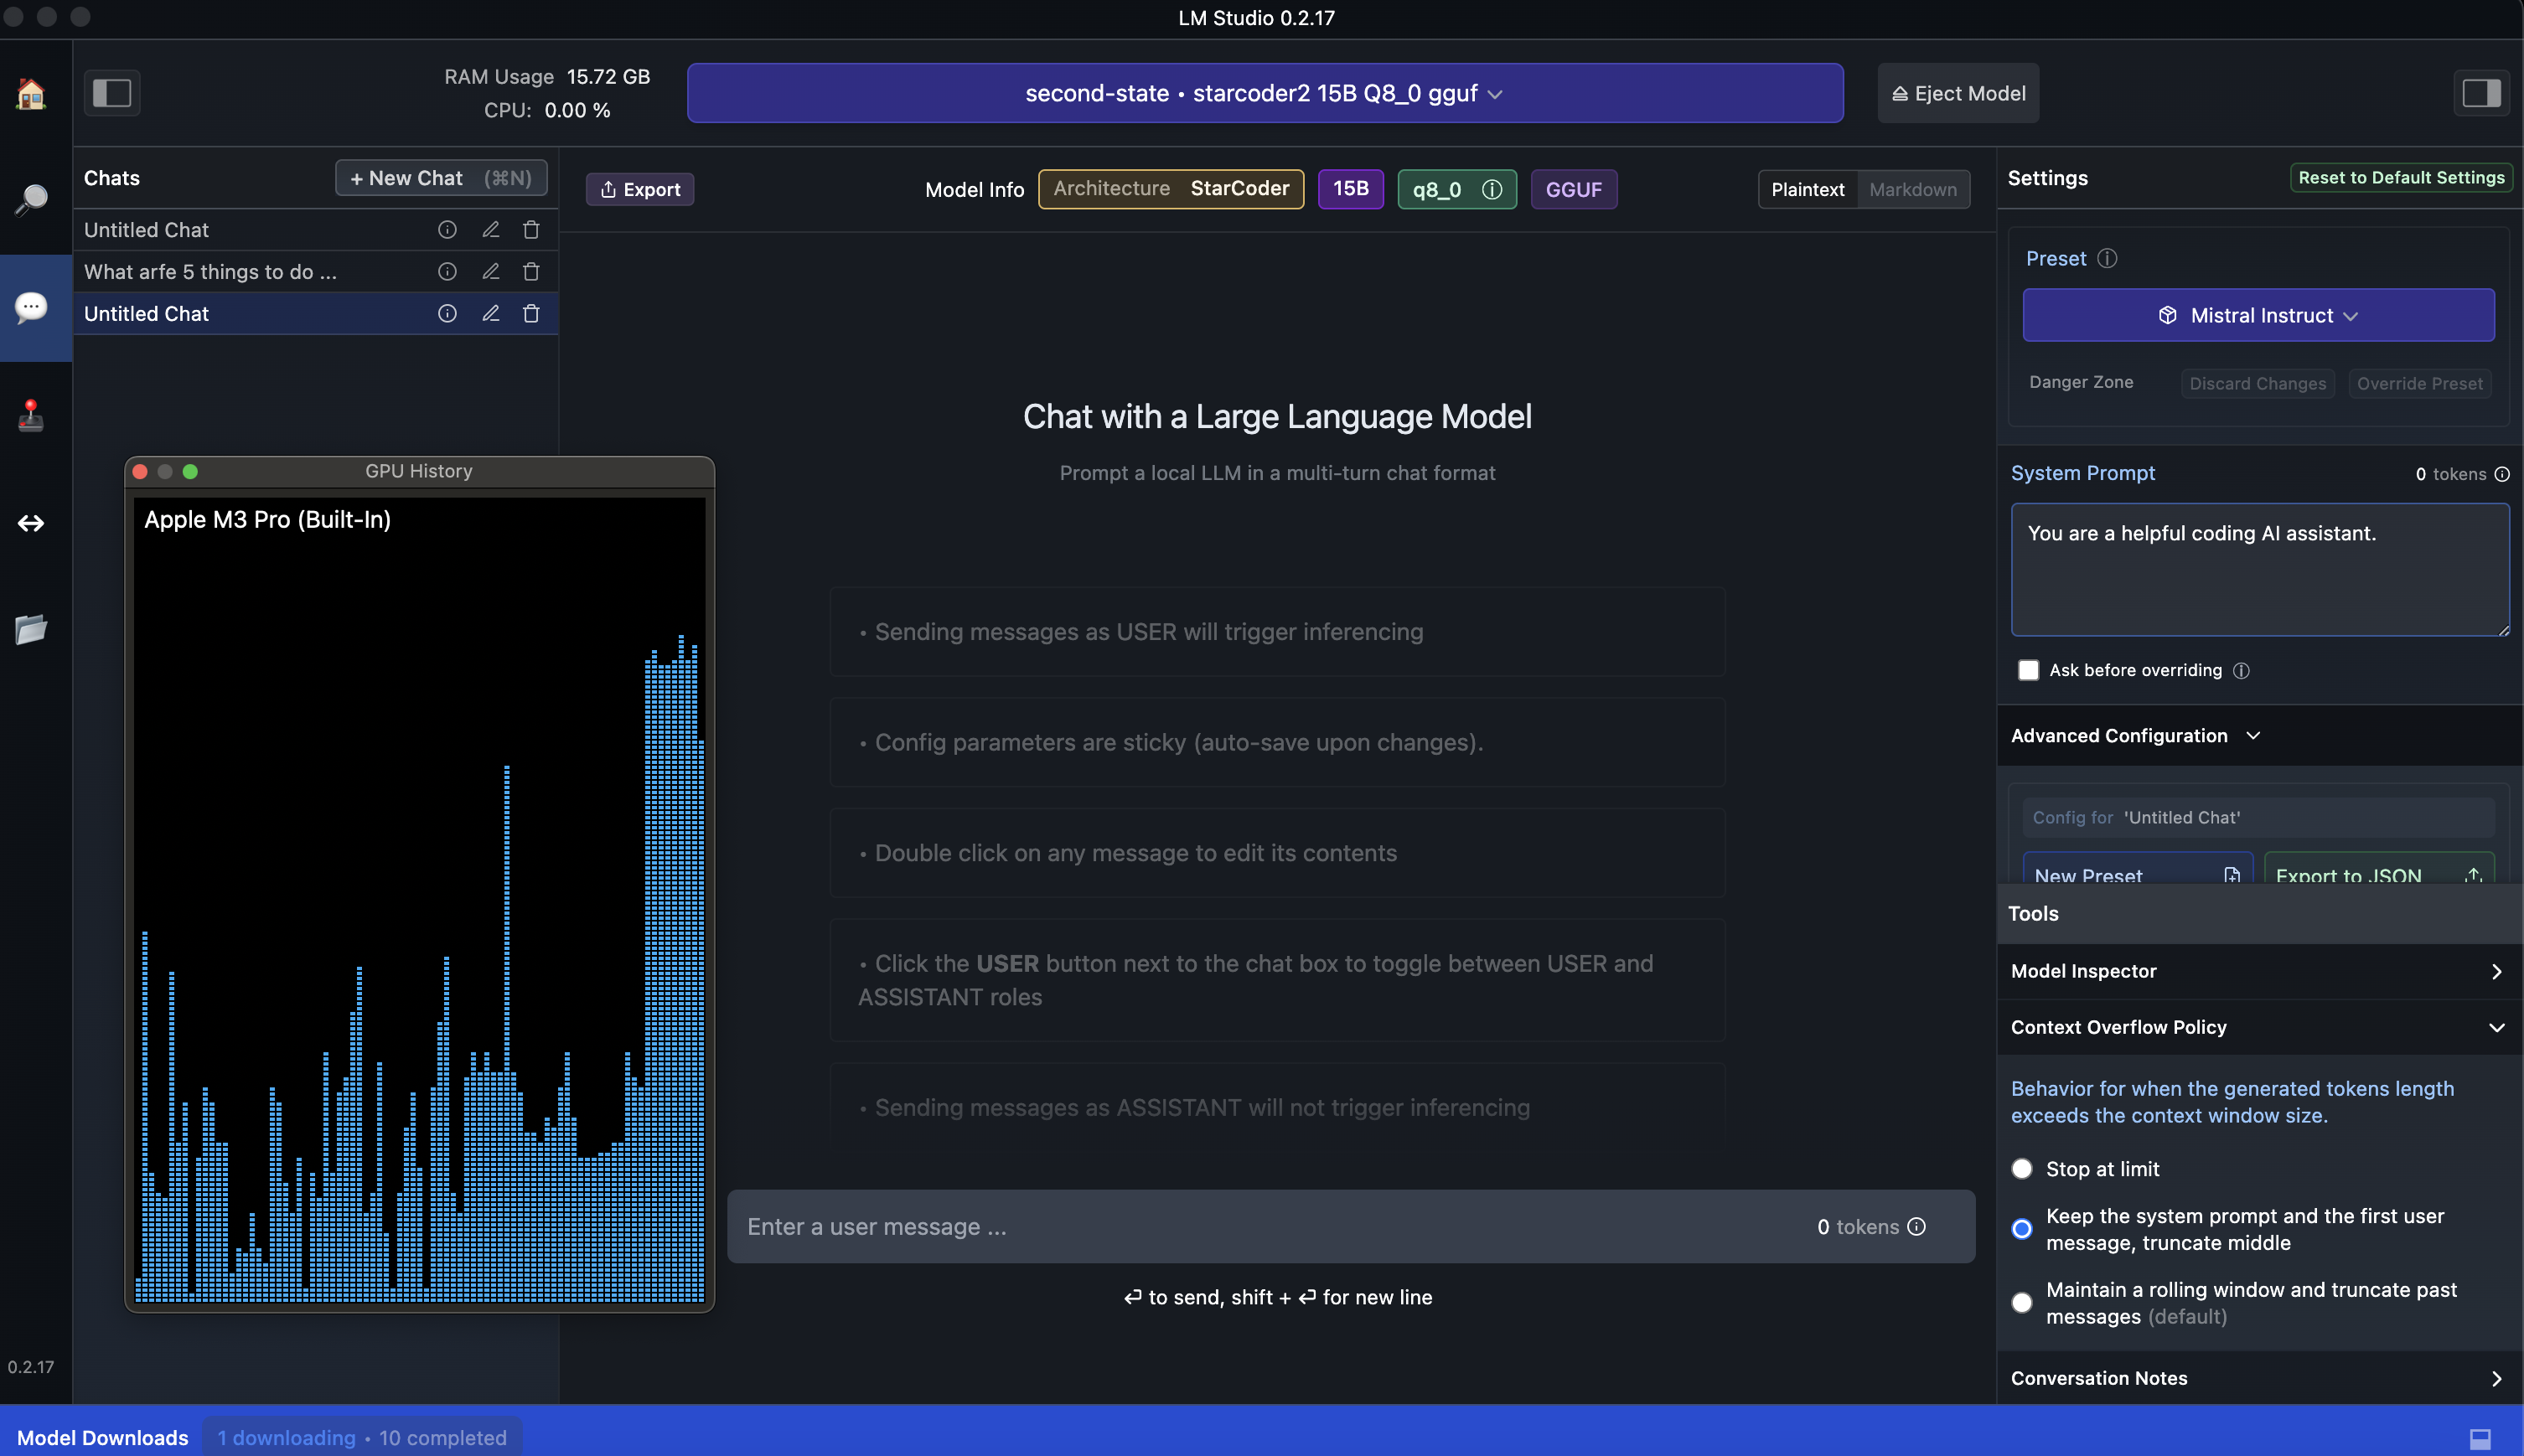
But first things first, you will need to load your model in, at the very top of the page select your models (bar in purple) and load the model. This will take 10-15 seconds depending on the speed of your storage and during this time you will see your memory consumption increase. In the example picture, Starcoder2 15b Q8_0 is using 15.72 GB of memory. You may struggle on an M1 based MAC, ideally you need 32GB of RAM or more to load the larger models.
LM Studio – Running An Inference Server
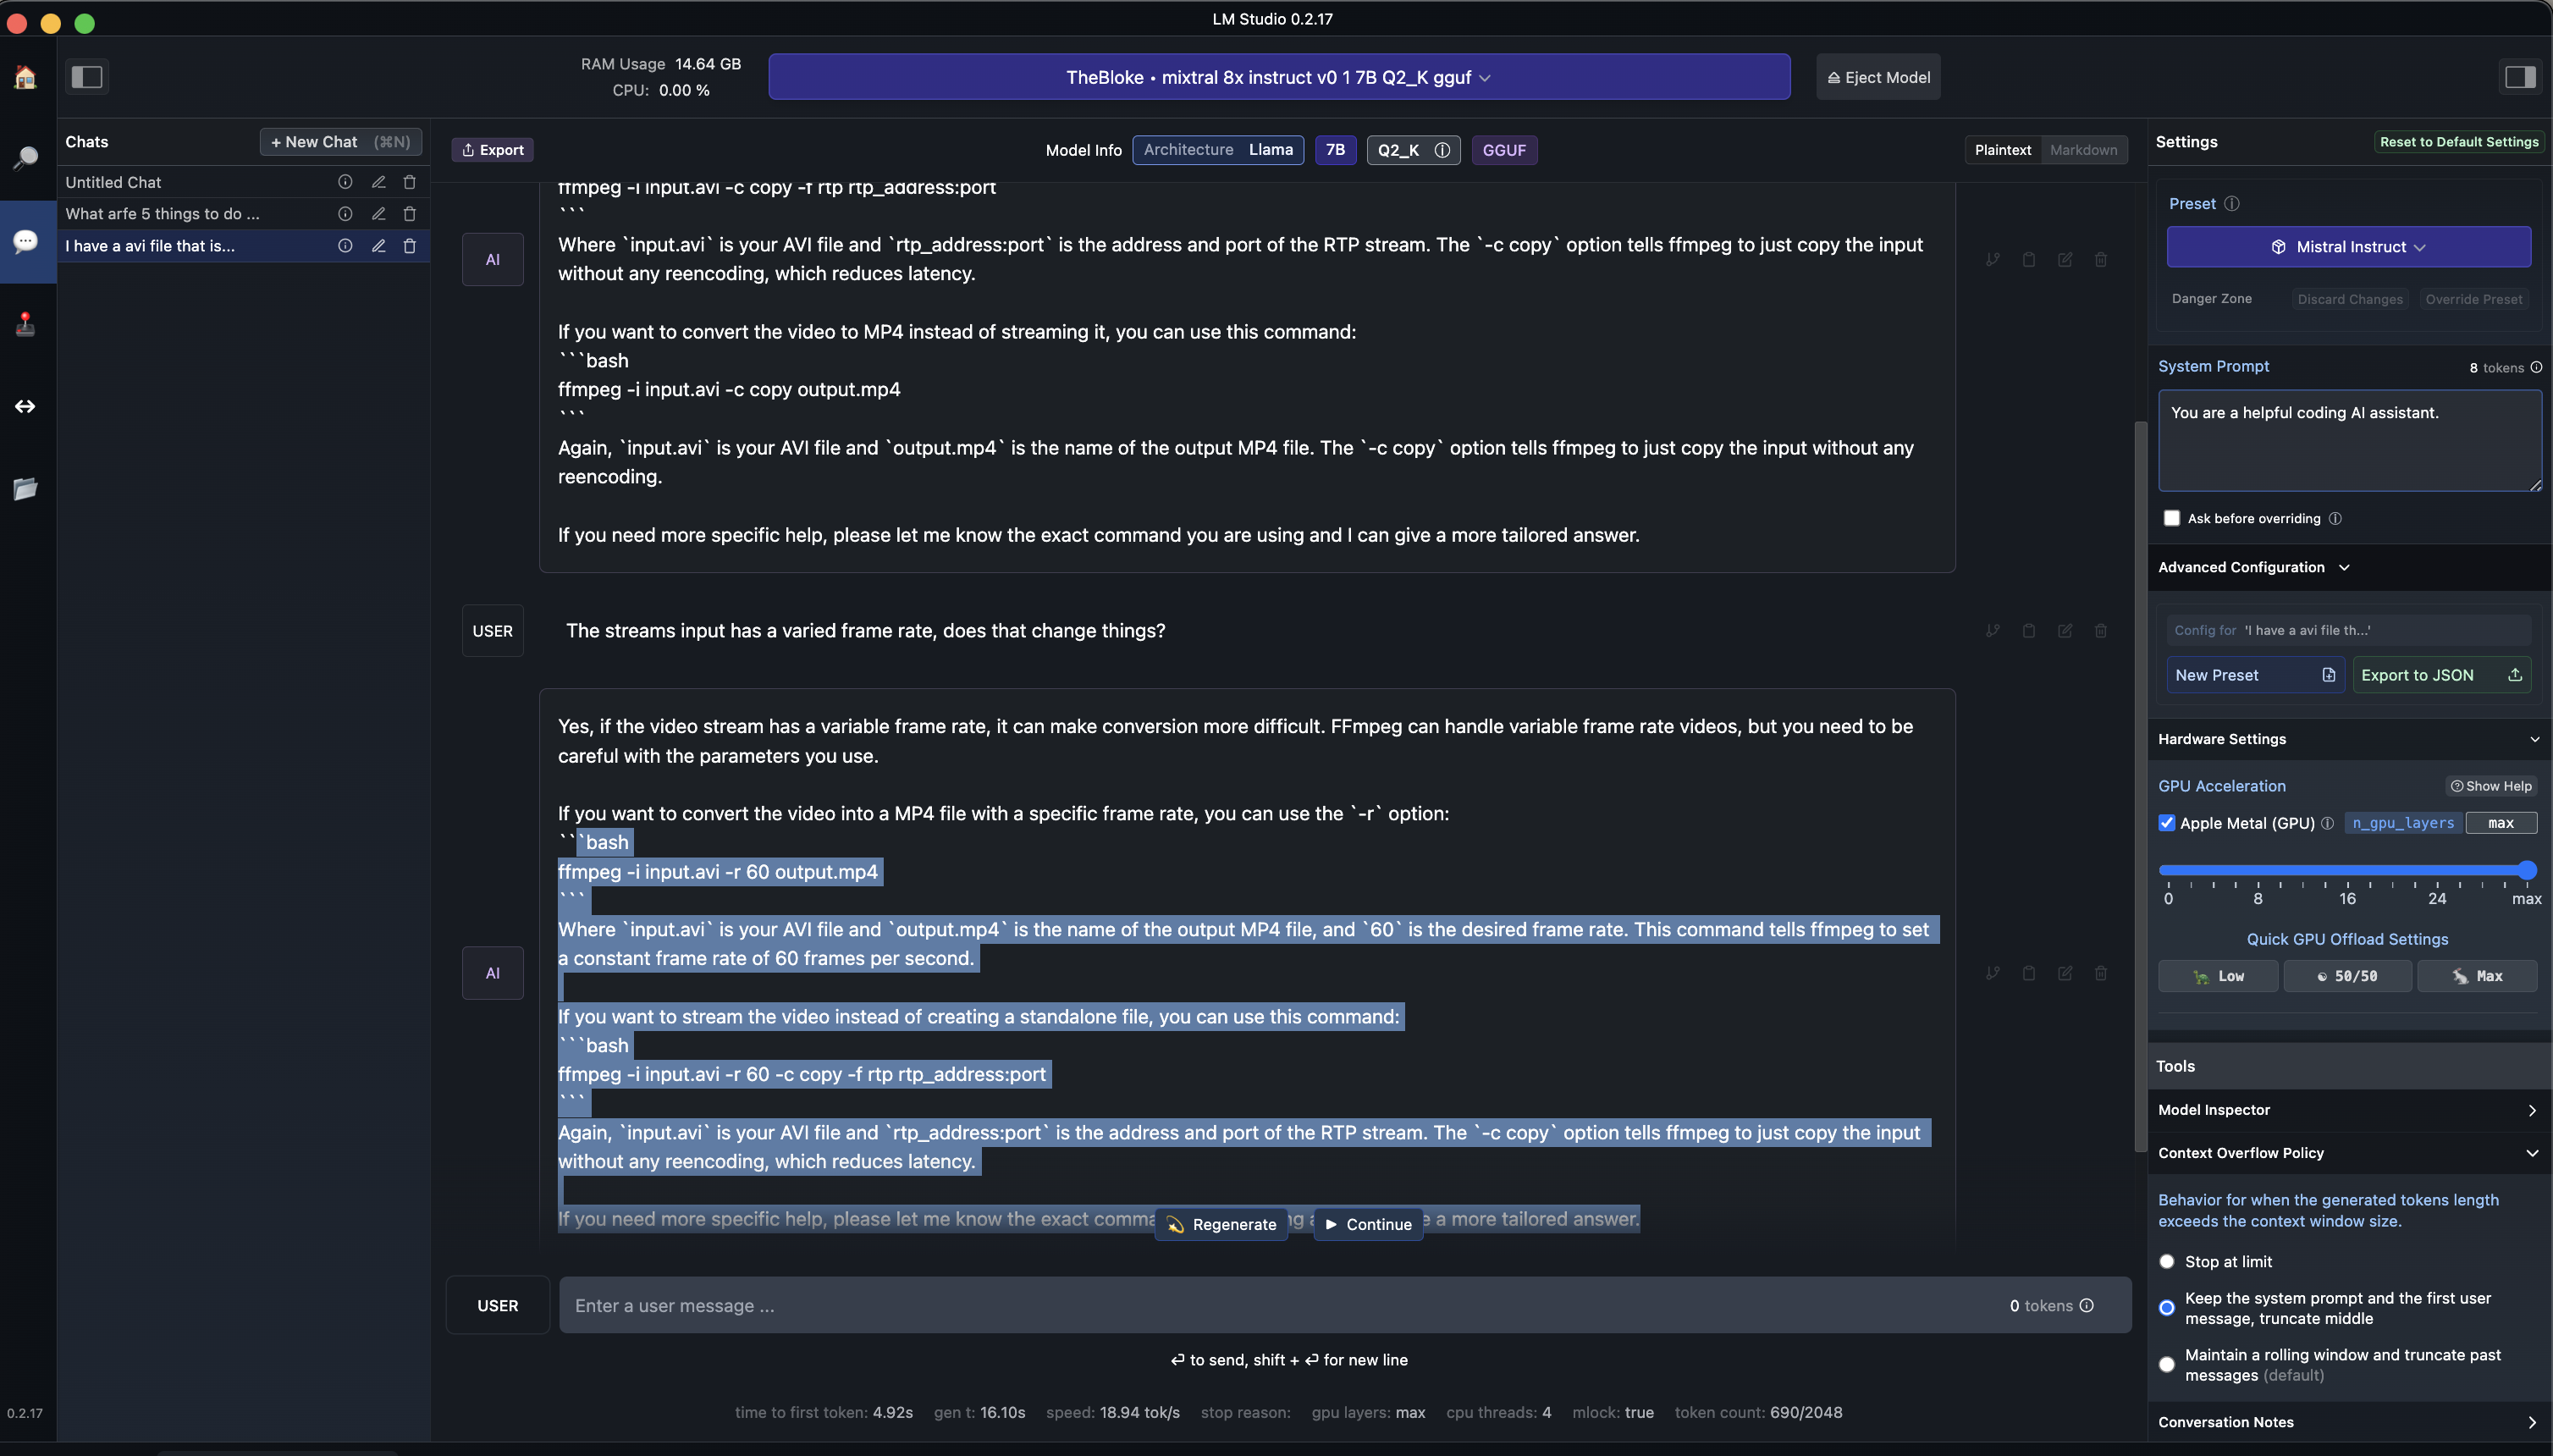
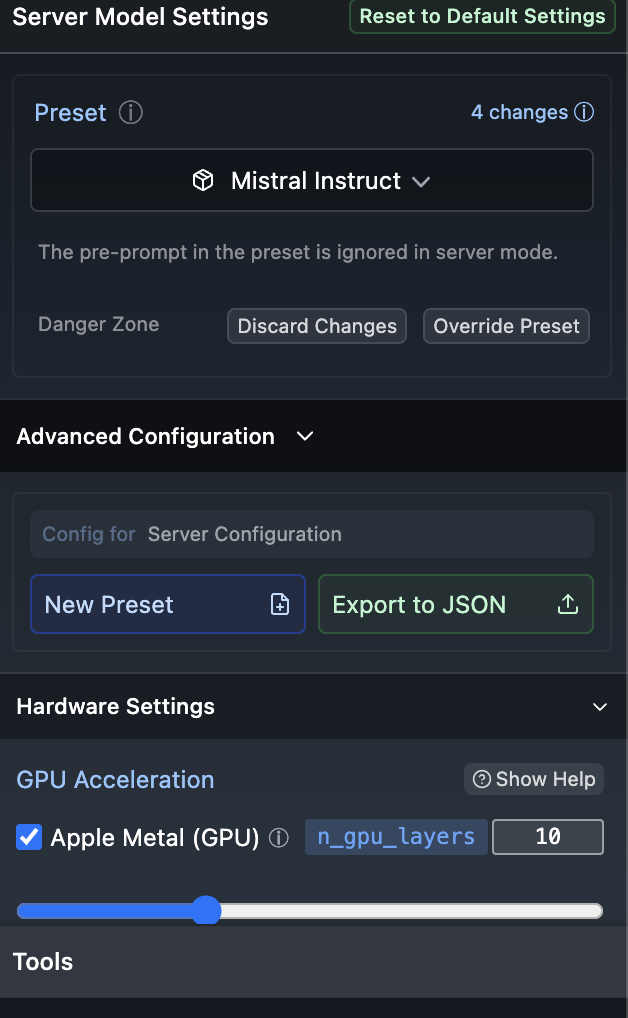
The part that excites me is not chat, but its local inference. By running inference locally, I can leverage plugins and other solutions that take place of Open AI. Click on the <-> icon on the left hand side, choose your model and start the server. On the right of this screen you can dial up or down the GPU (Apple Metal), along with seeing some code samples. Vision (if your model supports it) and so on. Python is the language of choice here.
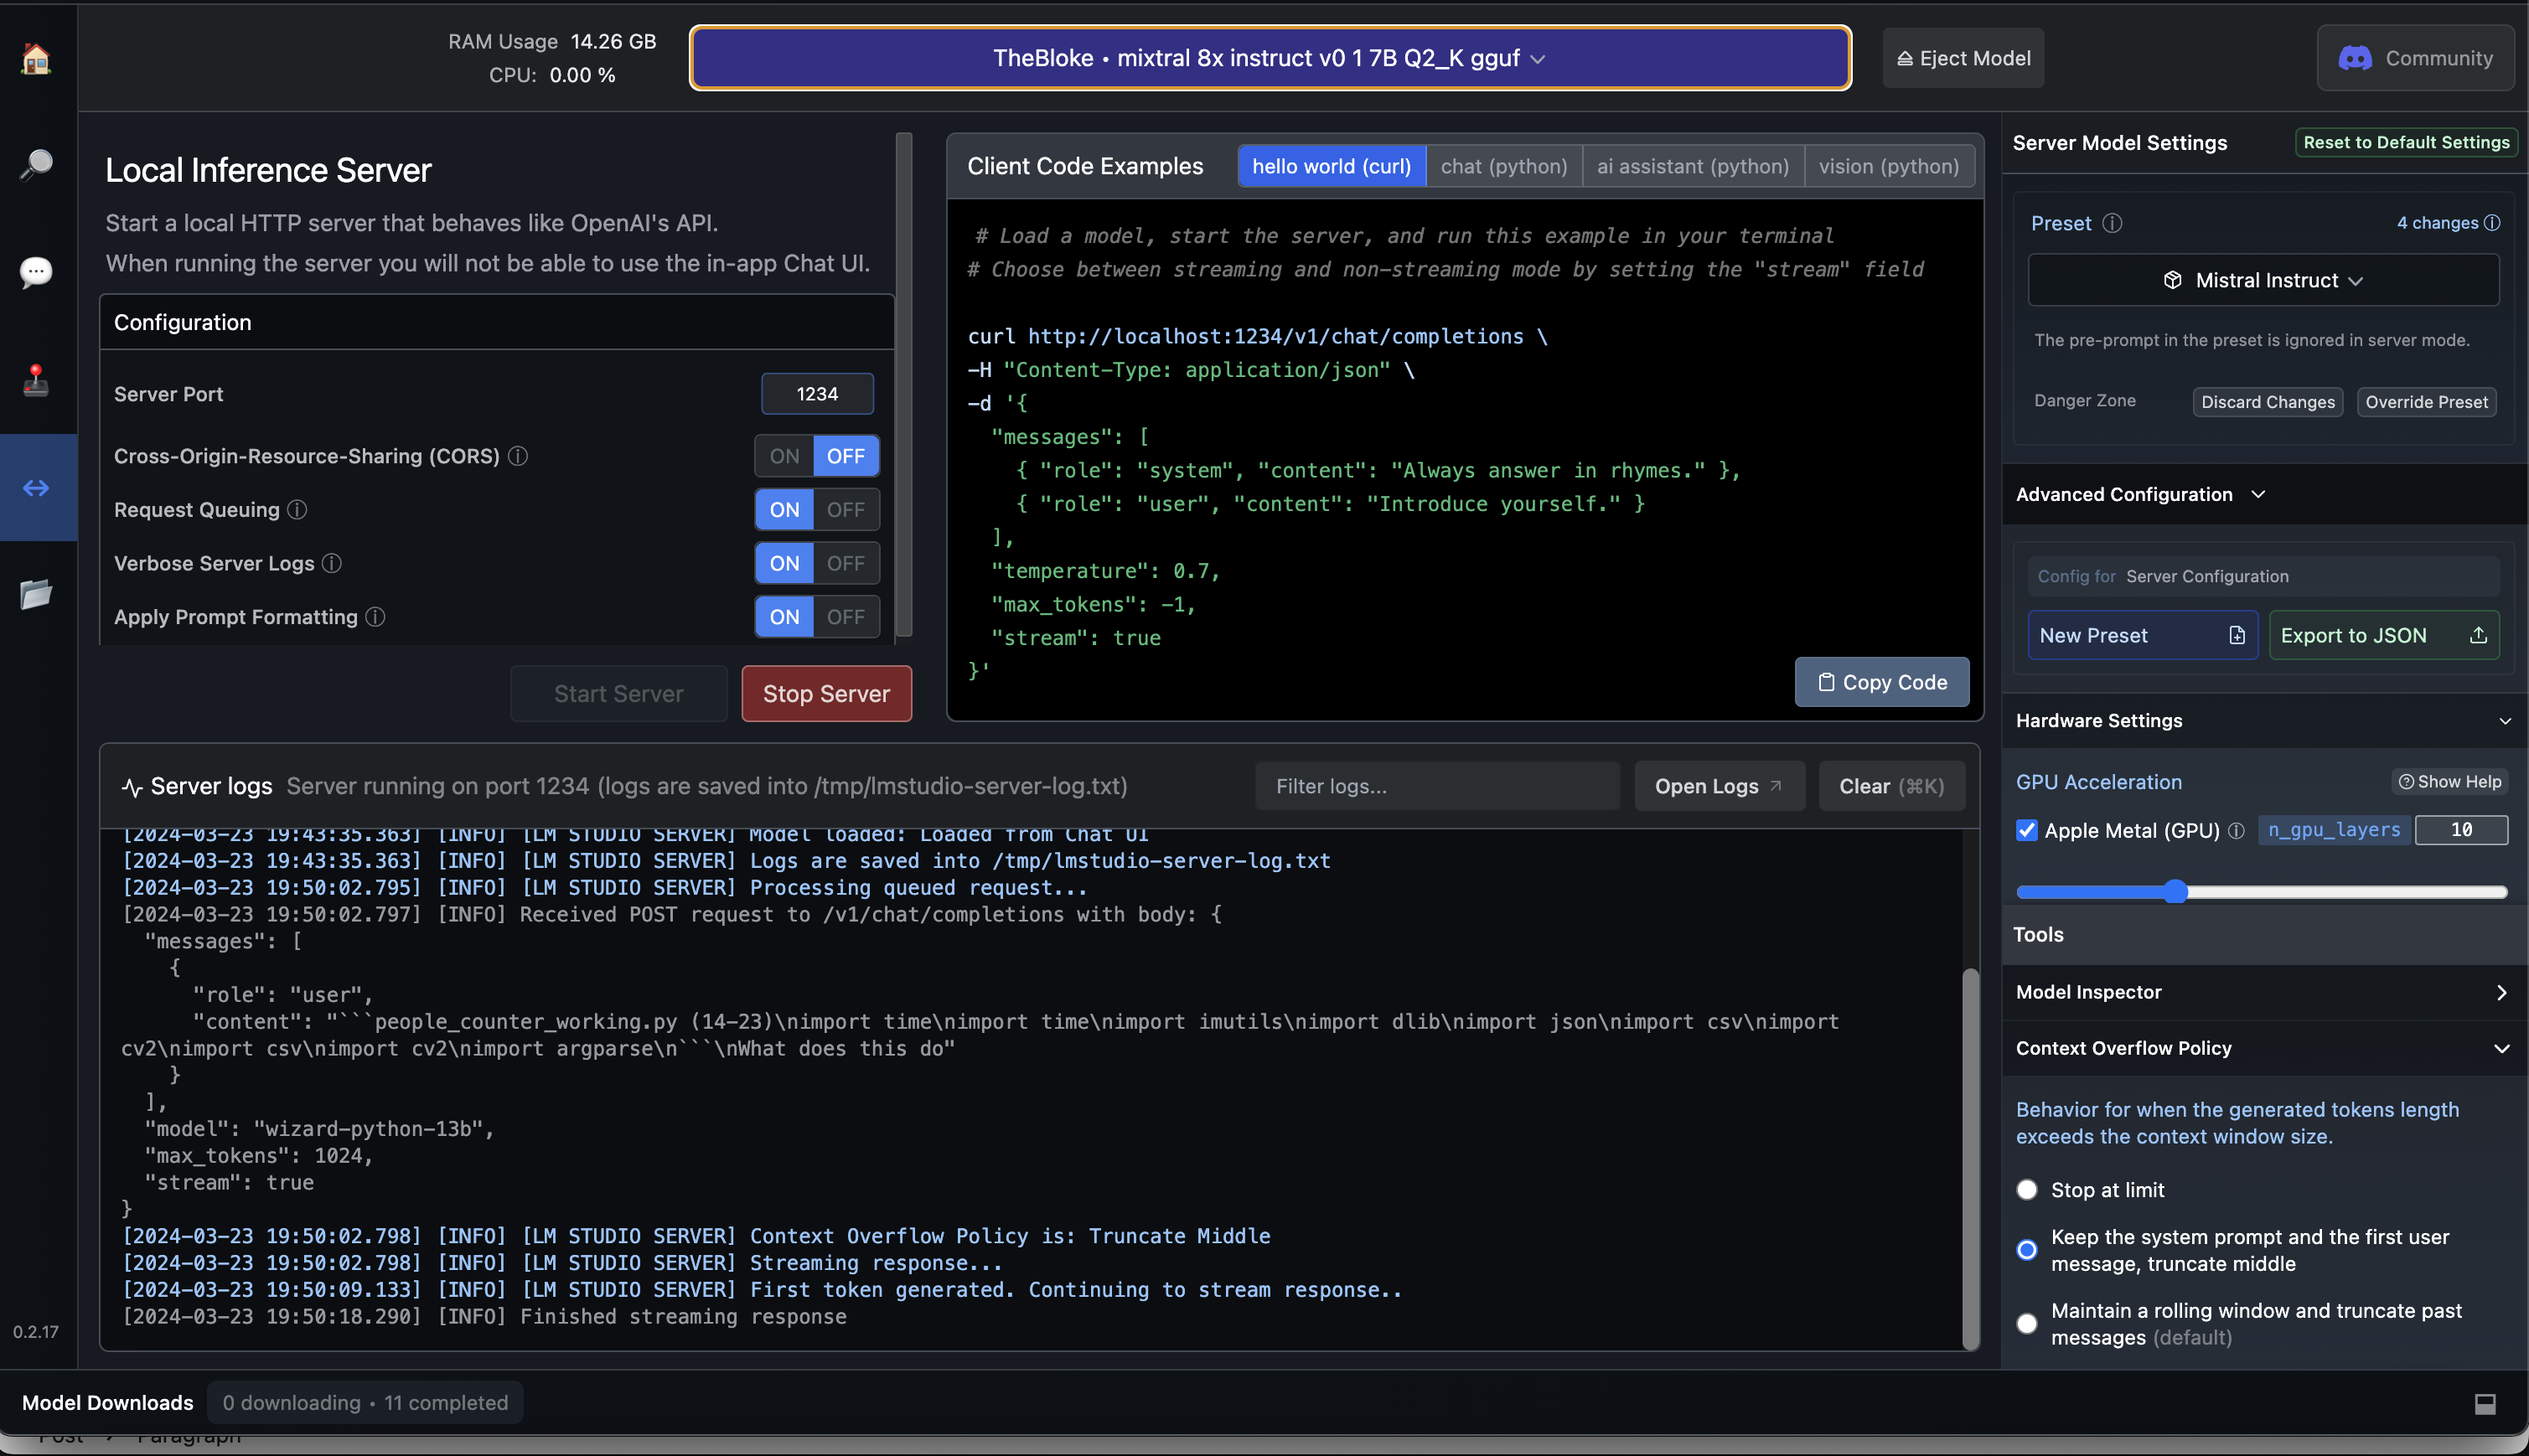
Below is a vision code example. Another cue to how this emulates OpenAI, LM Studio is your plugin replacement.
# Adapted from OpenAI's Vision example
from openai import OpenAI
import base64
import requests

# Point to the local server
client = OpenAI(base_url="http://localhost:1234/v1", api_key="lm-studio")

# Ask the user for a path on the filesystem:
path = input("Enter a local filepath to an image: ")

# Read the image and encode it to base64:
base64_image = ""
try:
  image = open(path.replace("'", ""), "rb").read()
  base64_image = base64.b64encode(image).decode("utf-8")
except:
  print("Couldn't read the image. Make sure the path is correct and the file exists.")
  exit()

completion = client.chat.completions.create(
  model="local-model", # not used
  messages=[
    {
      "role": "system",
      "content": "This is a chat between a user and an assistant. The assistant is helping the user to describe an image.",
    },
    {
      "role": "user",
      "content": [
        {"type": "text", "text": "What’s in this image?"},
        {
          "type": "image_url",
          "image_url": {
            "url": f"data:image/jpeg;base64,{base64_image}"
          },
        },
      ],
    }
  ],
  max_tokens=1000,
  stream=True
)

for chunk in completion:
  if chunk.choices[0].delta.content:
    print(chunk.choices[0].delta.content, end="", flush=True)
Given our inference server is running, and you are familiar with running LLM’s, we will move forward and move to seeing how we can query our self hosted LLM in VSCode.
Continue – Installation & Configuration
A great way to leverage LLM’s paid or not is to use the VS Code plugin called ‘Continue’. Continue is an open-source autopilot for VS Code and JetBrains and right now, I see this as the easiest way to code with any LLM. Continue is going to allow you to leverage the LLM of choice in LMStudio in VSCode.
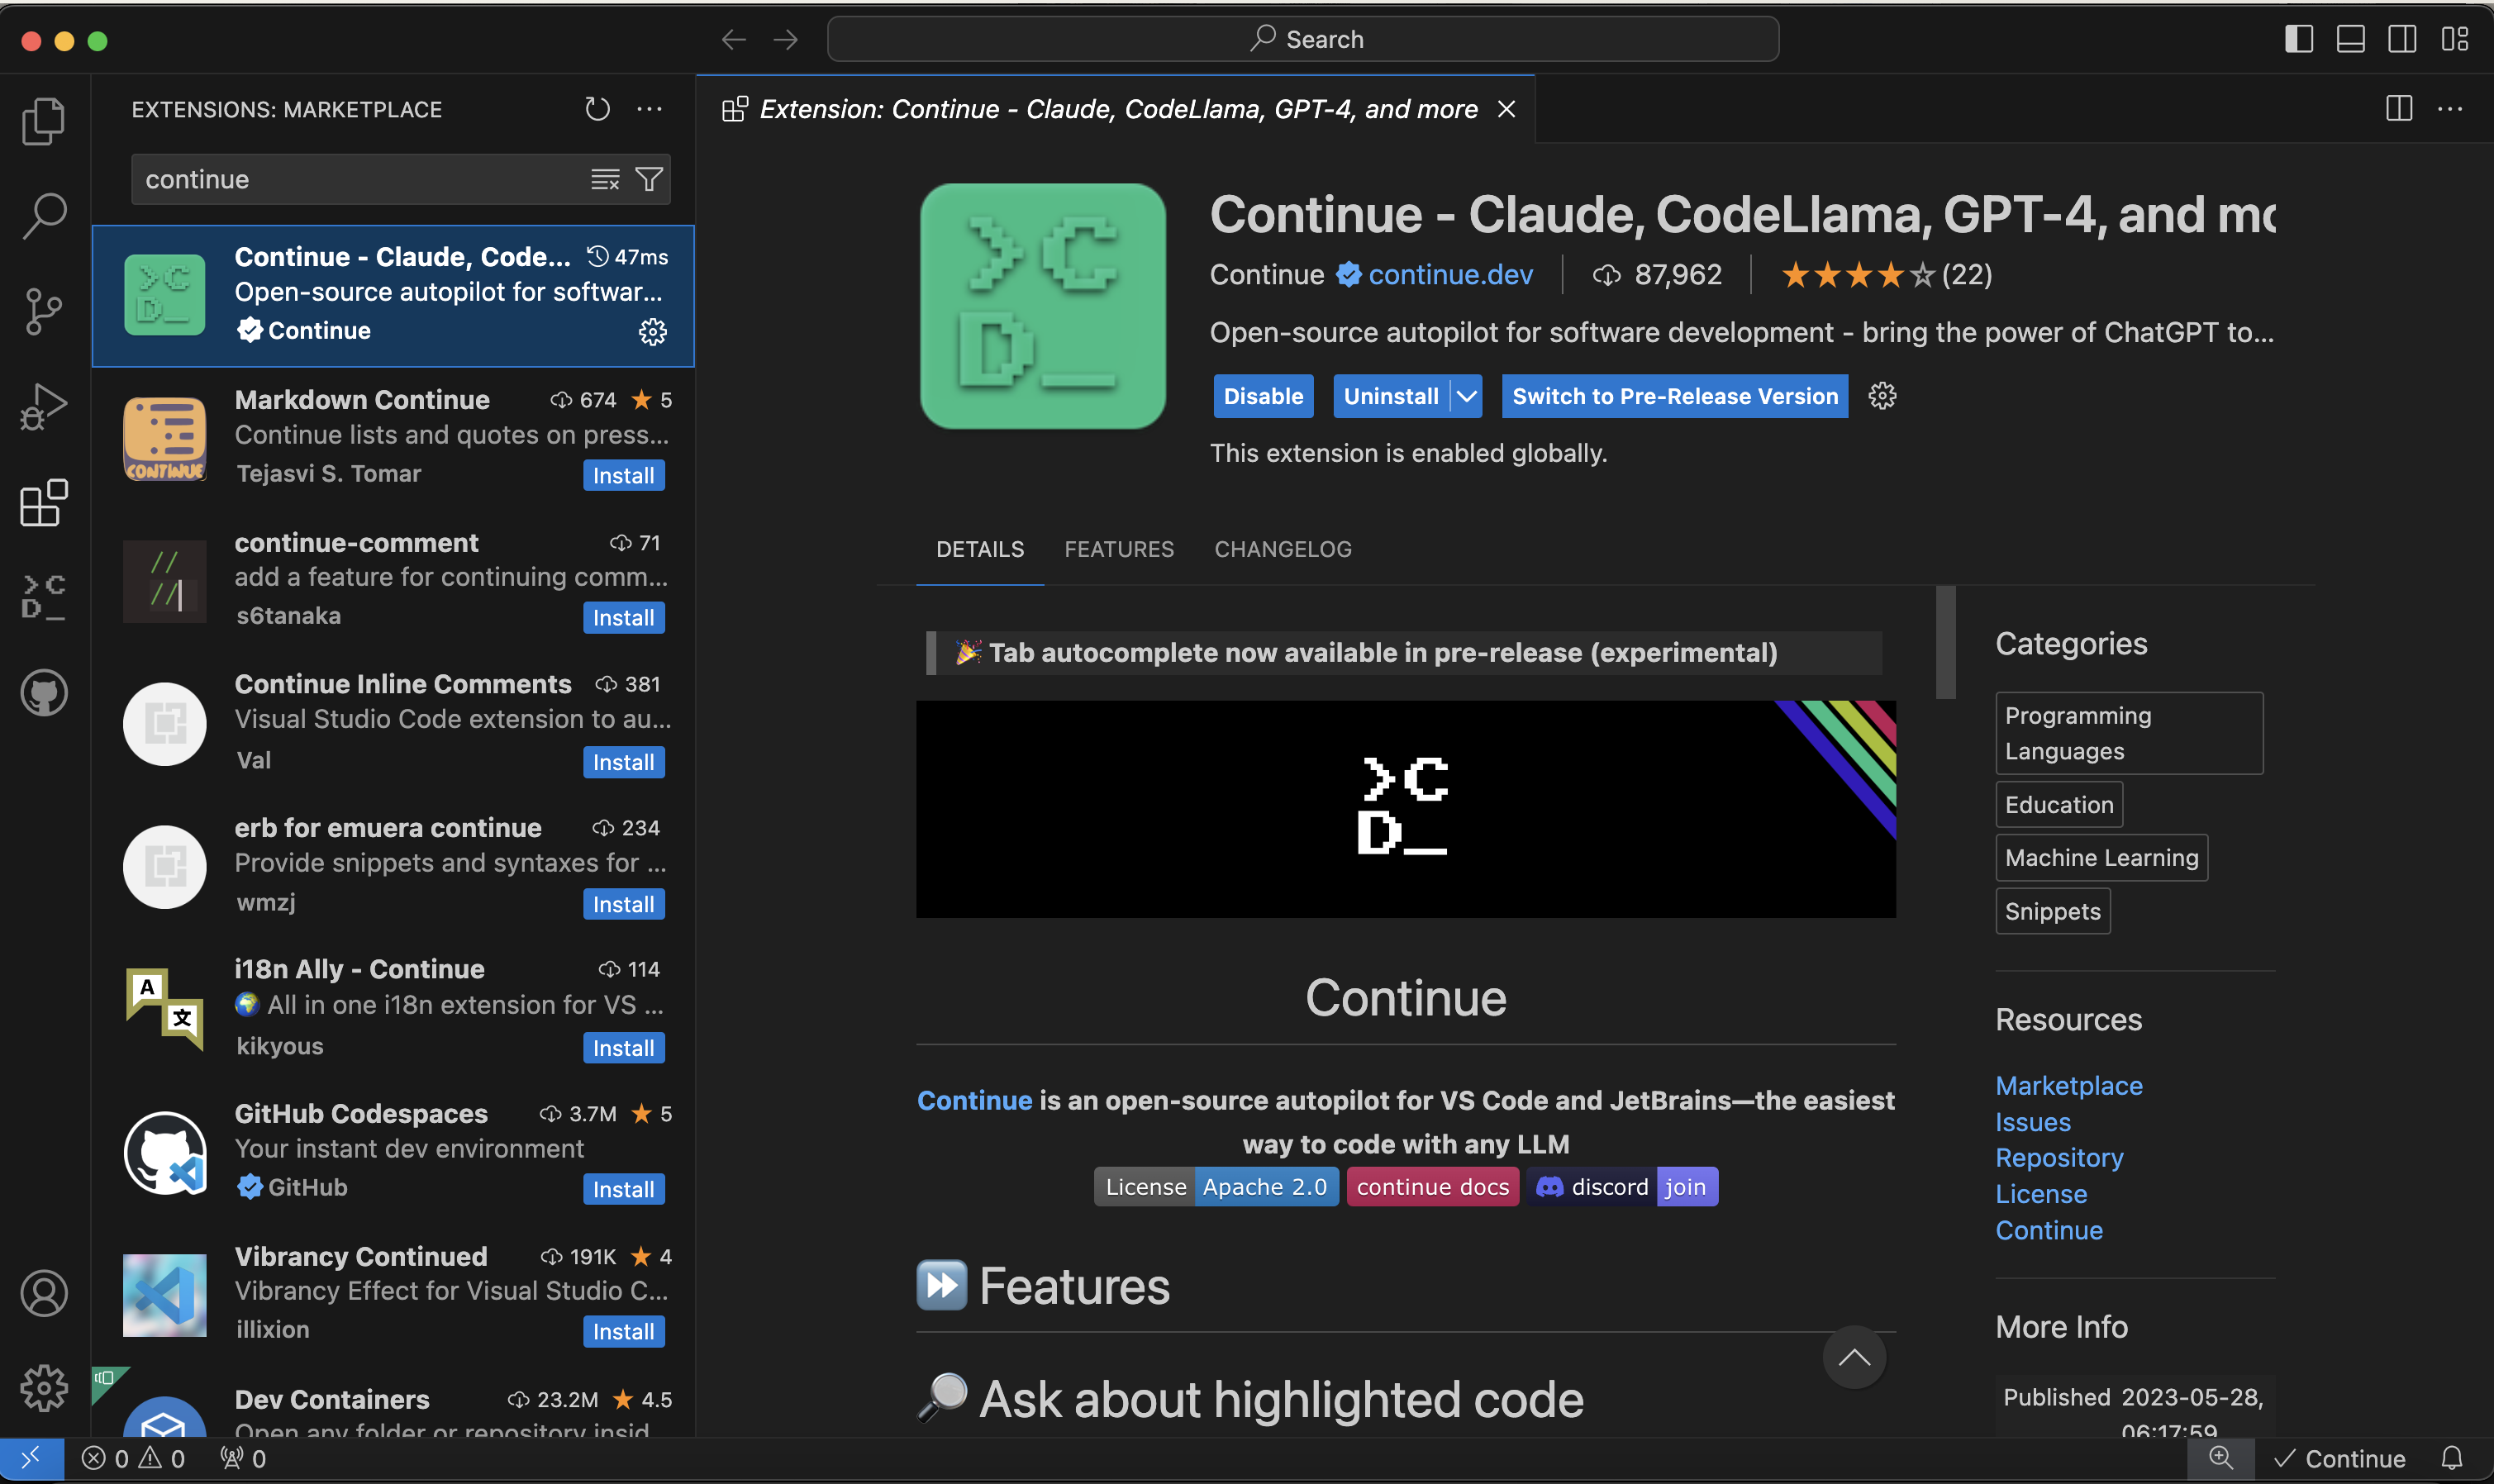
Features of Continue are as follows and the keen eye, will notice bottom right you will see ‘Continue’ with a tick, very similar to GitHub CoPilot when it is working
- Add highlighted code to context (chat with your code)
- Fix this code
- Optimise this code
- Write a DocString for this code
- Write Comments for this code
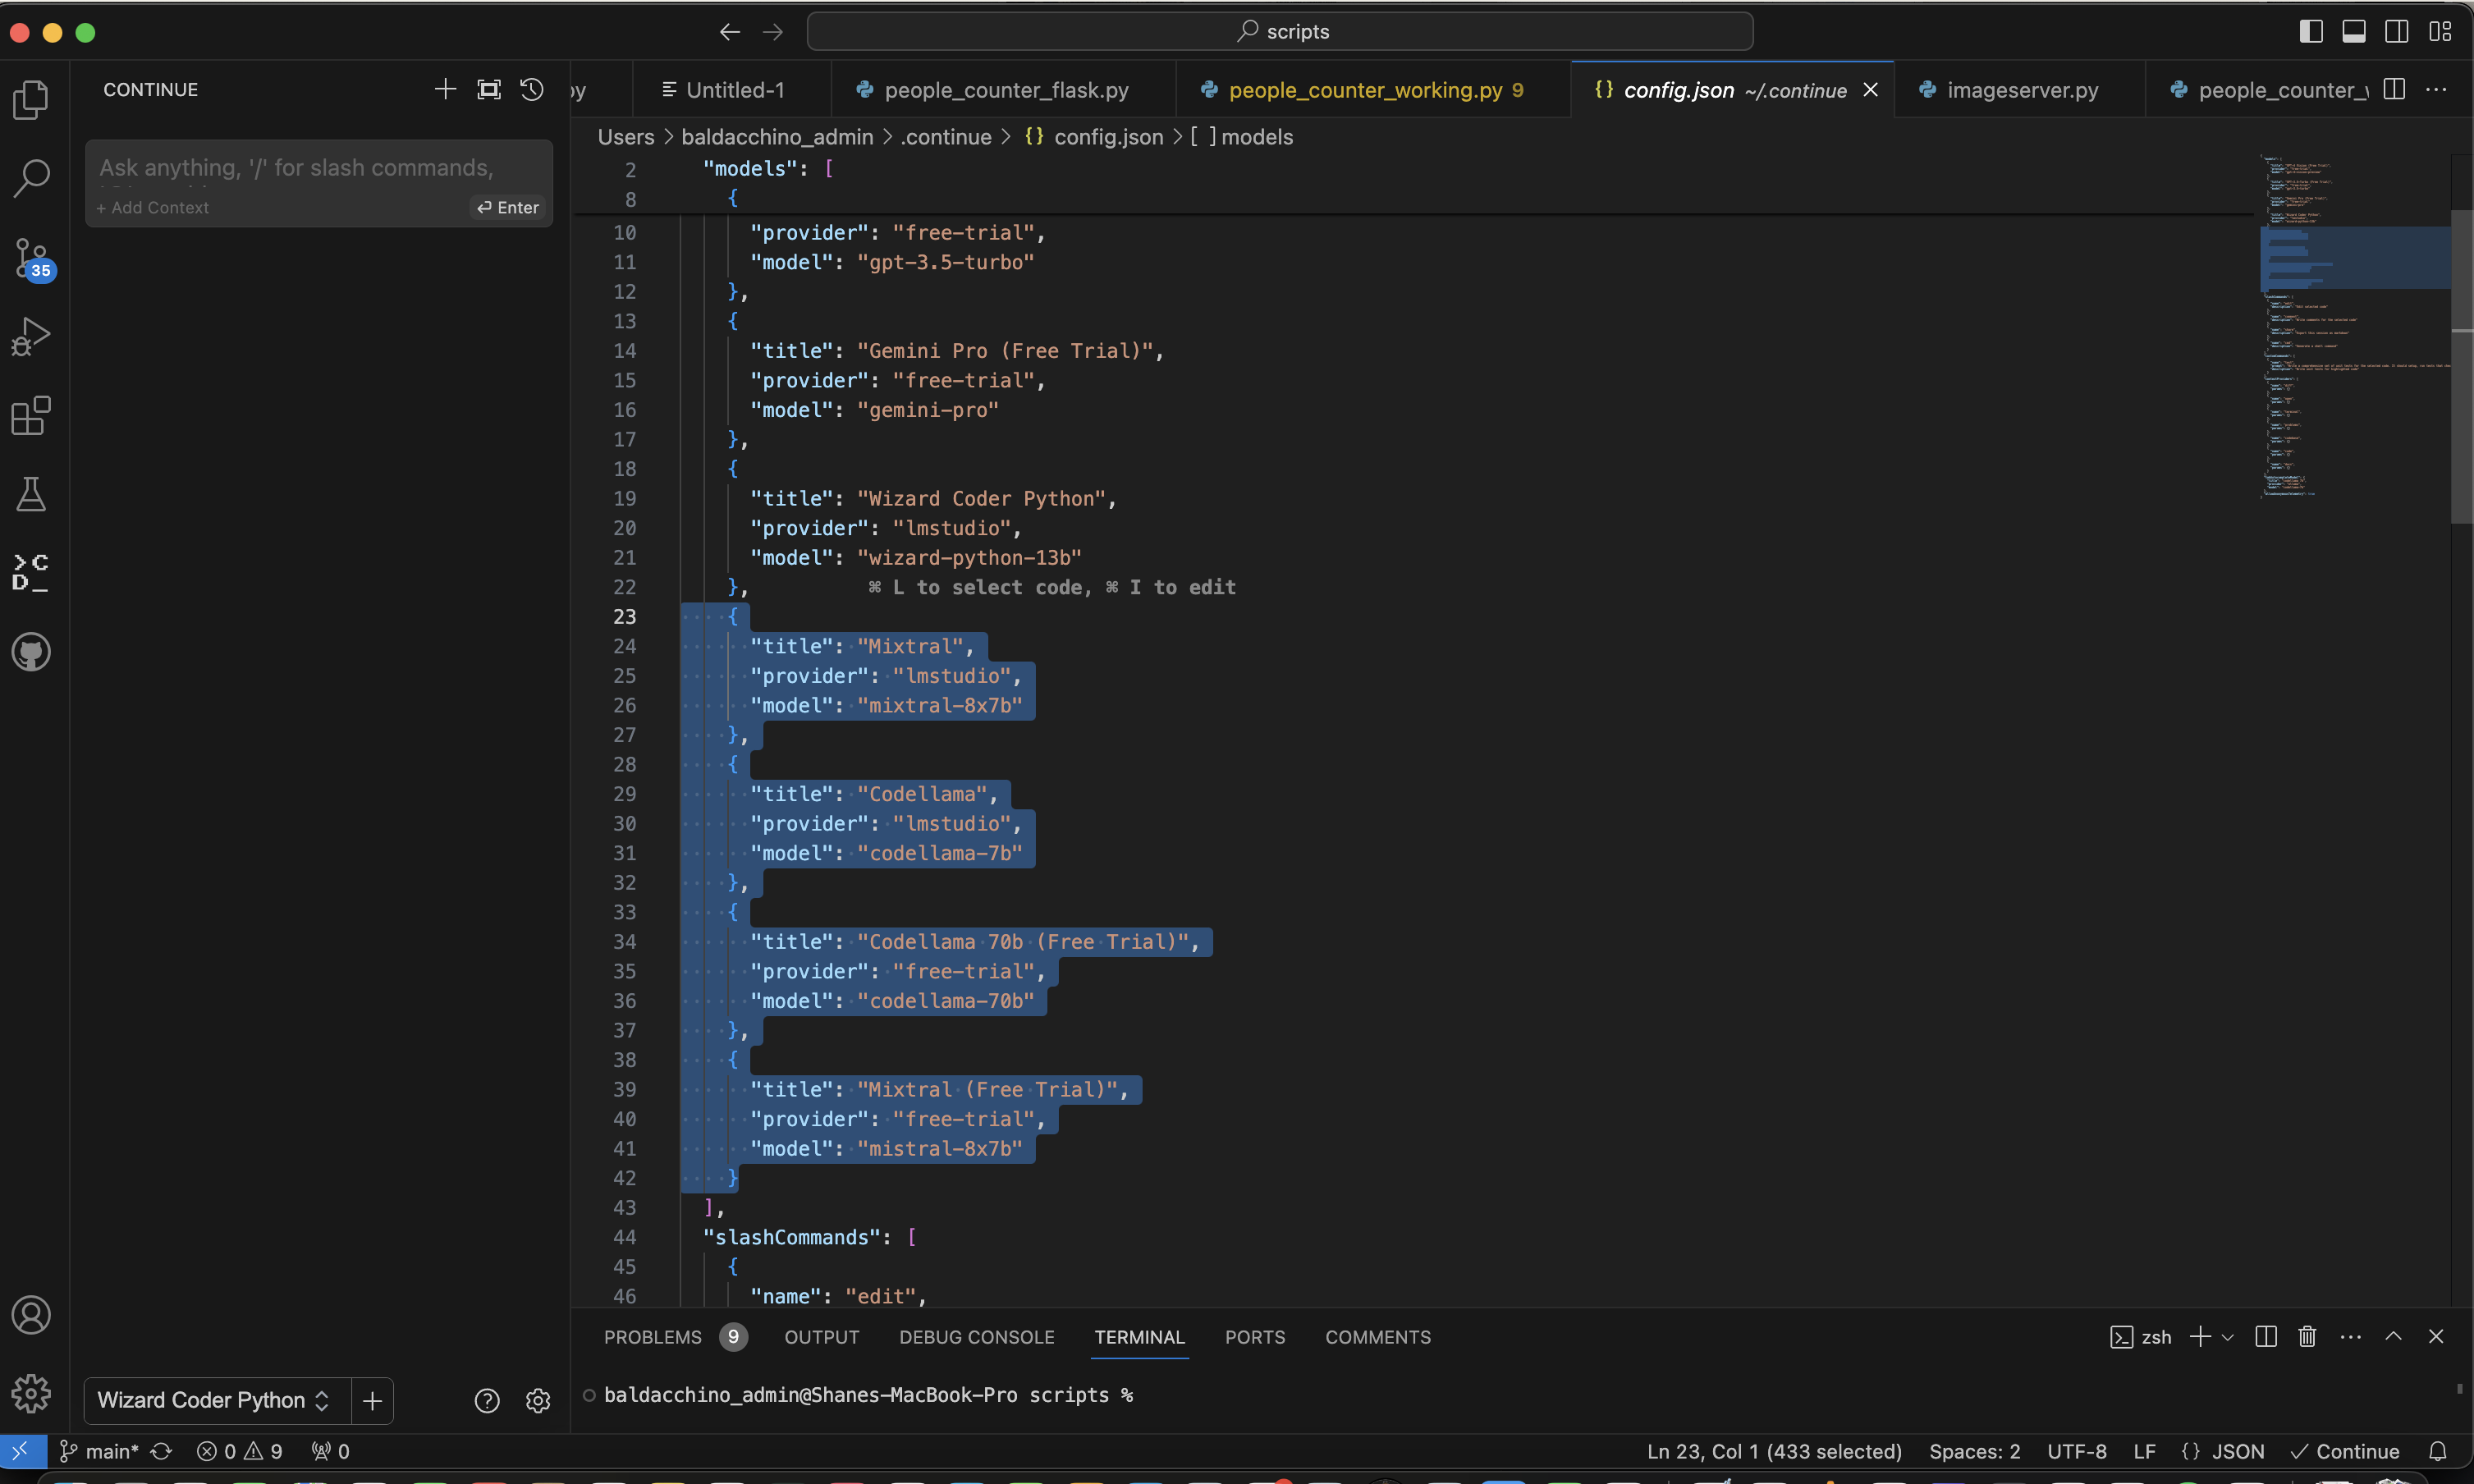
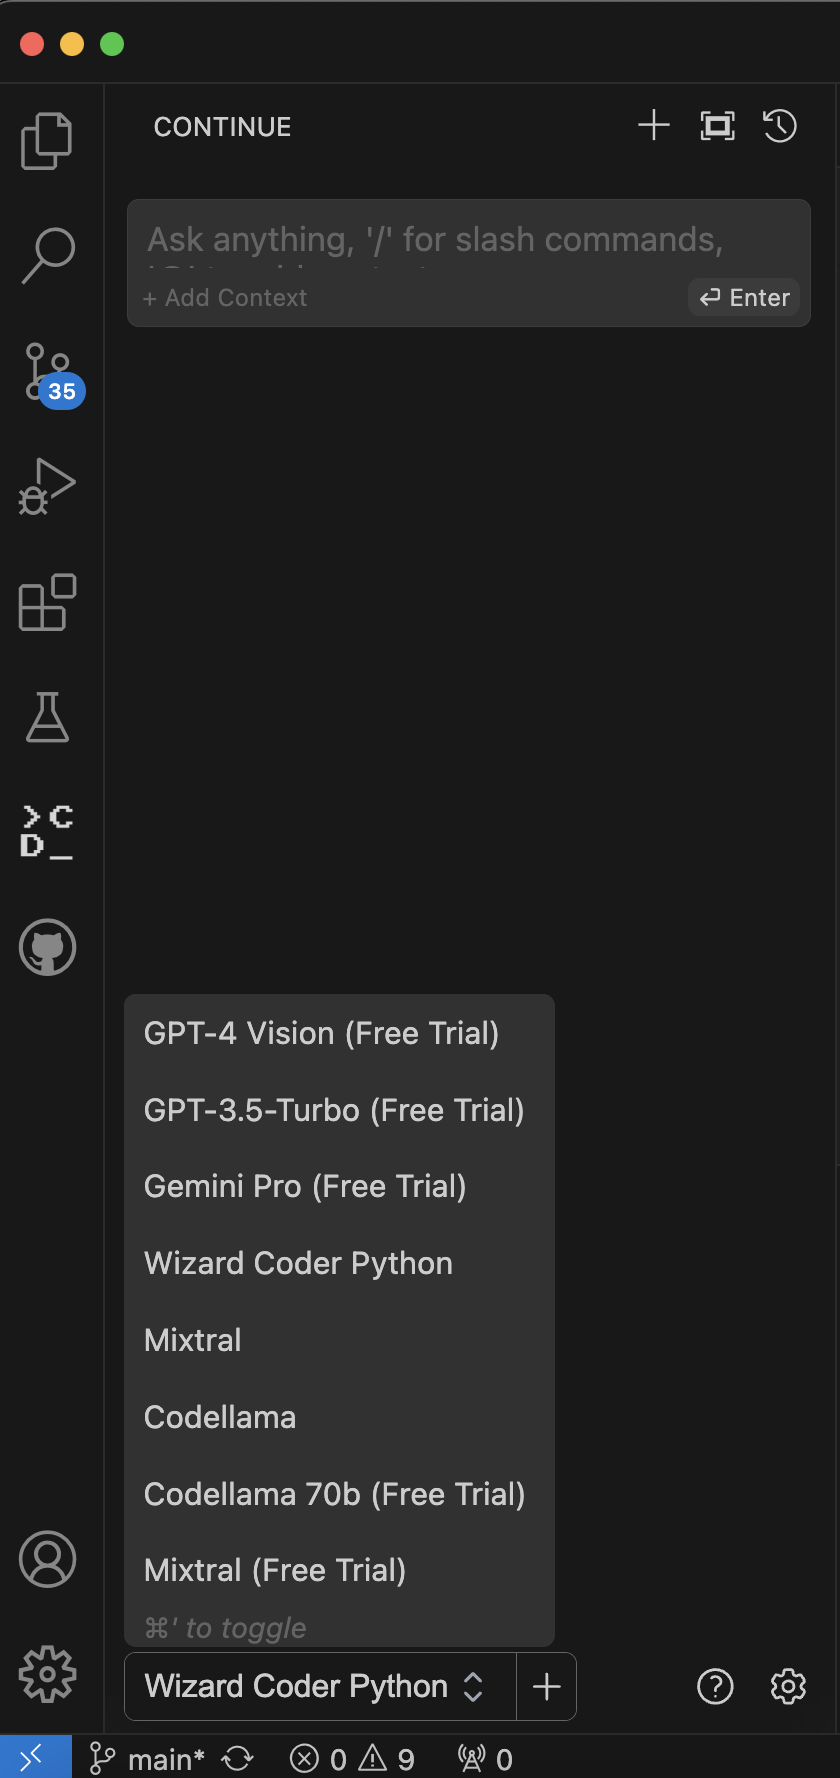
Continue does need to be configured, it needs to be told to use LMStudio, which is pretty simple. Click on the Continue icon on the left hand side the ‘>CD_’ and then the gears. This will bring up a JSON based configuration file. You will need to add JSON for the provider to go to LMStudio, an example of some of the models I have added. The key part here is the provider being lmstudio. If you are running just one model at a time on LMStudio then it really doesn’t matter what you call the title and model, as there is just one local inference server running. Newer versions of LMStudio (0.2.17) and above allow you to run multiple models at the same time.
  {
      "title": "Wizard Coder Python",
      "provider": "lmstudio",
      "model": "wizard-python-13b"
    },
    {
      "title": "Mixtral",
      "provider": "lmstudio",
      "model": "mixtral-8x7b"
    },
    {
      "title": "Codellama",
      "provider": "lmstudio",
      "model": "codellama-7b"
    }
Ollama – Adding in autocomplete
Continue with LMStudio does not provide the tab autocomplete function in VSCode. If you are not familar with what i am describing.
You may type in your IDE, ‘Write me a function that find the first 100 prime numbers in C++’, if i hit ‘tab’ I would expect the function to appear. We need Ollama to do this.
Download and install Ollama from https://ollama.com/download, it really is easy to get started. Running Ollama will yield nothing more than a icon in your taskbar.

We need to head to the terminal, and it has the same ‘Docker’ like vibes in its command line syntax.
ollama run, ollama list.
In order to run a model you use the ollama run command, this means you can run a different model for autocomplete if you wish.
| Model | Parameters | Size | Download |
|---|---|---|---|
| Llama 2 | 7B | 3.8GB | ollama run llama2 |
| Mistral | 7B | 4.1GB | ollama run mistral |
| Dolphin Phi | 2.7B | 1.6GB | ollama run dolphin-phi |
| Phi-2 | 2.7B | 1.7GB | ollama run phi |
| Neural Chat | 7B | 4.1GB | ollama run neural-chat |
| Starling | 7B | 4.1GB | ollama run starling-lm |
| Code Llama | 7B | 3.8GB | ollama run codellama |
| Llama 2 Uncensored | 7B | 3.8GB | ollama run llama2-uncensored |
| Llama 2 13B | 13B | 7.3GB | ollama run llama2:13b |
| Llama 2 70B | 70B | 39GB | ollama run llama2:70b |
| Orca Mini | 3B | 1.9GB | ollama run orca-mini |
| Vicuna | 7B | 3.8GB | ollama run vicuna |
| LLaVA | 7B | 4.5GB | ollama run llava |
| Gemma | 2B | 1.4GB | ollama run gemma:2b |
| Gemma | 7B | 4.8GB | ollama run gemma:7b |
To download a model, issue the ollama run command.
For example to run llama2, I issue
baldacchino_admin@Shanes-MacBook-Pro ~ % ollama run llama2
pulling manifest
pulling 8934d96d3f08... 100% ▕████████████████▏ 3.8 GB
pulling 8c17c2ebb0ea... 100% ▕████████████████▏ 7.0 KB
pulling 7c23fb36d801... 100% ▕████████████████▏ 4.8 KB
pulling 2e0493f67d0c... 100% ▕████████████████▏   59 B
pulling fa304d675061... 100% ▕████████████████▏   91 B
pulling 42ba7f8a01dd... 100% ▕████████████████▏  557 B
verifying sha256 digest
writing manifest
removing any unused layers
success
>>> Send a message (/? for help)
Ollama will now start automatically the model you have selected to run, this will persist on boot.
Continue – Configuring AutoComplete
We need to go back to the configuration of Continue in VSCode. Open up the JSON configuration file and scroll to the bottom to which you will see the ‘tabAutocompleteModel‘ brace. Enter in the provider as ollama, the model needs to match the model in the table above, and I suggest you use the model name as the title.
"tabAutocompleteModel": {
    "title": "codellama 7b",
    "provider": "ollama",
    "model": "codellama-7b"
  }
Congratulations you have just configured Continue, LMStudio and Ollama, so what can you do?
Let’s go for a lap around the features.
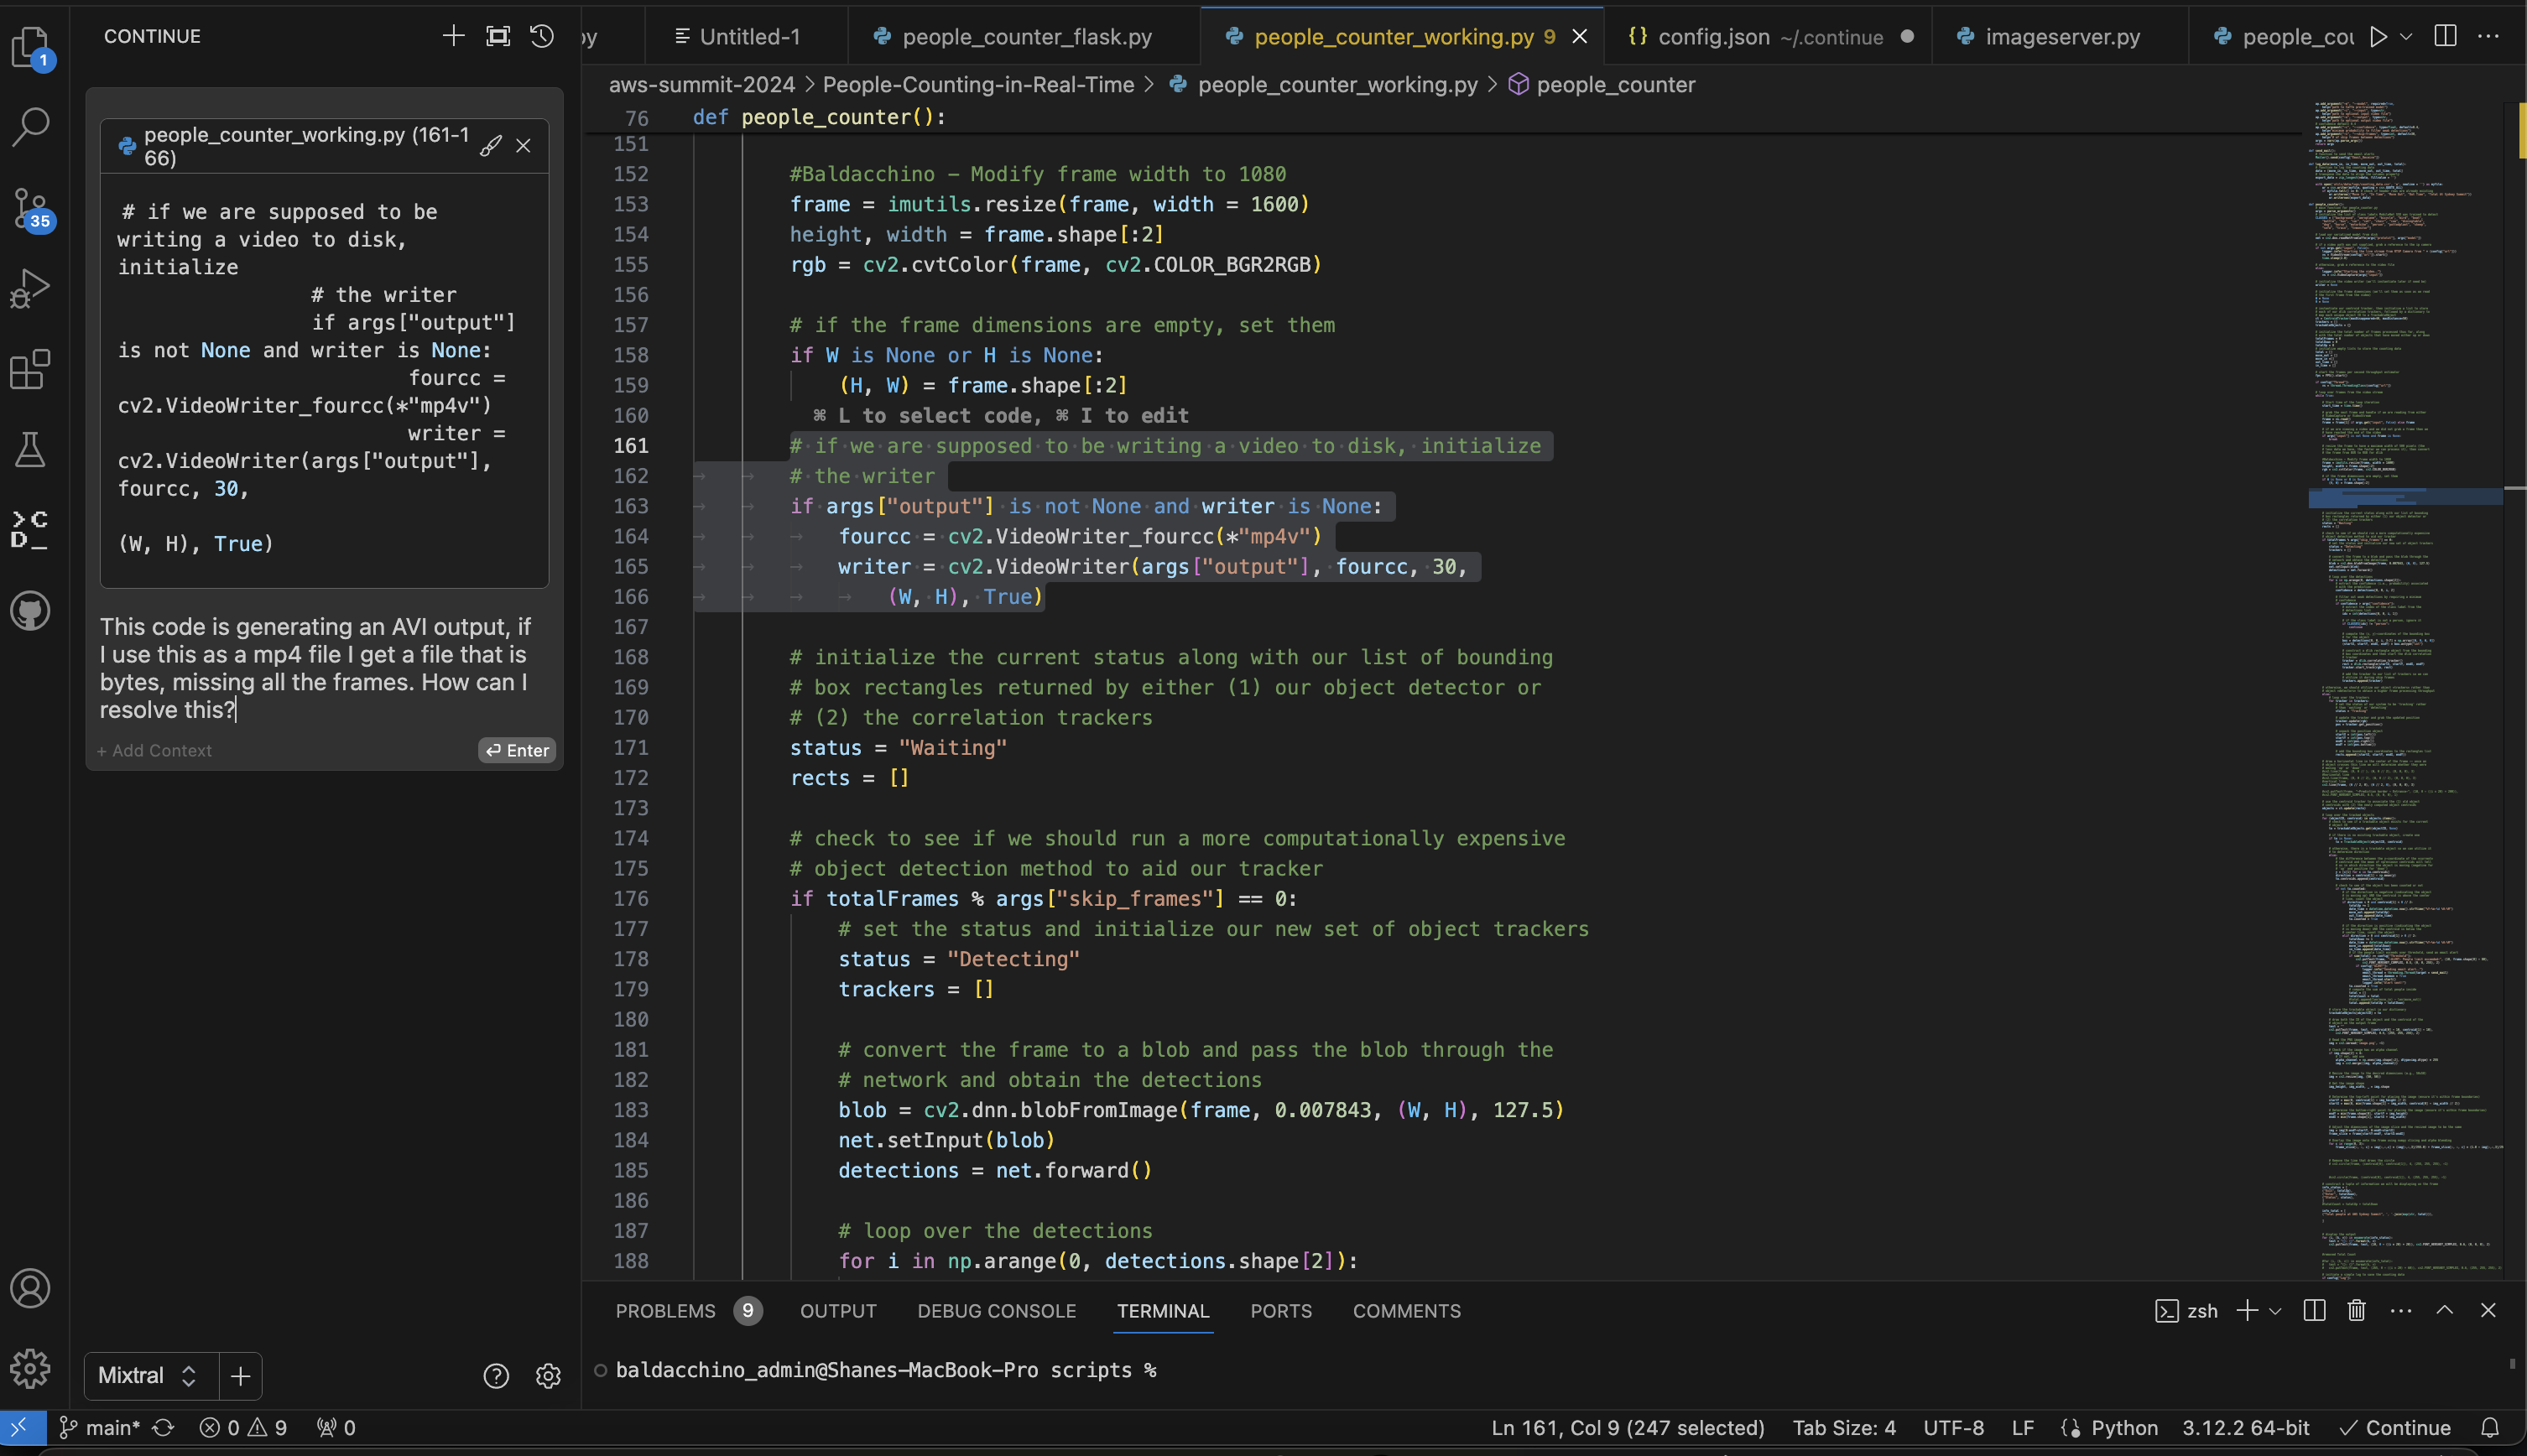
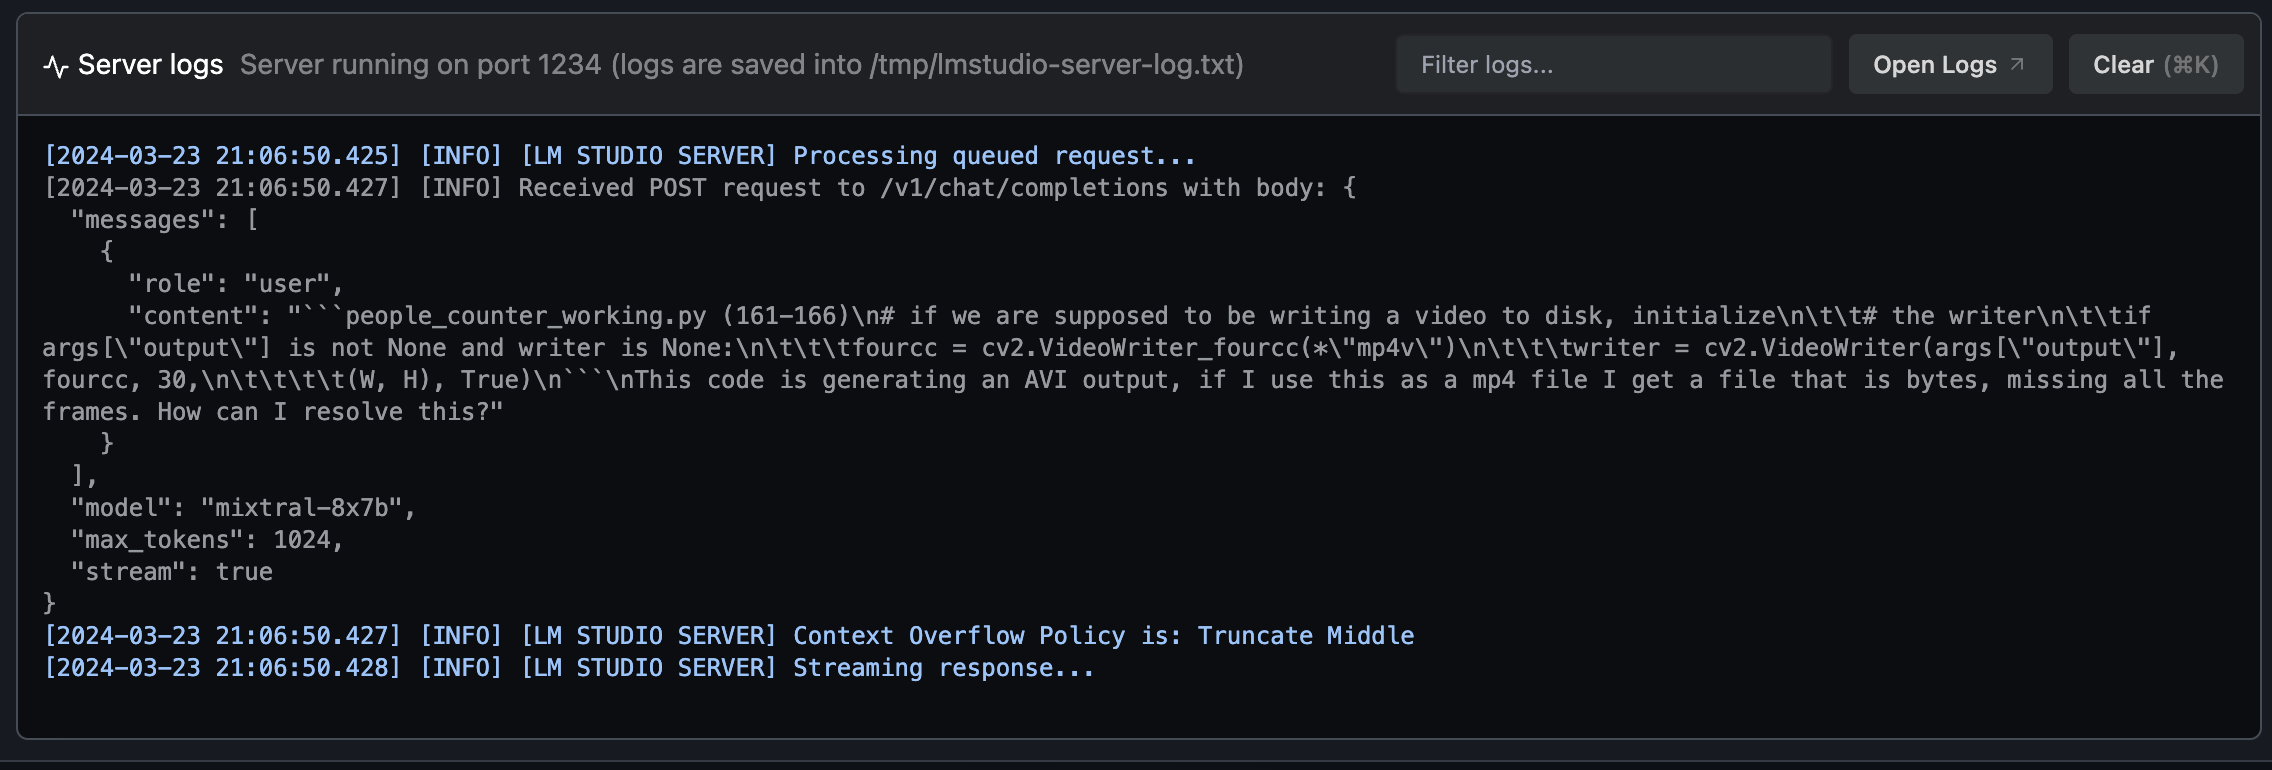
Adding Code To Context & Chatting With Code
Select a blog code, right click, select ‘Continue’ and add to context, this will shift the code block to the context on the left of the screen allowing you to chat with you code.

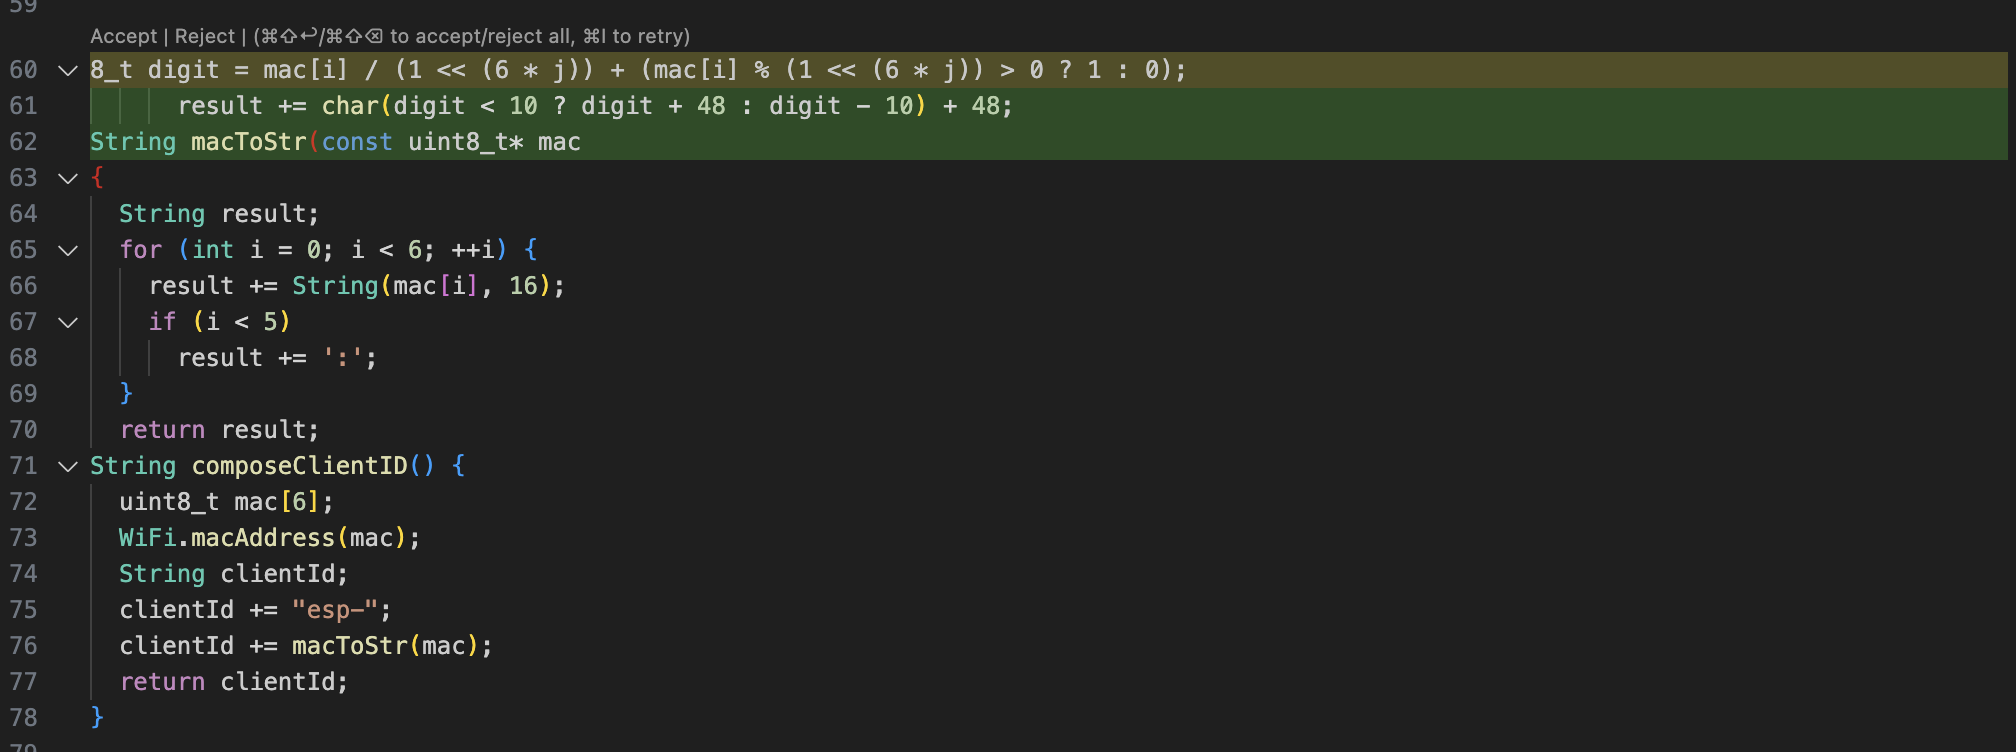
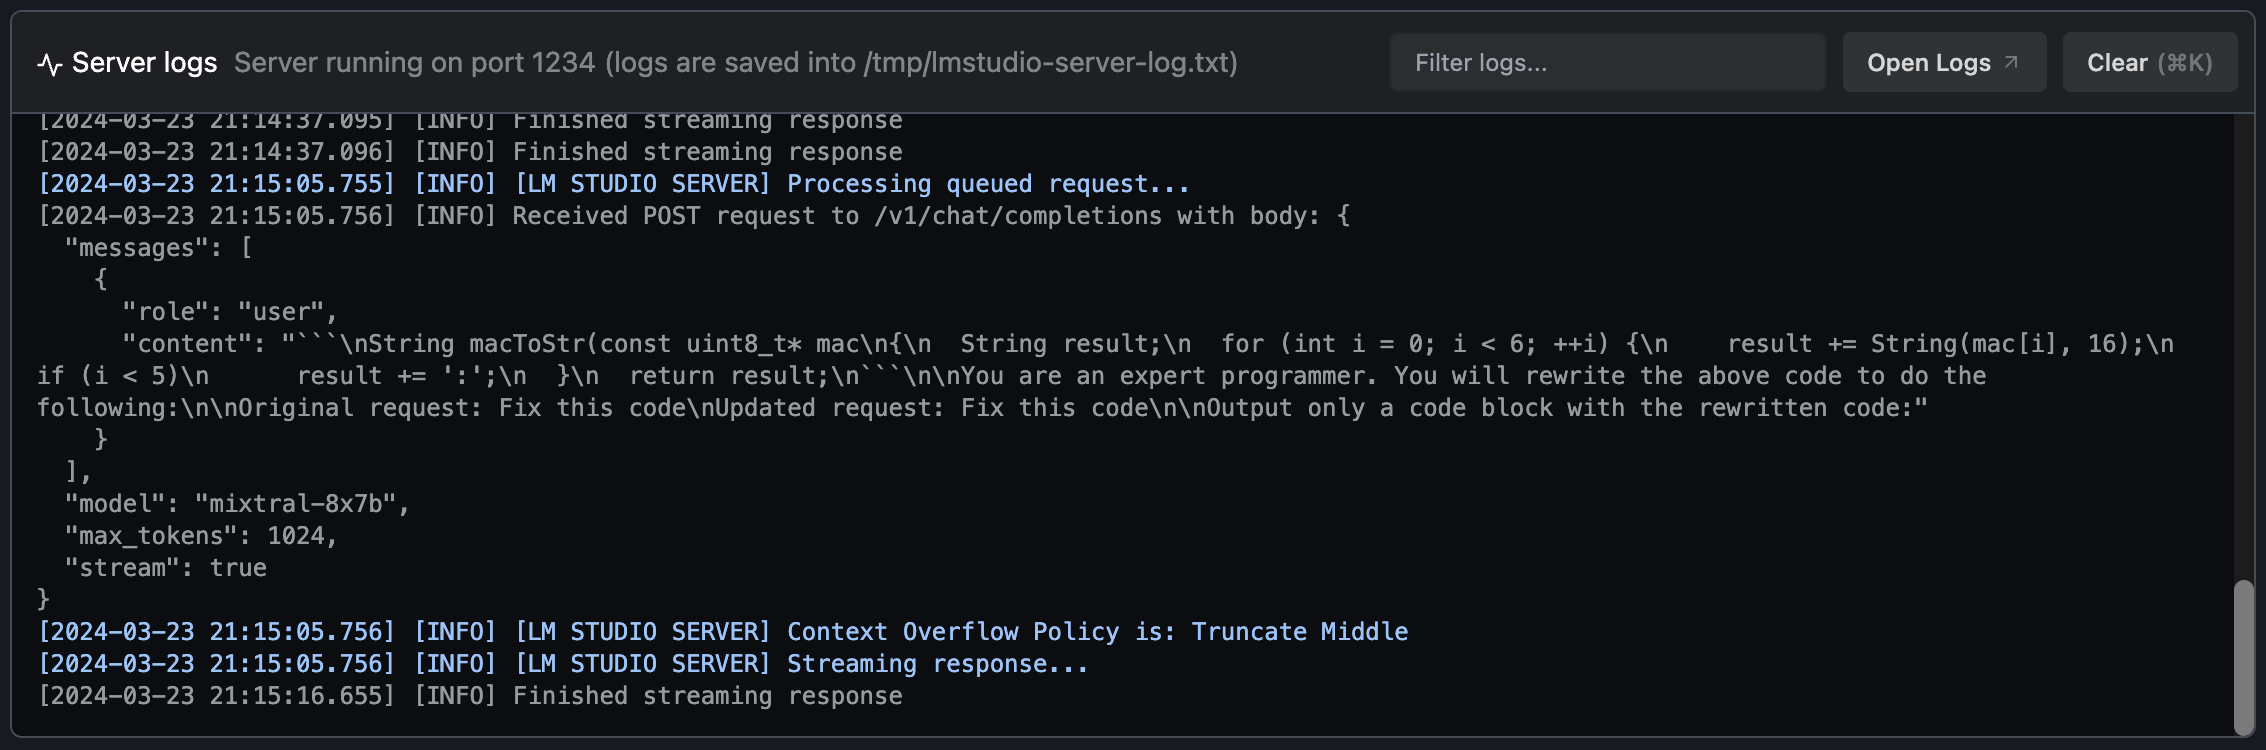
Fix This Code
Select the code, right click, select ‘Continue’ and ‘Fix this code’. This will send your code to LM Studio and you will be able to ‘accept or reject’.
Comment On / DocString My Code
Select the code, right click, select ‘Continue’ and either Comment or DocString. I find this really handy to describe code I haven’t written especially when I don’t understand the code base.


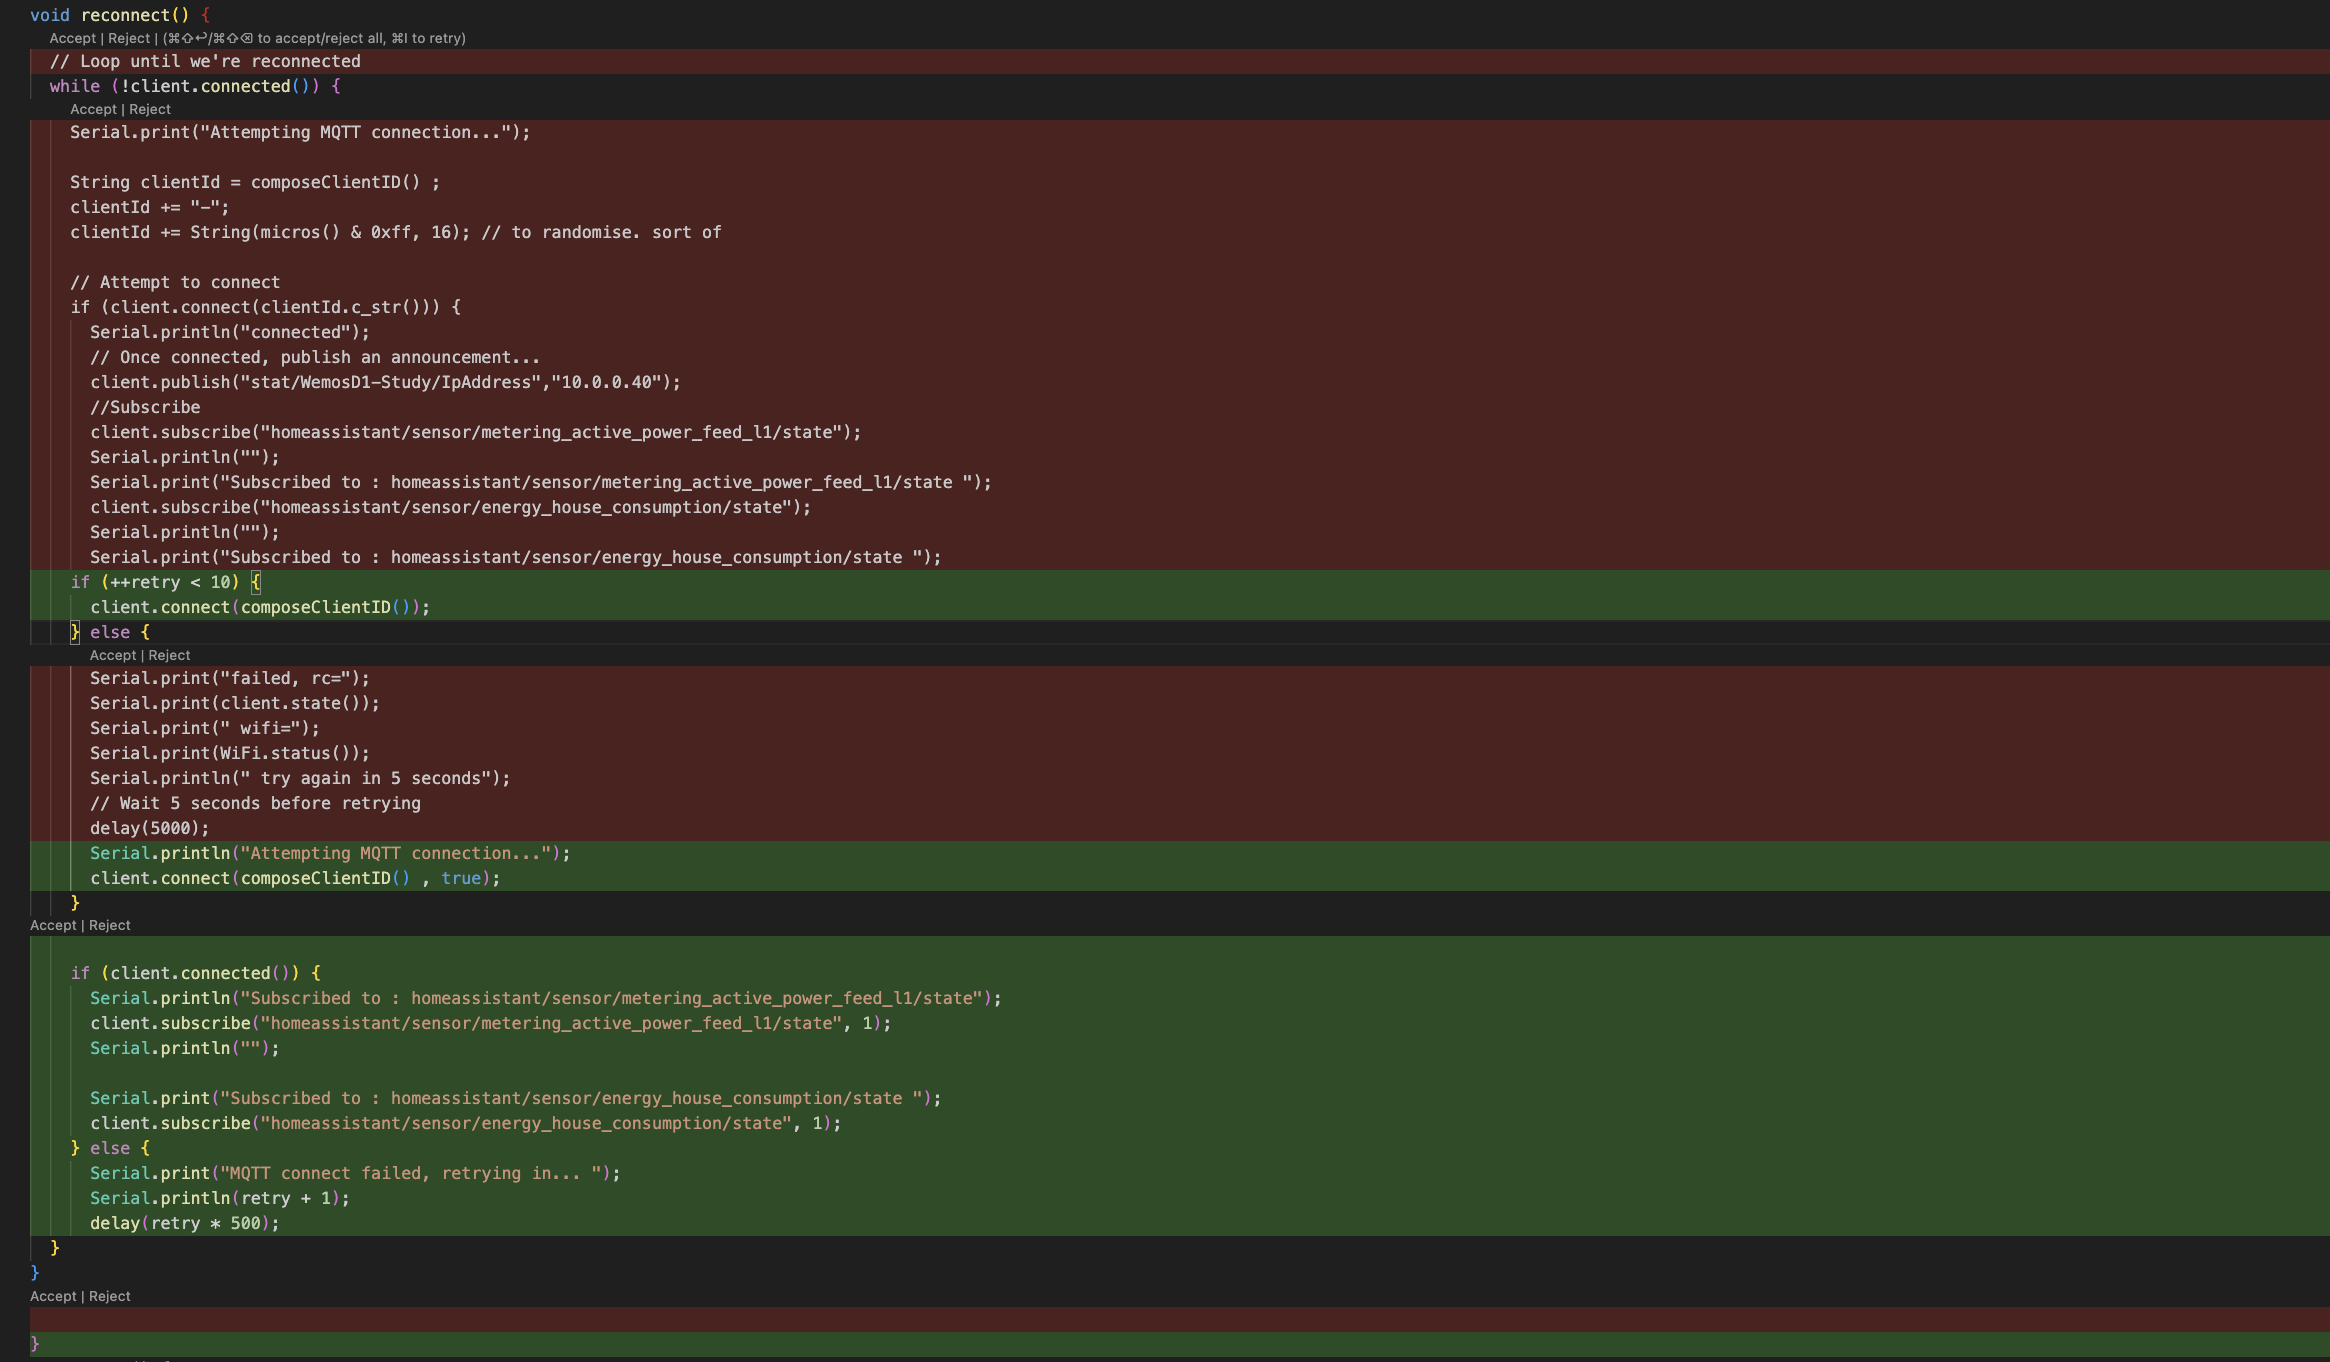
Optimise This Code
Select the code, right click, select ‘Continue’, and select Optimise this code. Much of my code I know is not perfect, I enjoy this function which makes my code cleaner, and I learn a trick of two.
Tab Autocomplete
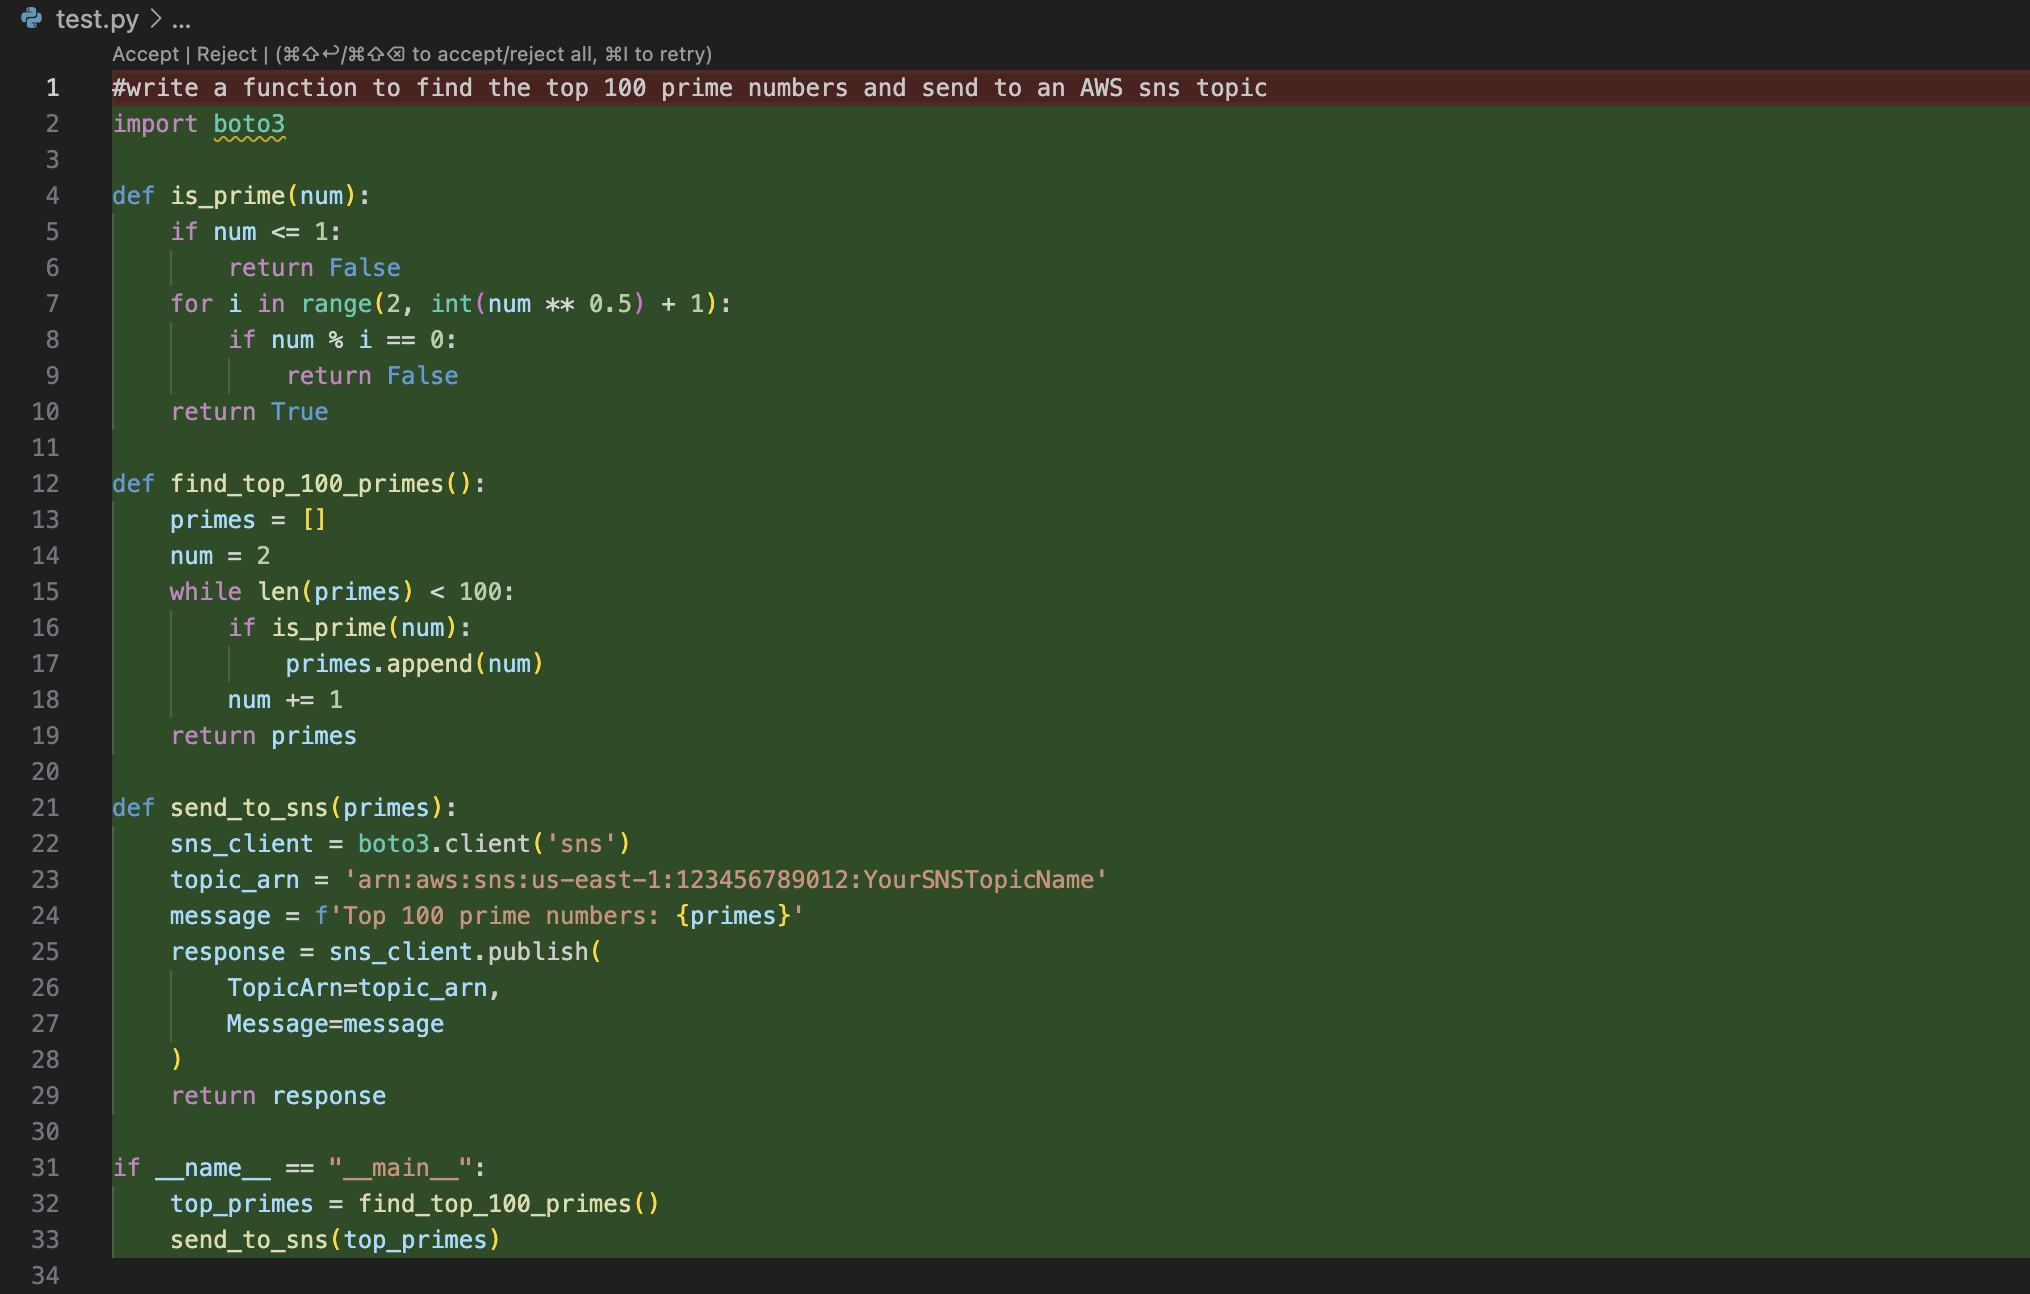
Simply start typing a comment and hit tab. This is perfect if you are adding a function or starting from scratch. It enables you to quickly get a boiler plate up and running of your solution.
How Good Is This Setup? – Lets Perform A Quick Test?
I have been using this setup for a week now and am blown away. My baseline, is being a user of GitHub CoPilot for the past 6 months, is it better than GitHub Co Pilot? Well that depends. This setup allows you to use specialist models that are designed for a given task, for example Wizard Coder Python is a model designed purely for Python coding.

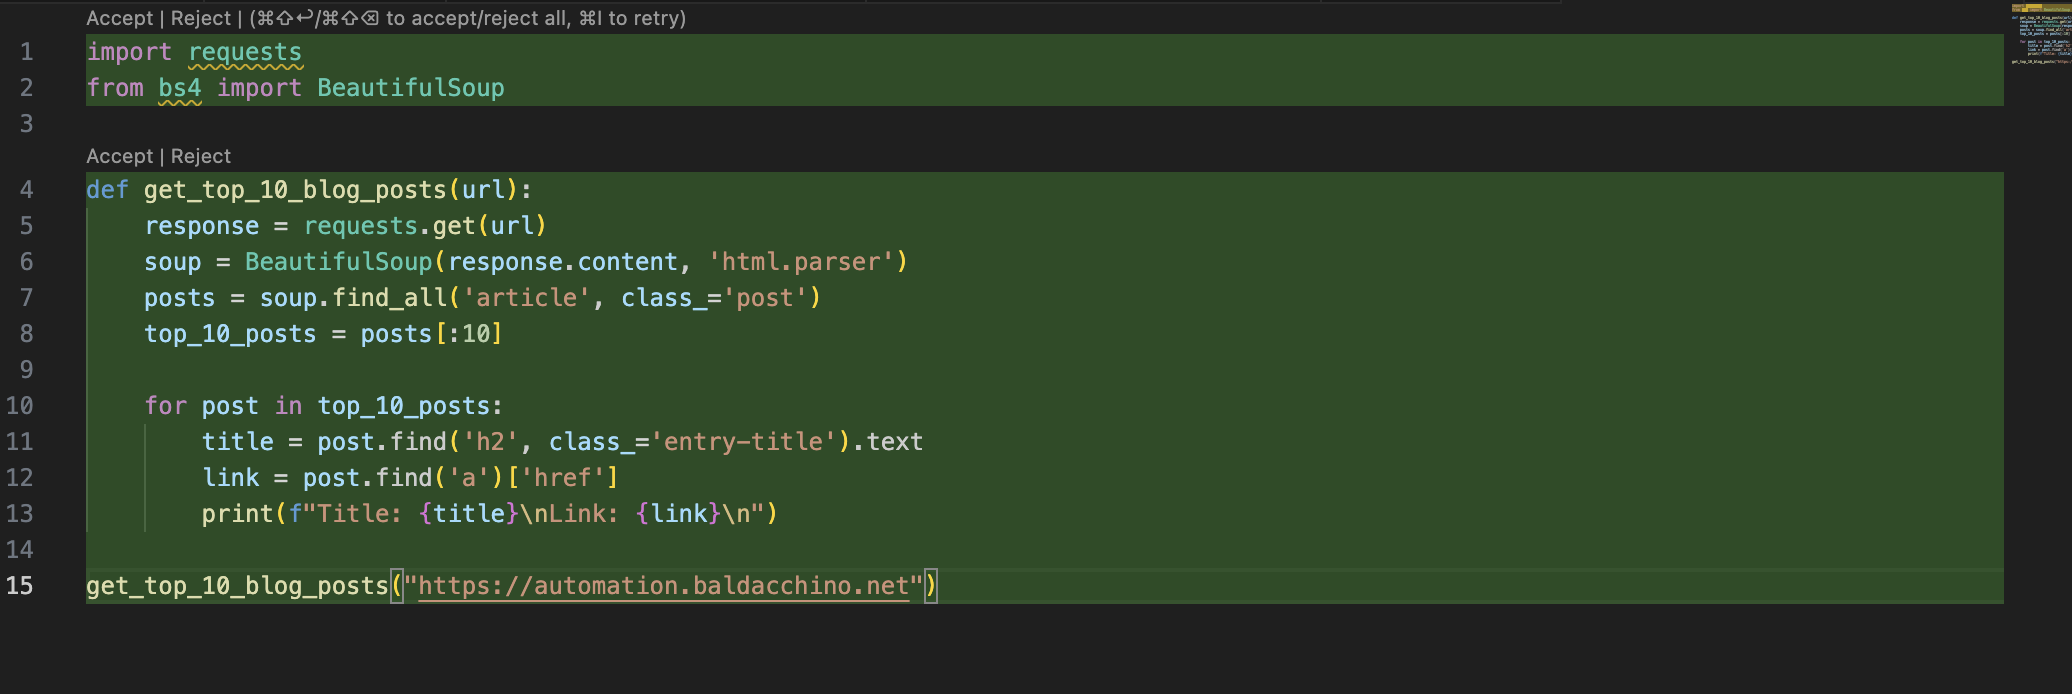
I am going to put this solution through its paces. I am going to ask LMStudio running Wizard Coder Python to “write a python program to parse the WordPress website https://automation.baldacchino.net and return the top 10 blog post, display the links and titles“.
Here is what is replied with, and as someone who codes in Python, it looks on the money. It is using Beautiful Soup (BS4) and requests.
import requests
from bs4 import BeautifulSoup

def get_top_10_blog_posts(url):
    response = requests.get(url)
    soup = BeautifulSoup(response.content, 'html.parser')
    posts = soup.find_all('article', class_='post')
    top_10_posts = posts[:10]

    for post in top_10_posts:
        title = post.find('h2', class_='entry-title').text
        link = post.find('a')['href']
        print(f"Title: {title}\nLink: {link}\n")

get_top_10_blog_posts("https://automation.baldacchino.net")
But does this generated code actually compile, and work? Thats the real test.
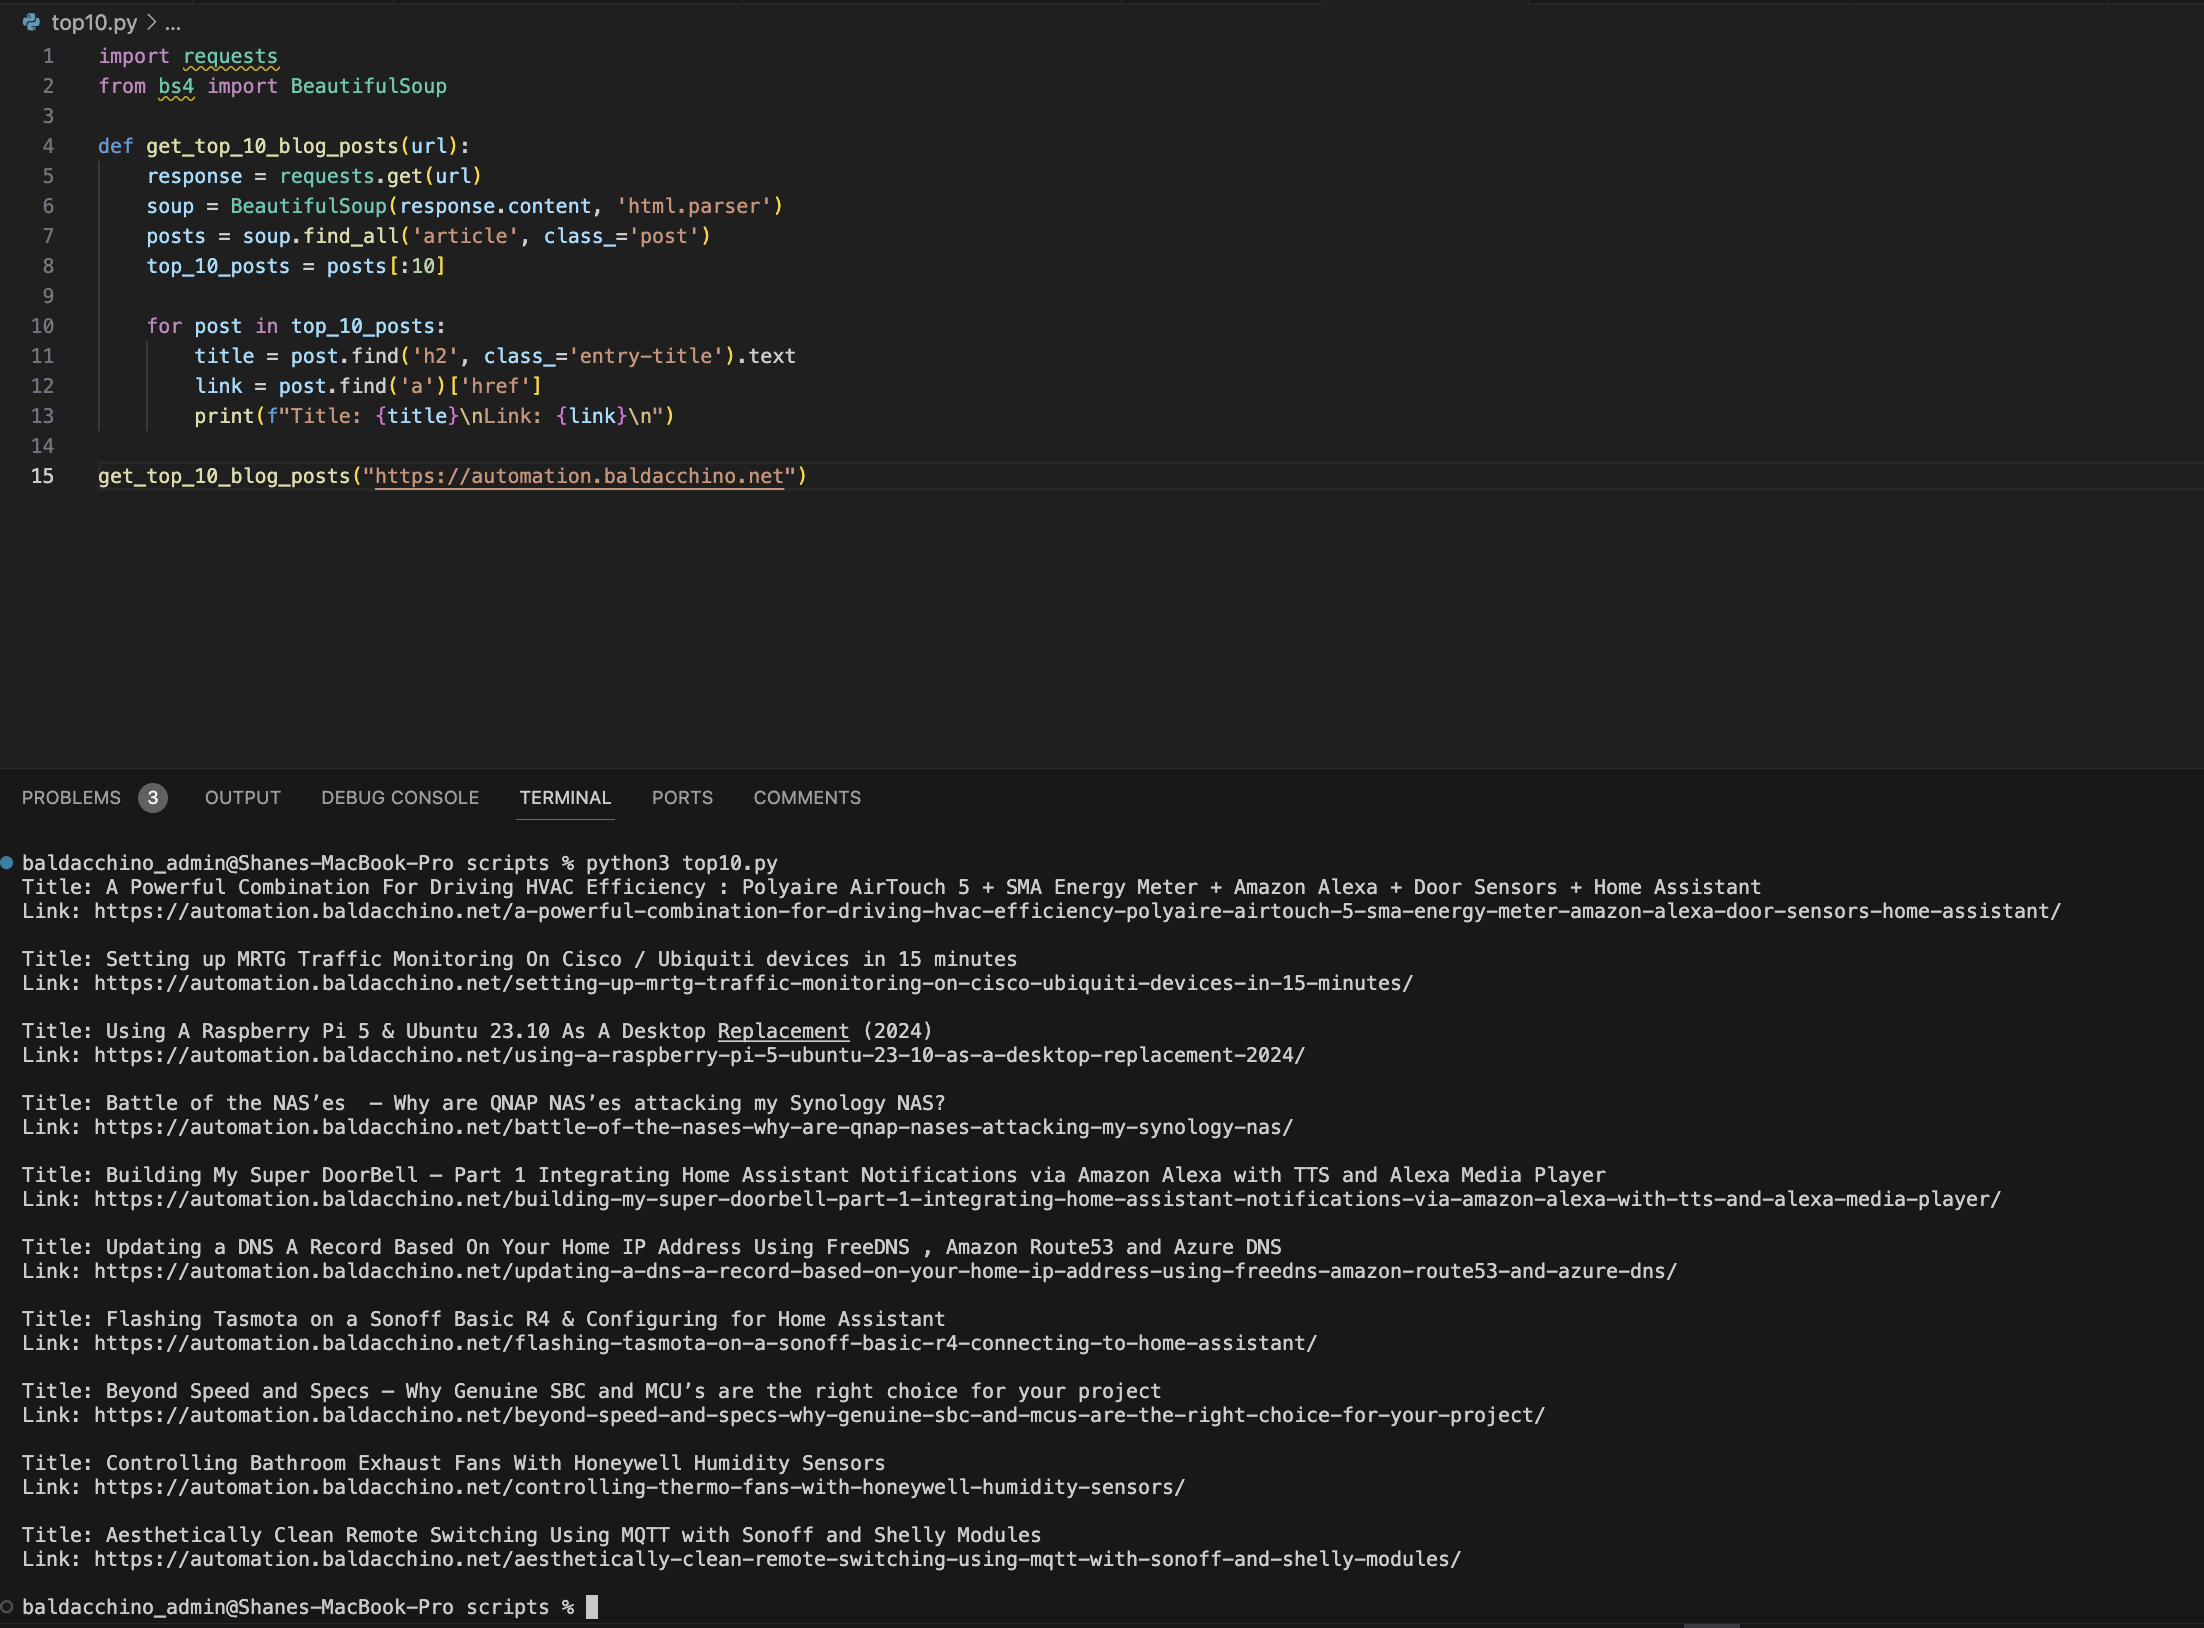
It did, first time without an issue (granted you will need to have these packages Python packages pre-installed)
baldacchino_admin@Shanes-MacBook-Pro scripts % python3 top10.py
Title: A Powerful Combination For Driving HVAC Efficiency : Polyaire AirTouch 5 + SMA Energy Meter + Amazon Alexa + Door Sensors + Home Assistant
Link: https://automation.baldacchino.net/a-powerful-combination-for-driving-hvac-efficiency-polyaire-airtouch-5-sma-energy-meter-amazon-alexa-door-sensors-home-assistant/

Title: Setting up MRTG Traffic Monitoring On Cisco / Ubiquiti devices in 15 minutes
Link: https://automation.baldacchino.net/setting-up-mrtg-traffic-monitoring-on-cisco-ubiquiti-devices-in-15-minutes/

Title: Using A Raspberry Pi 5 & Ubuntu 23.10 As A Desktop Replacement (2024)
Link: https://automation.baldacchino.net/using-a-raspberry-pi-5-ubuntu-23-10-as-a-desktop-replacement-2024/

Title: Battle of the NAS’es  – Why are QNAP NAS’es attacking my Synology NAS?
Link: https://automation.baldacchino.net/battle-of-the-nases-why-are-qnap-nases-attacking-my-synology-nas/

Title: Building My Super DoorBell – Part 1 Integrating Home Assistant Notifications via Amazon Alexa with TTS and Alexa Media Player
Link: https://automation.baldacchino.net/building-my-super-doorbell-part-1-integrating-home-assistant-notifications-via-amazon-alexa-with-tts-and-alexa-media-player/

Title: Updating a DNS A Record Based On Your Home IP Address Using FreeDNS , Amazon Route53 and Azure DNS
Link: https://automation.baldacchino.net/updating-a-dns-a-record-based-on-your-home-ip-address-using-freedns-amazon-route53-and-azure-dns/

Title: Flashing Tasmota on a Sonoff Basic R4 & Configuring for Home Assistant
Link: https://automation.baldacchino.net/flashing-tasmota-on-a-sonoff-basic-r4-connecting-to-home-assistant/

Title: Beyond Speed and Specs – Why Genuine SBC and MCU’s are the right choice for your project
Link: https://automation.baldacchino.net/beyond-speed-and-specs-why-genuine-sbc-and-mcus-are-the-right-choice-for-your-project/

Title: Controlling Bathroom Exhaust Fans With Honeywell Humidity Sensors
Link: https://automation.baldacchino.net/controlling-thermo-fans-with-honeywell-humidity-sensors/

Title: Aesthetically Clean Remote Switching Using MQTT with Sonoff and Shelly Modules
Link: https://automation.baldacchino.net/aesthetically-clean-remote-switching-using-mqtt-with-sonoff-and-shelly-modules/
My Thoughts & Summary
Amazing, simple as that. All the power of ChatGPT and GitHub CoPilot sitting in my laptop! Not only is this free, but as I plan to travel interstate with work multiple times in the coming weeks, it means whilst flying I can still be productive. No internet, no worries, it is all local.
Unless you are concerned about IP infringement (a valid point), the benefits of the commercial GitHub Co Pilot are harder to justify, much of the value that GitHub CoPilot provides, is provided in this mixture of software, free of charge. The barrier to entry with Apple Silicon is lower than ever. Mac’s are common, $2500 + GPU’s in desktops, less common.
Back to functionality, we are just getting started. LLM’s are appearing every day, with their own unique value propositions. Whilst all LLM’s are by nature incredibly capable, the do still have their unique pros and cons.
This this approach allows me to sample whats good, whats bad. It is not a once size fits all approach. I have tested Python Wizard Coder, StarCoder2, Mistral, CodeLlama and Gemma and they all have their unique pros and cons. Whilst I dont have an extensive set of testing data, there are examples of this pattern performing better than GitHub Co Pilot, and it makes sense. One general model vs domain specific models.
As we look to decarbonise the world, play your part run your models locally or perhaps even on that EC2/Azure VM Instance (GPU based).
So where does this leave us? At $0 cost, the ability to leverage amazing models that you can run locally with no chance of data leakage of your PII data to feed future LLM’s. Short of navigating IP indemnity (which may or may not be a valid risk), the future of performing inference on LLM’s will be based on this open approach, where builders can can pick and choose and run, locally (Kubernetes etc).
Everyone is on their own journey, and whilst this may work for me, it may not work for you, if you are looking to reduce operational overhead, there is plenty of value in a hosted solution and depending on your capabilities and risk profile, it may be the way to go.
Builders build. 👊👊
Thanks
Shane Baldacchino