
In a prior post I discussed how you can connect a 1602 LCD screen via i2C to an Arduino compliant MCU, with the aid of MQTT and C++ to display metrics that matter.
But I realised, other than wanting to know the temperature and metrics around energy consumption there was another key piece of information I am missing out on.
Are you like me, always wondering when your next meeting is? Sure, I can check my phone or Outlook, but wouldn’t it be convenient if this was always displayed on a screen that is in my line of site underneath my monitor bezel.

Never content with the status quo, but more so, wanting to learn more about SPI, i2C and LCD screens I thought, how could I leverage this desire as a learning opportunity to take this to the next level.
Disclaimer for this solution. There is no-doubt a more effective way to accomplish what I have created. My solution uses PowerShell, plus Python in order to parse my calendar and send my meetings over MQTT. This is a polyglot solution and I do this because I am more familiar with Python than PowerShell. I assumed the path of least resistance for reading from Outlook would be PowerShell, and the path to MQTT would be better solved with Python. This could how ever be simplified to be a single PowerShell or Python script.
In this post I will illustrate how to
– Use PowerShell to read your Outlook Calendar
– Use Python to deem upcoming meetings in the next 2 hours in your calendar
– Create Non-Blocking C++ Code to display your meeting
This post makes the following two assumptions.
- Your 1602LCD is up and working. If you haven’t got this sorted out, see this post where I walk you through the process.
- The computer you run this script on has Microsoft Outlook installed and your profile is configured with the calendar you wish to parse.
- You already have a MQTT broker (example Mosquito in place and you are familiar with MQTT constructs.
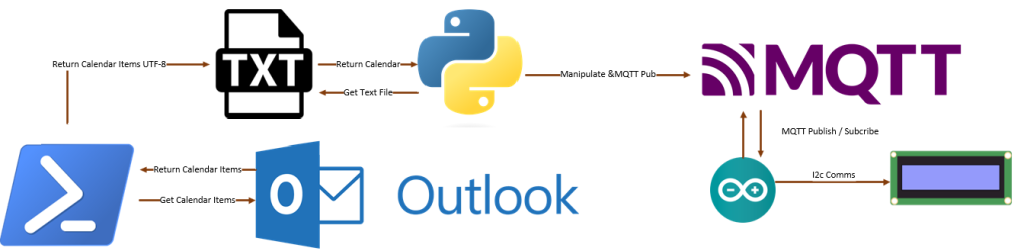
The process of displaying your next Outlook meeting on this screen has the follow key steps, and again you could remove the Python step and refactor this into a single script
- Scheduled Task (schtasks) to execute your code on your schedule (every 30 minutes works fine for me)
- PowerShell to parse your Outlook calendar and generate an output file with meetings for the day.
- Python to parse the generated output file. This script will need to deem the next meeting and then publish a MQTT message stating when the next meeting is.
- An Arduino sketch to subscribe to the topic and display your next Outlook meeting in a non-blocking method via i2C
Reading Calendar Items From Outlook
PowerShell is used to read from Outlook, for the main reason that whilst you could use other languages, the support for Outlook in PowerShell is rich with plenty of examples. It may be possible to do this in other languages such as Python, but examples are few and far apart (this looks like it may work – https://pythoninoffice.com/get-outlook-calendar-meeting-data-using-python). I look to always use the path of least resistance. This is a polyglot solution, and it is possible to simplify in to one script.
This code using a COM object, to speak to the MAPI namespace. The output is then piped into a text file.
# Get a list of meetings occurring today.

	$olFolderCalendar = 9
	$ol = New-Object -ComObject Outlook.Application
	$ns = $ol.GetNamespace('MAPI')
	$Start = (Get-Date).ToShortDateString()
	$End =  (Get-Date).ToShortDateString()
	$Filter = "[MessageClass]='IPM.Appointment' AND [Start] > '$Start' AND [End] < '$End'"
	$appointments = $ns.GetDefaultFolder($olFolderCalendar).Items
	$appointments.IncludeRecurrences = $true
	$appointments.Restrict($Filter) |
	% {
		if ($_.IsRecurring -ne $true) {
			# send the meeting down the pipeline
			$_;
		} else {
			#"RECURRING... see if it occurs today?"
			try {
				# This will throw an exception if it's not on today. (Note how we combine today's *date* with the start *time* of the meeting)
				$_.GetRecurrencePattern().GetOccurrence( ((Get-Date).ToString("yyyy-MM-dd") + " " + $_.Start.ToString("HH:mm")) )
				# but if it is on today, it will send today's occurrence down the pipeline.
			}
			catch
			{
				#"Not today"
			}
		}
	} | sort -property Start | % {
        ($_.Start.ToString("HH:mm") + "," + $_.Subject.ToUpper())
	}
Worth noting, you must use a UTF8 encoding to ensure malformed characters to do not appear in the output file that is to be parsed by our Python script.
powershell outlook2mqtt.ps1 | Out-File -FilePath "output.txt" -Encoding UTF8
Parsing the Python Output
The PowerShell script generated a text file, ‘output.txt’. Output.txt contains of all our meetings of the current day (Time and Subject). But what is the next meeting we need to be notified of?
We need to answer this question and publish this meeting to our MQTT broker, which will then be consumed by our MCU controlling our 1602 LCD screen.
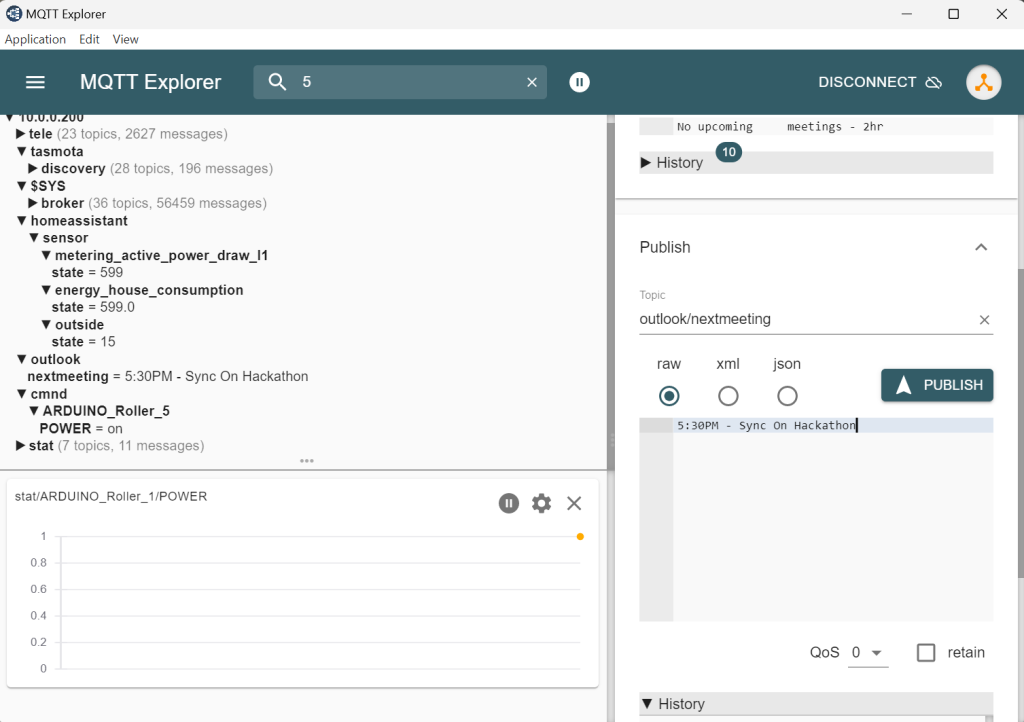
This python code parses the output file. It evaluates line by line against the current hour and next hour. As long as meeting is not CANCELLED a string is built in the format of ‘Time – Meeting’, and if there is more than one meeting, the string is built out with a separator of “|”. If there is a meeting, this is published to the MQTT topic of “outlook/nextmeeting” otherwise a string stating no meetings in the next 2 hours is published.
Modify your MQTT broker FQDN (Fully Qualified Domain Name) as you see fit.
#.\outlook2mqtt.ps1 | Out-File -FilePath "output.txt" -Encoding UTF8
import paho.mqtt.client as mqtt

# Define MQTT broker connection details
broker_address = "Your MQTT Broker FQDN"
broker_port = 1883

meeting = ""
topic = "outlook/nextmeeting"

from datetime import datetime

current_time = datetime.now()
current_hour = current_time.hour
current_minute = current_time.minute

#print(f"Current Hour: {current_hour}")

with open('output.txt', 'r', encoding='utf-8') as file:
    for line in file:
        parts = line.strip().split(',')
        if len(parts) >= 2:
            hour = parts[0].strip('ÿþ')
            text = parts[1].strip()
            if hour[:2] == str(current_hour) and hour[3:5] > str(current_minute) and "CANCELED" not in text:
                print(f"{hour}, {text}")
                if len(meeting) > 1:
                    meeting = meeting + " | " + hour + "-" + text
                    print(f"{hour}, {text}")
                else:
                    meeting = hour + "-" + text
                    print(f"{hour}, {text}")
            elif hour[:2] == str(current_hour+1) and "CANCELED" not in text:
                if len(meeting) > 1:
                    meeting = meeting + " | " + hour + "-" + text
                    print(f"{hour}, {text}")
                else:
                    meeting = hour + "-" + text
                    print(f"{hour}, {text}")
                    meeting = hour + "-" + text

# Create MQTT client
client = mqtt.Client()
# Connect to MQTT broker
client.connect(broker_address, broker_port)

if len(meeting) > 3:
    client.publish(topic, meeting)
else:
    client.publish(topic, "No upcoming     meetings - 2hr")
# Disconnect from MQTT broker
client.disconnect()
Displaying Our Next Meeting On Our Screen – C++ Code
Displaying a long text string poses a few challenges. It’s not as easy as displaying a single character. Whereas power consumption metrics and temperatures are integers, these can be long text strings, 255 characters plus.
There is 2 distinct challenges.
Challenge 1 – Blocking
If you are an old hat at MCU’s, you will know the importance of writing non-blocking code. Any time the MCU is in a delay state, everything else stops. This means, using delays for text scrolling of long strings is not an option. I did try this, but it made the solution unreliable.
For example, in this example I have my next meeting being displayed every 25 seconds. If we assume the meeting title(s) results in a 50-character string, it will result in missing MQTT messages due to delays. I was using a 250ms delay per character to scroll. 250ms delay x 50 characters is 12.5 seconds. That is a whopping 50% of the time and simply unacceptable.
We need to do this is a non-blocking manner, we need to use the millis() command. This allows us to display our strings, ensuring on the screen for set periods of time, so that we can read them, and at the same time ensuring we don’t halt the MCU from receiving MQTT messages.
In Arduino programming, the millis() function is a built-in function that returns the number of milliseconds that have passed since the Arduino board started running. It is often used for timing and implementing delays without blocking the execution of other tasks.
Here’s how millis() works in Arduino:
millis() is based on a hardware timer or interrupt that increments a counter approximately every 1 millisecond.
It returns an unsigned long integer value representing the elapsed time in milliseconds.
The value returned by millis() keep increasing as time passes, and it will continue to increase even after it reaches its maximum value (2^32 – 1) by wrapping around back to zero.
Here’s a simple example to demonstrate the usage of millis() in Arduino:
void setup() {
  Serial.begin(9600);  // Initialize the serial communication at 9600 bps
}

void loop() {
  unsigned long currentMillis = millis();  // Get the current time in milliseconds

  // Print the current time every second
  if (currentMillis % 1000 == 0) {
    Serial.println(currentMillis);
  }
}
In this example, millis() is used to obtain the current time in milliseconds. The code checks if the current time is divisible by 1000 (indicating a one-second interval) and then prints the current time using the Serial.println() function.
Using millis(), you can implement time-based operations, such as creating delays or scheduling events, without blocking the program’s execution. By comparing the current time with previously recorded values of millis(), you can determine if a specific time duration has passed and trigger actions accordingly.
Remember that the value returned by millis() will continue to increase until it reaches its maximum and then restart from zero.
Thats the first problem. The second is problem is our 1602 screen.
Challenge 2 – 16 characters x 2 lines
As a refresher our 1602 screen has 2 lines of 16 characters. The problem with that is you have 32 characters to play with, how do you split up a long string that is more than 32 characters long? We need to chunk this up and divide our string in to blocks of 32 characters.
But if you divide a string by 32 (characters), you end up with uneven numbers. Enter the ceil() function. Until this post I had not used ceil() before. I would usually use round, but the problem with round is, it will round to the nearest integer. That is not going to work here, because any rounding down will result in lost characters.
In Arduino, the ceil() function is a mathematical function that is used to round a floating-point number up to the nearest integer. The term “ceil” stands for “ceiling,” which refers to the mathematical concept of rounding up.
The ceil() function takes a single argument, which is the floating-point number you want to round up. It returns an integer value that is greater than or equal to the original number. Here’s the syntax of the ceil() function:
double number = 3.14;
int roundedNumber = ceil(number);
In this example, the variable number has a value of 3.14 (pi). By using the ceil() function, we round up this value to the nearest integer, which results in roundedNumber being assigned a value of 4.
Challenges solved, specific, to this sketch, in order to obtain our next meeting, we need to add the following snippets of code (the full code sample is below):
void loop() {
   if (MQTTTopic == "outlook/nextmeeting") {
    outlook_nextmeeting = MQTTPayload;
  }

  int outlook_nextmeeting_length = outlook_nextmeeting.length();

  if ( millis() - lastOutlook > 35000) {
    lcd.clear();
    lastOutlook = millis();
    if (outlook_nextmeeting.length() > 16) {
        int numParts = ceil(outlook_nextmeeting.length() / 16.0);  // Calculate the number of parts
        String parts[numParts];  // Create an array to store the parts
        // Split the string into parts
        for (int i = 0; i < numParts; i++) {
          int startIdx = i * 16;
          int endIdx = startIdx + 16;
          parts[i] = outlook_nextmeeting.substring(startIdx, endIdx);
        }

        // Display each part on the LCD
        for (int i = 0; i < numParts; i++) {
          lcd.clear();  // Clear the LCD screen

          // Display the first part on line 0 and the second part on line 1
            lcd.setCursor(0, 0);  // Set the cursor to line 0
            lcd.print(parts[i]);  // Display the current part on line 0
            lcd.setCursor(0, 1);  // Set the cursor to line 1
            if ((i+1) < numParts) { // Need to check we are not out of bounds
              lcd.print(parts[i+1]);  // Display the current part on line 1
            }
          i=i+1;

          delay(2000);  // Delay for 2 seconds before displaying the next part
        }
      }
    lcd.clear();
  }
}
Thats what I added to make the Outlook function work, the entire sketch is below. Note this sketch does more than just drive the 1602 LCD screen but you should be able to easily cut out what you need to make this work.
For the keen eyed, you will notice I am blocking 2 seconds of every 35 seconds, it’s not great but something I can live with. This could be refactored, but at this frequency I have not found any adverse issues.
#include <PubSubClient.h>
#include <ESP8266WiFi.h>
#include <LiquidCrystal_I2C.h>
LiquidCrystal_I2C lcd(0x27,16,2);

int feed_in_red_light_pin= 1;
int feed_in_green_light_pin = 3;
int feed_in_blue_light_pin = 0;
int consumption_red_light_pin= 2;
int consumption_green_light_pin = 12;
int consumption_blue_light_pin = 15;
const char* ssid = "Your SSID";
const char* pswd = "Your SSID Password";
const char* mqtt_server = "Your MQTT Broker FQDN";
int totalColumns = 16;
int totalRows = 2;

String MQTTTopic;
String MQTTPayload;
String IPAddress;
String MQTTPayloadLength;
String downstairs_c;
String outside_c;
String feedin_w;
String griddraw_w;
String usage_w;
String consumption_w;
String outlook_nextmeeting;
WiFiClient espClient;
PubSubClient client(espClient);
long lastTemp = 0;
long lastOutlook = 0;
int value = 0;

int status = WL_IDLE_STATUS;     // the starting Wifi radio's status

void setup_wifi() {
  delay(10);
  // We start by connecting to a WiFi network
  Serial.println();
  Serial.print("Connecting to ");
  Serial.println(ssid);
  WiFi.begin(ssid, pswd);
  while (WiFi.status() != WL_CONNECTED) {
    delay(500);
    Serial.print(".");
  }
  Serial.println("");
  Serial.println("WiFi connected");
  Serial.println("IP address: ");
  Serial.println(WiFi.localIP());
}

void callback(char* topic, byte* payload, unsigned int length) {
  MQTTTopic = String(topic);
  MQTTPayload = "";
  Serial.println("T [" + MQTTTopic +"]");
  for (int i = 0; i < length; i++) {
    MQTTPayload = String(MQTTPayload + (char)payload[i]);
  }
  Serial.println("P [" + MQTTPayload + "]");
}
String macToStr(const uint8_t* mac)
{
  String result;
  for (int i = 0; i < 6; ++i) {
    result += String(mac[i], 16);
    if (i < 5)
      result += ':';
  }
  return result;
}
String composeClientID() {
  uint8_t mac[6];
  WiFi.macAddress(mac);
  String clientId;
  clientId += "esp-";
  clientId += macToStr(mac);
  return clientId;
}

void reconnect() {
  // Loop until we're reconnected
  while (!client.connected()) {
    Serial.print("Attempting MQTT connection...");
    String clientId = composeClientID() ;
    clientId += "-";
    clientId += String(micros() & 0xff, 16); // to randomise. sort of

    // Attempt to connect
    if (client.connect(clientId.c_str())) {
      Serial.println("connected");
      // Once connected, publish an announcement...
      client.publish("stat/WemosD1-Study/IpAddress","10.0.0.40");
      //Subscribe
      client.subscribe("homeassistant/sensor/metering_active_power_feed_l1/state");
      Serial.println("");
      Serial.print("Subscribed to : homeassistant/sensor/metering_active_power_feed_l1/state ");
      client.subscribe("homeassistant/sensor/energy_house_consumption/state");
      Serial.println("");
      Serial.print("Subscribed to : homeassistant/sensor/energy_house_consumption/state ");
      client.subscribe("homeassistant/sensor/downstairs/state");
      Serial.println("");
      Serial.print("Subscribed to : homeassistant/sensor/downstairs/state ");
      client.subscribe("homeassistant/sensor/outside/state");
      Serial.println("");
      Serial.print("Subscribed to : homeassistant/sensor/outside/state ");
      client.subscribe("homeassistant/sensor/metering_active_power_draw_l1/state");
      Serial.println("");
      Serial.print("Subscribed to : homeassistant/sensor/metering_active_power_draw_l1/state ");
      client.subscribe("outlook/nextmeeting");
      Serial.println("");
      Serial.print("Subscribed to : outlook/nextmeeting ");

    } else {
      Serial.print("failed, rc=");
      Serial.print(client.state());
      Serial.print(" wifi=");
      Serial.print(WiFi.status());
      Serial.println(" try again in 5 seconds");
      // Wait 5 seconds before retrying
      delay(5000);
    }
  }
}

void setup() {
  lcd.init();
  lcd.clear();
  lcd.backlight();
  Serial.begin(9600);
  setup_wifi();
  client.setServer(mqtt_server, 1883);
  client.setCallback(callback);
  pinMode(feed_in_red_light_pin, OUTPUT);
  pinMode(feed_in_green_light_pin, OUTPUT);
  pinMode(feed_in_blue_light_pin, OUTPUT);
}

void loop() {
  // confirm still connected to mqtt server
  if (!client.connected()) {
    reconnect();
  }
  client.loop();

  if (MQTTTopic == "homeassistant/sensor/outside/state") {
    outside_c = MQTTPayload;
  }
  if (MQTTTopic == "homeassistant/sensor/downstairs/state") {
    downstairs_c = MQTTPayload;
  }
   if (MQTTTopic == "outlook/nextmeeting") {
    outlook_nextmeeting = MQTTPayload;
  }
  if (MQTTTopic == "homeassistant/sensor/metering_active_power_feed_l1/state") {
    feedin_w = MQTTPayload;
  }
  if ((feedin_w.toInt() == 0) && (MQTTTopic == "homeassistant/sensor/metering_active_power_draw_l1/state")) {
    griddraw_w = MQTTPayload;
  }
  if (MQTTTopic == "homeassistant/sensor/energy_house_consumption/state") {
    usage_w = MQTTPayload.toInt();
  }
  int outlook_nextmeeting_length = outlook_nextmeeting.length();
  if ( millis() - lastTemp > 10000) {
    lcd.setCursor(0,0);
    lcd.print("Downstairs - " + downstairs_c + "C    ");
    lcd.setCursor(0,1);
    lcd.print("Outside - " + outside_c + "C    ");
    lastTemp = millis();
    delay(2000);
    lcd.clear();
  }

  if ( millis() - lastOutlook > 25000) {
    lcd.clear();
    lastOutlook = millis();

    if (outlook_nextmeeting.length() > 16) {
        int numParts = ceil(outlook_nextmeeting.length() / 16.0);  // Calculate the number of parts
        String parts[numParts];  // Create an array to store the parts
        // Split the string into parts
        for (int i = 0; i < numParts; i++) {
          int startIdx = i * 16;
          int endIdx = startIdx + 16;
          parts[i] = outlook_nextmeeting.substring(startIdx, endIdx);
        }
        // Display each part on the LCD
        for (int i = 0; i < numParts; i++) {
          lcd.clear();  // Clear the LCD screen

          // Display the first part on line 0 and the second part on line 1
            lcd.setCursor(0, 0);  // Set the cursor to line 0
            lcd.print(parts[i]);  // Display the current part on line 0
            lcd.setCursor(0, 1);  // Set the cursor to line 1
            if ((i+1) < numParts) { // Need to check we are not out of bounds
              lcd.print(parts[i+1]);  // Display the current part on line 1
            }
          i=i+1;
          delay(2000);  // Delay for 1 seconds before displaying the next part
        }
      }
    lcd.clear();
  }

  if (feedin_w.toInt() >= 0) {
    if (feedin_w.toInt() > 0) { // need this to not display feed-in and go to grid draw
      lcd.setCursor(0,0);
      lcd.print("Feed In - " + feedin_w + "w    ");
    }
    if (feedin_w.toInt() == 0)  {
      feed_in_RGB_color(255, 0, 0); // Red
    // Serial.println("Changing to red");
    }
      else if (feedin_w.toInt() > 0 && feedin_w.toInt() < 251) {
      feed_in_RGB_color(255, 0, 255); // Magenta = Error
      //  Serial.println("Changing to magenta");

    }
    else if (feedin_w.toInt() > 250 && feedin_w.toInt() < 501) {
      feed_in_RGB_color(0, 0, 255); // Blue
      //  Serial.println("Changing to blue");
    }
    else if (feedin_w.toInt() > 500 && feedin_w.toInt() < 1001) {
      feed_in_RGB_color(0, 255, 255); // Cyan
      //  Serial.println("Changing to cyan");
    }
    else if (feedin_w.toInt() > 1000 && feedin_w.toInt() <= 2500) {
        feed_in_RGB_color(255, 255, 0); // Yellow
    // Serial.println("Changing to yellow");
    }
    else if (feedin_w.toInt() > 2500) {
        feed_in_RGB_color(0, 255, 0); // Green
      //  Serial.println("Changing to green");
      }
  }
// Display grid draw if feed in is 0
if ((feedin_w.toInt() == 0) && (griddraw_w.toInt() > 0)) {
    lcd.setCursor(0,0);
    lcd.print("GridDraw - " + griddraw_w + "w    ");
}
// House Consumtpion
   if (usage_w.toInt() > 0) {
    lcd.setCursor(0,1);
    lcd.print("Usage - " + usage_w + "w    ");

    if (usage_w.toInt() > 0 && usage_w.toInt() < 401) {
      consumption_RGB_color(0, 255, 0); // Green
    }
    else if (usage_w.toInt() > 400 && usage_w.toInt() < 501) {
      // Serial.println("Changing to yellow");
        consumption_RGB_color(255, 255, 0); // Yellow
    }
      else if (usage_w.toInt() > 500 && usage_w.toInt() < 1001) {
              consumption_RGB_color(0, 255, 255); // Cyan
        //  Serial.println("Changing to cyan");
    }
    else if (usage_w.toInt() > 1000 && usage_w.toInt() <= 2001) {
            consumption_RGB_color(0, 0, 255); // Blue
      //  Serial.println("Changing to blue");
    }
    else if (usage_w.toInt() > 2000 && usage_w.toInt() <= 3001) {
               consumption_RGB_color(255, 0, 255); // Magenta
    }
    else if (usage_w.toInt() > 3000) {
      // Serial.println("Changing to red");
          consumption_RGB_color(255, 0, 0); // Red
      //  Serial.println("Changing to red");
      }
  }
}
void feed_in_RGB_color(int red_light_value, int green_light_value, int blue_light_value)
 {
  analogWrite(feed_in_red_light_pin, red_light_value);
  analogWrite(feed_in_green_light_pin, green_light_value);
  analogWrite(feed_in_blue_light_pin, blue_light_value);
 }
 void consumption_RGB_color(int red_light_value, int green_light_value, int blue_light_value)
 {
  analogWrite(consumption_red_light_pin, red_light_value);
  analogWrite(consumption_green_light_pin, green_light_value);
  analogWrite(consumption_blue_light_pin, blue_light_value);
 }
Save the sketch, validate this works by publishing a MQTT message to the topic path, it should display every 35 seconds. If it does not display, you will need to debug this step.
Wiring Everything Together – Lets Make It Work!
We now have every discrete component working, but we need to wrap this up. I am going to us a simple batch file which executues the Powershell, followed by Python.
powershell "outlook2mqtt.ps1 | Out-File -FilePath "output.txt" -Encoding UTF8"
python Calendar2MQTT.py
At this stage I suggest you validate this works, execute the batch file. Output.txt should get created and contain your schedule.
PS C:\Scripts\PSto1602> type .\output.txt
10:00,COMPANY1 + COMPANY2 MONTHLY GOVERNANCE
10:30,COMPANT1 WEEKLY V-TEAM
13:00,V-TEAM CONNECT
13:00,DROP-IN MENTORING CLINIC
15:00,V-TEAM WEEKLY CONNECT
The batch file execution will inlcude the Python script, this will ouput what is being published to the MQTT topic.
Once you have validated this process manually works, we can schedule this. For my purposes I have chosen to run this every 30 minutes, I chose 30 minutes as a frequency as its often enough to catch those rogue meetings that people book last minutes. Your execution cadence is your personal choice.
We can schedule this using the Windows Task Scheduler and more so, we can drive this in the CLI using the schtasks command.
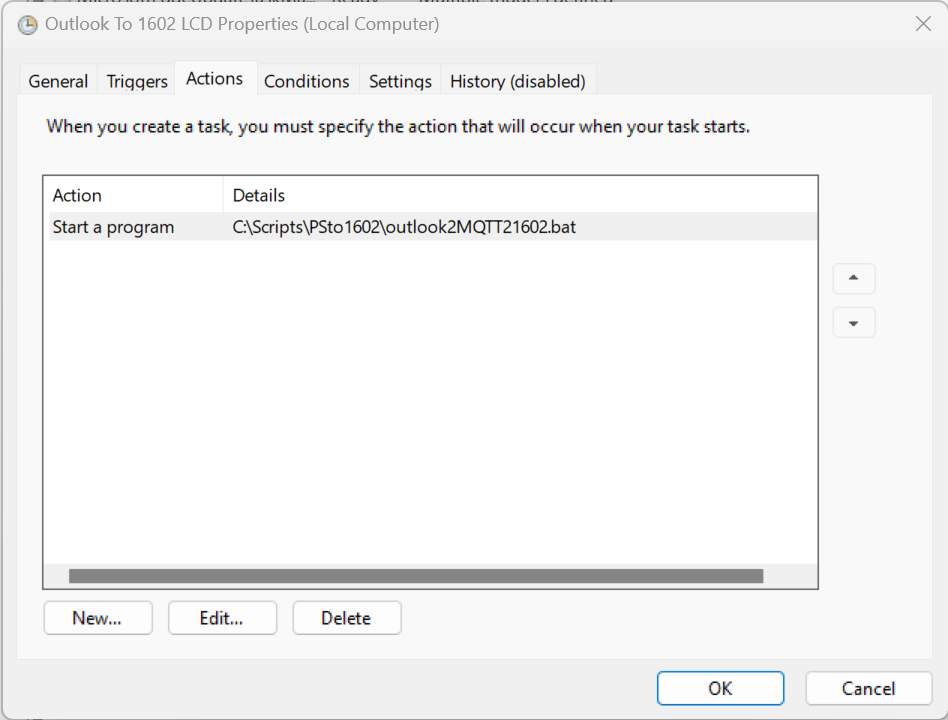
I called my batch file ‘Outlook2MQTT1602.bat’. To execute every 30 minutes using the schtasks command-line tool use the following command
schtasks /create /sc minute /mo 30 /tn "Outlook To 1602 LCD" /tr "<path_to_bat_file>"
Replace <path_to_bat_file> with the actual file path of ‘Outlook2MQTT1602.bat’. Make sure to include the file extension (.bat). For example, if the batch file is located in the “C:\Scripts” directory, the command would be:
schtasks /create /sc minute /mo 30 /tn "Outlook To 1602 LCD" /tr "C:\Scripts\Outlook2MQTT1602.bat"
After executing the command, the scheduled task ‘Outlook To 1602 LCD’ will be created, and it will run the specified batch file every 30 minutes.
You can verify the task has been successfully created by opening the Task Scheduler. You can access it by searching for “Task Scheduler” in the Start menu.
Just note, that scheduling tasks in Windows with schtasks requires administrative privileges. Make sure you are running PowerShell or CMD as administrator.
Summary
Did I need to do this, of course not. The thing is, as good as technology is, something nothing beats something that is in your face, persistent and always on.
No longer do I need to fiddle with a phone or open Outlook, it’s there and staring at me. With rich support for various SDK’s this article illustrates a scrappy way to achieve and outcome.
Perfection is the enemy of progress and as a result I am using various languages because they are best suited for various tasks. The path of least resistance. PowerShell for Outlook and Python for Paho/MQTT, but with a little bit of effort this could be one script.
Get your hands dirty and learn new methods and techniques. This solution is a polyglot, PowerShell, Python, MQTT, C++, I2C it doesnt matter. The modern builder needs to span multiple technologies, and I hope this illustrates how easy it is to string things together to get a practical outcome.
I hope you learnt a thing or two from this post.
Think big and stay creative.
Shane Baldacchino