Public cloud brings a paradigm shift in what can be done, the art of the possible is possible and in the context of this post, I am planning to replicate ~250ish MQTT topics running in a Mosquitto MQTT container in to Azure IoT Hub.
From ML (Machine Learning) through to anomaly detection and everything in between, the bells and whistles Azure graces myself is far and beyond the capabilities of any on premise system, coupled with low administrative effort of consuming a managed service.
Who has the longest showers? Who wakes up first? Which devices are powered on, yet their is no activity? These questions and many can all be answered from the thousands events occurring each day in my house, but first we need to get these events in to Azure.
Today I use Mosquitto (in docker container) locally with Home Assistant, Tasmota devices, a PLC and a Arduino Mega. I publish and consume thousands of messages each day (1.4messages per second, which is mostly PIR data). The easiest path here is to not have these devices publish to Azure IOT Hub, but to have Mosquitto replicate all messages locally through to Azure IoT Hub. Remember the 3 laws of IOT, one of them being the law of physics.
Latency to the cloud can be unacceptable, think crash avoidance system and medical alerts, but here it’s my snarky 10 year old wondering why there is so much lag when a button is pressed.
Therefore some decision-making must continue to be executed locally and in the absence of not having internet, my house must continue to function.
Ideally something like this image below, once we are publishing events in Azure IoT Hub we are then able to leverage these in the Azure platform as described above.
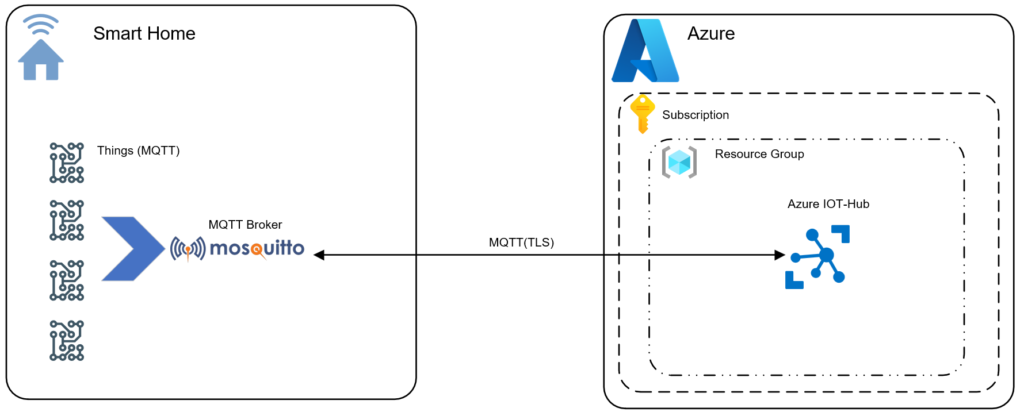
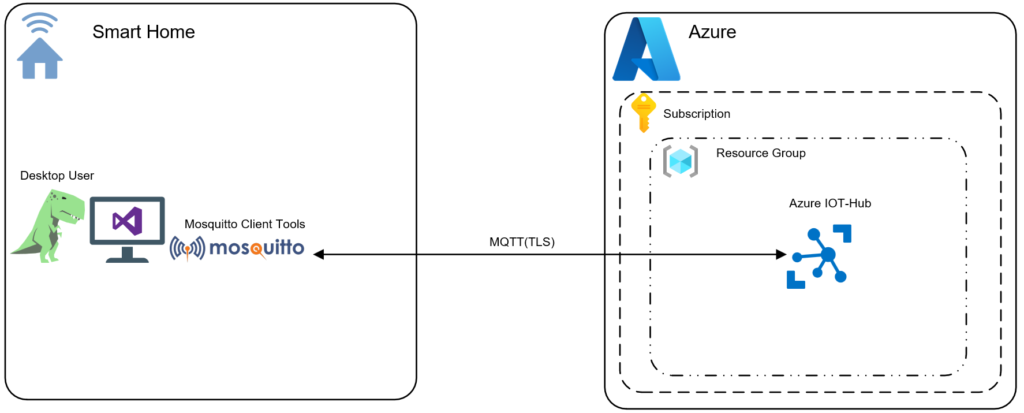
The thing is, you need to crawl before you can walk and in this post I will illustrate how you can create an Azure IoT-Hub, a device and publish/subscribe MQTT (version 3.11 compliant) messages via Mosquitto client tools (mosquitto_pub / mosquitto_sub) to Azure IoT Hub and we will do this using the Azure CLI.
What is Azure IoT Hub?
Azure IoT Hub brings highly secure and reliable communication between your Internet of Things (IoT) application and the devices it manages. Some key features are per-device authentication, built-in device management and scaled provisioning. From an IOT perspective it provides AMQP, MQTT and HTTP endpoints and its MQTT we will be focusing on in this post. It does a lot, but in the context of this post, think of it as your MQTT broker in the cloud that you dont need to manage.
How about AZ-CLI?
Simply put, your CLI (Command Line Interface) for Azure. It is a cross-platform CLI to connect to Azure and execute administrative commands on Azure resources. It allows the execution of commands through a terminal using interactive command-line prompts or a script. The Azure CLI, known as AZ CLI is available across Azure services and is designed to get you working quickly with Azure, with an emphasis on automation and I see it as that interim step between the console and using a direct SDK or service API. You can find more information on Azure CLI here.
You can install the Azure CLI locally on Linux, Mac, or Windows computers. It can also be used from a browser through the Azure Cloud Shell (very cool 👍👍) or run from inside a Docker container.
I am not going to cover setting up Azure CLI, see the Azure CLI setup guide for more information on setting up and configuring for your subscription.
Enough about this, lets get started.
High Level Steps
1. Create Azure IoT Hub
2. Extract Connection Strings
3. Create IoT Device
4. Create SAS Policy
5. TLS Certificate
6. Pulling It Together
7. Mosquitto_pub/Mosquitto_sub
Variables You Will Need To Substitute
This post serves as a high level walkthrough for establishing full duplex (publish and subscribe) communication from your local broker in to Azure. You will be presented with outputs from CLI or from your Azure subscription, that you will need to substitute with your values in order to pass in to the Mosquitto client tools. Some key values you need to substitute.
Resource-group
Device name
SAS token
Connection string
Step 1: Create the Azure IoT Hub
You will need to firstly create your Azure IoT Hub instance. There are many SKU’s but the F1 SKU provides 8000 messages per day for free and is a good way to get started without incurring cost. Alternate SKU’s can be found here.
az iot hub create --resource-group BaldacchinoRG --name Baldacchino-IOTHub -sku F1 --partition-count 2
The output of this command will provide a lot of JSON. Extract your Azure IoT-Hub endpoint. Copy and paste this in to a document in your favourite IDE, we will be adding many values to this document to build out the required.
"hostName": "BaldacchinoIotHub.azure-devices.net",
Step 2: Extract the Primary Connection String
You will need to identify the connection string of your IOT-Hub
az iot hub connection-string show
This output of this command will provide your connection string (there is two, this will only show the primary). Copy and paste this in to your document.
[
  {
    "connectionString": "HostName=Baldacchino-IOTHub.azure-devices.net;SharedAccessKeyName=iothubowner;SharedAccessKey=******************************************************=",
    "name": "Baldacchino-IOTHub"
  }
]
Step 3: Create your device
You now need to create your MQTT device, for the purpose of this walkthrough we will use a SAS token for authentication.
az iot hub device-identity create -n Baldacchino-IOTHub -d Mosquitto
There is no JSON you will need to copy to your clipboard here but you will notice in the JSON output that the type is SAS and we not using x509 certificates.
"type": "sas",
"x509Thumbprint": {
"primaryThumbprint": null,
"secondaryThumbprint": null
}
},
"capabilities": {
"iotEdge": false
}
Step 4: Generate a SAS token
There are multiple ways to provide Authentication. SAS tokens and x509 certificates are the common approaches.
The SAS token is a string that you generate on the client side, and you pass this string to Azure IoT Hub for authentication. Azure IoT Hub then checks the SAS parameters and the signature to verify that it is valid.
az iot hub generate-sas-token -d Mosquitto -n Baldacchino-IOTHub
Copy and paste the SharedAccessSignature from the JSON output in your document.
{
  "sas": "SharedAccessSignature sr=Baldacchino-IOTHub.azure-devices.net%2Fdevices%2FMosquitto&sig=%2BdJrIWgg6XIzaT9sIvRZGSMYGv9lRKwihG2JnyEXMO4%3D&se=1633391816"
}
Step 5: We need TLS
MQTT typically runs on port 1833 in an unsecure manner but Azure IoT Hub mandates MQTT over TLS on 8883. The root CA is not part of your Operating System’s keychain and as such you will need to download the PEM file to use with Mosquitto.
You can download the certificate from GitHub at https://raw.githubusercontent.com/Azure/azure-iot-sdk-c/master/certs/certs.c. Copy the Baltimore certificate, to save you some time I have pasted this below, and save it as Baltimore.pem
-----BEGIN CERTIFICATE-----
MIIDdzCCAl+gAwIBAgIEAgAAuTANBgkqhkiG9w0BAQUFADBaMQswCQYDVQQGEwJJ
RTESMBAGA1UEChMJQmFsdGltb3JlMRMwEQYDVQQLEwpDeWJlclRydXN0MSIwIAYD
VQQDExlCYWx0aW1vcmUgQ3liZXJUcnVzdCBSb290MB4XDTAwMDUxMjE4NDYwMFoX
DTI1MDUxMjIzNTkwMFowWjELMAkGA1UEBhMCSUUxEjAQBgNVBAoTCUJhbHRpbW9y
ZTETMBEGA1UECxMKQ3liZXJUcnVzdDEiMCAGA1UEAxMZQmFsdGltb3JlIEN5YmVy
VHJ1c3QgUm9vdDCCASIwDQYJKoZIhvcNAQEBBQADggEPADCCAQoCggEBAKMEuyKr
mD1X6CZymrV51Cni4eiVgLGw41uOKymaZN+hXe2wCQVt2yguzmKiYv60iNoS6zjr
IZ3AQSsBUnuId9Mcj8e6uYi1agnnc+gRQKfRzMpijS3ljwumUNKoUMMo6vWrJYeK
mpYcqWe4PwzV9/lSEy/CG9VwcPCPwBLKBsua4dnKM3p31vjsufFoREJIE9LAwqSu
XmD+tqYF/LTdB1kC1FkYmGP1pWPgkAx9XbIGevOF6uvUA65ehD5f/xXtabz5OTZy
dc93Uk3zyZAsuT3lySNTPx8kmCFcB5kpvcY67Oduhjprl3RjM71oGDHweI12v/ye
jl0qhqdNkNwnGjkCAwEAAaNFMEMwHQYDVR0OBBYEFOWdWTCCR1jMrPoIVDaGezq1
BE3wMBIGA1UdEwEB/wQIMAYBAf8CAQMwDgYDVR0PAQH/BAQDAgEGMA0GCSqGSIb3
DQEBBQUAA4IBAQCFDF2O5G9RaEIFoN27TyclhAO992T9Ldcw46QQF+vaKSm2eT92
9hkTI7gQCvlYpNRhcL0EYWoSihfVCr3FvDB81ukMJY2GQE/szKN+OMY3EU/t3Wgx
jkzSswF07r51XgdIGn9w/xZchMB5hbgF/X++ZRGjD8ACtPhSNzkE1akxehi/oCr0
Epn3o0WC4zxe9Z2etciefC7IpJ5OCBRLbf1wbWsaY71k5h+3zvDyny67G7fyUIhz
ksLi4xaNmjICq44Y3ekQEe5+NauQrz4wlHrQMz2nZQ/1/I6eYs9HRCwBXbsdtTLS
R9I4LtD+gdwyah617jzV/OeBHRnDJELqYzmp
-----END CERTIFICATE-----
You can validate your TLS certificate by using openSSL
openssl x509 -in Balitore.pem -text
Certificate:
Data:
Version: 3 (0x2)
Serial Number: 33554617 (0x20000b9)
Signature Algorithm: sha1WithRSAEncryption
Issuer: C = IE, O = Baltimore, OU = CyberTrust, CN = Baltimore CyberTrust Root
Validity
Not Before: May 12 18:46:00 2000 GMT
Not After : May 12 23:59:00 2025 GMT
Subject: C = IE, O = Baltimore, OU = CyberTrust, CN = Baltimore CyberTrust Root
Subject Public Key Info:
Public Key Algorithm: rsaEncryption
RSA Public-Key: (2048 bit)
Modulus:
00:a3:04:bb:22:ab:98:3d:57:e8:26:72:9a:b5:79:
d4:29:e2:e1:e8:95:80:b1:b0:e3:5b:8e:2b:29:9a:
64:df:a1:5d:ed:b0:09:05:6d:db:28:2e:ce:62:a2:
62:fe:b4:88:da:12:eb:38:eb:21:9d:c0:41:2b:01:
52:7b:88:77:d3:1c:8f:c7:ba:b9:88:b5:6a:09:e7:
73:e8:11:40:a7:d1:cc:ca:62:8d:2d:e5:8f:0b:a6:
50:d2:a8:50:c3:28:ea:f5:ab:25:87:8a:9a:96:1c:
a9:67:b8:3f:0c:d5:f7:f9:52:13:2f:c2:1b:d5:70:
70:f0:8f:c0:12:ca:06:cb:9a:e1:d9:ca:33:7a:77:
d6:f8:ec:b9:f1:68:44:42:48:13:d2:c0:c2:a4:ae:
5e:60:fe:b6:a6:05:fc:b4:dd:07:59:02:d4:59:18:
98:63:f5:a5:63:e0:90:0c:7d:5d:b2:06:7a:f3:85:
ea:eb:d4:03:ae:5e:84:3e:5f:ff:15:ed:69:bc:f9:
39:36:72:75:cf:77:52:4d:f3:c9:90:2c:b9:3d:e5:
c9:23:53:3f:1f:24:98:21:5c:07:99:29:bd:c6:3a:
ec:e7:6e:86:3a:6b:97:74:63:33:bd:68:18:31:f0:
78:8d:76:bf:fc:9e:8e:5d:2a:86:a7:4d:90:dc:27:
1a:39
Exponent: 65537 (0x10001)
X509v3 extensions:
X509v3 Subject Key Identifier:
E5:9D:59:30:82:47:58:CC:AC:FA:08:54:36:86:7B:3A:B5:04:4D:F0
X509v3 Basic Constraints: critical
CA:TRUE, pathlen:3
X509v3 Key Usage: critical
Certificate Sign, CRL Sign
Signature Algorithm: sha1WithRSAEncryption
85:0c:5d:8e:e4:6f:51:68:42:05:a0:dd:bb:4f:27:25:84:03:
bd:f7:64:fd:2d:d7:30:e3:a4:10:17:eb:da:29:29:b6:79:3f:
76:f6:19:13:23:b8:10:0a:f9:58:a4:d4:61:70:bd:04:61:6a:
12:8a:17:d5:0a:bd:c5:bc:30:7c:d6:e9:0c:25:8d:86:40:4f:
ec:cc:a3:7e:38:c6:37:11:4f:ed:dd:68:31:8e:4c:d2:b3:01:
74:ee:be:75:5e:07:48:1a:7f:70:ff:16:5c:84:c0:79:85:b8:
05:fd:7f:be:65:11:a3:0f:c0:02:b4:f8:52:37:39:04:d5:a9:
31:7a:18:bf:a0:2a:f4:12:99:f7:a3:45:82:e3:3c:5e:f5:9d:
9e:b5:c8:9e:7c:2e:c8:a4:9e:4e:08:14:4b:6d:fd:70:6d:6b:
1a:63:bd:64:e6:1f:b7:ce:f0:f2:9f:2e:bb:1b:b7:f2:50:88:
73:92:c2:e2:e3:16:8d:9a:32:02:ab:8e:18:dd:e9:10:11:ee:
7e:35:ab:90:af:3e:30:94:7a:d0:33:3d:a7:65:0f:f5:fc:8e:
9e:62:cf:47:44:2c:01:5d:bb:1d:b5:32:d2:47:d2:38:2e:d0:
fe:81:dc:32:6a:1e:b5:ee:3c:d5:fc:e7:81:1d:19:c3:24:42:
ea:63:39:a9
Step 6: Pulling it together
We will soon be using Mosquitto_pub and Mosquitto_sub to publish and subscribe to messages. I am going to assume you have these installed on your local environment.
You can easily install this on a Debian based environment with the following command.
sudo apt install mosquitto-clients
For Windows and MAC, see the Mosquitto website.
We now have everything we need for Mosquitto but publish and subscribe have different required parameters for publishing and subscribing.
What Mosquitto_pub needs
mosquitto_pub \
-t "MQTT topic name" \
-i "pub_client" \
-u "username" \
-P "password" \
-h "host name" \
-V mqttv311 \
-p 8883 \
--cafile Baltimore.pem
-m '{"key":"value"}'
What Mosquitto_sub needs
mosquitto_sub \
-t "MQTT topic name" \
-i "pub_client" \
-u "username" \
-P "password" \
-h "host name" \
-V mqttv311 \
-p 8883 \
--cafile Baltimore.pem
To publish a MQTT message to Azure, you can not just any topic name. It must be in the following format
devices/{DeviceID}/messsages/events/
In my example Mosquitto is my DeviceID
Step 7: Example Publishing and Subscribing
We now have all of the data and understand the required paramters to pass to both Mosquitto_pub and Mosquitto_sub. Now lets leverage these command line tools to build our completed commands and publish a message.
Substitute the values in the examples above with your data. My topic in this example is ‘Output-FAN\Kids Bathroom’. I am using ‘-d’ for verbose logging. You can use any topic name you like.
Mosquitto_pub
mosquitto_pub -t "devices/Mosquitto/messages/events/" -i "Mosquitto" -u "Baldacchino-IOTHub.azure-devices.net.azure-devices.net/Mosquitto/?api-version=2018-06-30" -P "SharedAccessSignature sr=Baldacchino-IOTHub.azure-devices.net%2Fdevices%2FMosquitto&sig=O5Pt61EL3n1HLzt9G2%2FYJglpCk6m4I6XsbEu4WfnRoA%3D&se=1636984597" -h "Baldacchino-IOTHub.azure-devices.net" -V mqttv311 -p 8883 --cafile Balitore.pem -m '{"key":"value"}' -d

Client Mosquitto sending CONNECT
Client Mosquitto received CONNACK (0)
Client Mosquitto sending PUBLISH (d0, q0, r0, m1, 'devices/Mosquitto/messages/events/', ... (12 bytes))
Client Mosquitto sending DISCONNECT
Mosquitto_sub
mosquitto_sub -t "devices/Mosquitto/messages/events/" -i "Mosquitto" -u "Baldacchino-IOTHub.azure-devices.net.azure-devices.net/Mosquitto/?api-version=2018-06-30" -P "SharedAccessSignature sr=Baldacchino-IOTHub.azure-devices.net%2Fdevices%2FMosquitto&sig=O5Pt61EL3n1HLzt9G2%2FYJglpCk6m4I6XsbEu4WfnRoA%3D&se=1636984597" -h "Baldacchino-IOTHub.azure-devices.net" -V mqttv311 -p 8883 --cafile c:\scripts\cert.pem -d

Client Mosquitto sending CONNECT
Client Mosquitto received CONNACK (0)
Client Mosquitto sending SUBSCRIBE (Mid: 1, Topic: devices/Mosquitto/messages/events/, QoS: 0, Options: 0x00)
Client Mosquitto received SUBACK
Subscribed (mid: 1): 0
We can validate the message has been received via Azure IoT Hub by monitoring incoming events on the end-point
az iot hub monitor-events --hub-name Baldacchino-IOTHub
Starting event monitor, use ctrl-c to stop...
{
"event": {
"origin": "Mosquitto",
"module": "",
"interface": "",
"component": "",
"payload": "'{key:value}'"
}
}
Conclusion
We just walked through how you can use Mosquitto Client Tools (mosquitto_pub / mosquitto_sub) to publish and subscribe MQTT messages to Azure IoT Hub and you did it not via the Azure Portal but via Azure CLI 💪💪.
Whilst this is a baby step, it is the step we need to take before we can look at broker (the Mosquitto daemon) to broker (Azure IOT Hub) replication.
MQTT is the de-facto IOT protocol for devices, from Alexa, through to lights and locks and devices on the factory floor. It is as close to an IOT protocol standard that we have today. Azure IOT on the other hand is your gateway in to the world of cloud. The Azure cloud platform contains more than 200 (and growing) products and cloud services designed to help you bring new solutions to life, solve today’s challenges and create the future.
What this means to my house at this stage I am uncertain but I know, I will be looking next to work on broker to broker communication before feeding the thousands of events that occur in my house daily in to Azure IoT-Hub.
Think-big and happy automating.
Shane Baldacchino
I work for @Microsoft but opinions expressed are my own
I read the your blog. Thanks for the details. I had a query please. Could you please advise what modifications has to done to you above commands when I already have a publisher device with me (but i don’t have broker and subscriber) and I know which topic needs to be published.
Not exactly sure what you mean here, can you elaborate on which commands or parts specifically?
You will always need a MQTT broker if you are subscribing or publishing any message via MQTT.
Thank you for your detailed explanation. Unfortunately, my messages are being refused by the azure IOT Hub when attempting to publish. I was hoping you could provided some insight on what might be causing the issue. Using the Balitore.pem I receive the following responds;
Client Mosquitto sending CONNECT
Client Mosquitto received CONNACK (5)
Connection error: Connection Refused: not authorised.
Client Mosquitto sending DISCONNECT
I can only assume there is something wrong with the user and/or password (but not going to share here). user is “{iot hub name.azure-device.net}/{device}/?api-version=2018-06-30”. Not sure why the API version but tried with and without. The pass is the complete Shared access signature generated by the “az iot hub generate-sas-token” command. Even though this string changes every time I run this command, and this string is different from the connection string available from the portal.
If you have any thoughts I would very much appreciate the help. Thanks!
Hey Chad,
Thanks for such a detailed post. I thought I would leave this till Monday, but given you wrote such a detailed message Chad, I had to try this.
Firstly, the post is still valid as I have just walked through, that was my concern.
Here is output of my simple test.
PS C:\Program Files\Mosquitto> .\mosquitto_pub -t "devices/Mosquitto/messages/events/" -i "Mosquitto" -u "myiot-hub.azure-devices.net/Mosquitto/?api-version=2018-06-30" -P "SharedAccessSignature sr=myiot-hub.azure-devices.net%2Fdevices%2FMosquitto&sig=PFOd6zaB9r9FNVIhcC9bSRNqpvU%2Bp9tDtXrML9IC%2B5Q%3D&se=1675460310" -h "myiot-hub.azure-devices.net" -V mqttv311 -p 8883 --cafile c:\scripts\cert.pem -m '{"Test":"123"}' -d

Client Mosquitto sending CONNECT

Client Mosquitto received CONNACK (0)

Client Mosquitto sending PUBLISH (d0, q0, r0, m1, 'devices/Mosquitto/messages/events/', ... (10 bytes))

Client Mosquitto sending DISCONNECT
Is your command structure the same as this and what does your certificate look like?
Mine looks like
-----BEGIN CERTIFICATE-----

MIIDdzCCAl+gAwIBAgIEAgAAuTANBgkqhkiG9w0BAQUFADBaMQswCQYDVQQGEwJJ

RTESMBAGA1UEChMJQmFsdGltb3JlMRMwEQYDVQQLEwpDeWJlclRydXN0MSIwIAYD

VQQDExlCYWx0aW1vcmUgQ3liZXJUcnVzdCBSb290MB4XDTAwMDUxMjE4NDYwMFoX

DTI1MDUxMjIzNTkwMFowWjELMAkGA1UEBhMCSUUxEjAQBgNVBAoTCUJhbHRpbW9y

ZTETMBEGA1UECxMKQ3liZXJUcnVzdDEiMCAGA1UEAxMZQmFsdGltb3JlIEN5YmVy

VHJ1c3QgUm9vdDCCASIwDQYJKoZIhvcNAQEBBQADggEPADCCAQoCggEBAKMEuyKr

mD1X6CZymrV51Cni4eiVgLGw41uOKymaZN+hXe2wCQVt2yguzmKiYv60iNoS6zjr

IZ3AQSsBUnuId9Mcj8e6uYi1agnnc+gRQKfRzMpijS3ljwumUNKoUMMo6vWrJYeK

mpYcqWe4PwzV9/lSEy/CG9VwcPCPwBLKBsua4dnKM3p31vjsufFoREJIE9LAwqSu

XmD+tqYF/LTdB1kC1FkYmGP1pWPgkAx9XbIGevOF6uvUA65ehD5f/xXtabz5OTZy

dc93Uk3zyZAsuT3lySNTPx8kmCFcB5kpvcY67Oduhjprl3RjM71oGDHweI12v/ye

jl0qhqdNkNwnGjkCAwEAAaNFMEMwHQYDVR0OBBYEFOWdWTCCR1jMrPoIVDaGezq1

BE3wMBIGA1UdEwEB/wQIMAYBAf8CAQMwDgYDVR0PAQH/BAQDAgEGMA0GCSqGSIb3

DQEBBQUAA4IBAQCFDF2O5G9RaEIFoN27TyclhAO992T9Ldcw46QQF+vaKSm2eT92

9hkTI7gQCvlYpNRhcL0EYWoSihfVCr3FvDB81ukMJY2GQE/szKN+OMY3EU/t3Wgx

jkzSswF07r51XgdIGn9w/xZchMB5hbgF/X++ZRGjD8ACtPhSNzkE1akxehi/oCr0

Epn3o0WC4zxe9Z2etciefC7IpJ5OCBRLbf1wbWsaY71k5h+3zvDyny67G7fyUIhz

ksLi4xaNmjICq44Y3ekQEe5+NauQrz4wlHrQMz2nZQ/1/I6eYs9HRCwBXbsdtTLS

R9I4LtD+gdwyah617jzV/OeBHRnDJELqYzmp

-----END CERTIFICATE-----
Hope this helps. Let me know how you go
Shane
HI Shane,
Thank you so much for your quick response. I tried to reproduce your command line as faithfully as I could. Below is most of my command and the text of my certificate. I left out some details because it’s the internet, but you are welcome to email me and I’ll send you the complete command.
chad@chad-Precision-7550:~/mqttsandbox$ mosquitto_pub -t “devices/TESTEDGE/messages/events/” -i “Mosquitto” -u “{ Left this out for security}.azure-devices.net/TESTEDGE/?api-version=2018-06-30” -P “SharedAccessSignature sr={ Left this out for security}” -h “{ Left this out for security}.azure-devices.net” -V mqttv311 -p 8883 –cafile Balitore.pem -m ‘{“Test_key”:”99.999999″}’ -d
Client Mosquitto sending CONNECT
Client Mosquitto received CONNACK (5)
Connection error: Connection Refused: not authorised.
Client Mosquitto sending DISCONNECT
—–BEGIN CERTIFICATE—–
MIIDdzCCAl+gAwIBAgIEAgAAuTANBgkqhkiG9w0BAQUFADBaMQswCQYDVQQGEwJJ
RTESMBAGA1UEChMJQmFsdGltb3JlMRMwEQYDVQQLEwpDeWJlclRydXN0MSIwIAYD
VQQDExlCYWx0aW1vcmUgQ3liZXJUcnVzdCBSb290MB4XDTAwMDUxMjE4NDYwMFoX
DTI1MDUxMjIzNTkwMFowWjELMAkGA1UEBhMCSUUxEjAQBgNVBAoTCUJhbHRpbW9y
ZTETMBEGA1UECxMKQ3liZXJUcnVzdDEiMCAGA1UEAxMZQmFsdGltb3JlIEN5YmVy
VHJ1c3QgUm9vdDCCASIwDQYJKoZIhvcNAQEBBQADggEPADCCAQoCggEBAKMEuyKr
mD1X6CZymrV51Cni4eiVgLGw41uOKymaZN+hXe2wCQVt2yguzmKiYv60iNoS6zjr
IZ3AQSsBUnuId9Mcj8e6uYi1agnnc+gRQKfRzMpijS3ljwumUNKoUMMo6vWrJYeK
mpYcqWe4PwzV9/lSEy/CG9VwcPCPwBLKBsua4dnKM3p31vjsufFoREJIE9LAwqSu
XmD+tqYF/LTdB1kC1FkYmGP1pWPgkAx9XbIGevOF6uvUA65ehD5f/xXtabz5OTZy
dc93Uk3zyZAsuT3lySNTPx8kmCFcB5kpvcY67Oduhjprl3RjM71oGDHweI12v/ye
jl0qhqdNkNwnGjkCAwEAAaNFMEMwHQYDVR0OBBYEFOWdWTCCR1jMrPoIVDaGezq1
BE3wMBIGA1UdEwEB/wQIMAYBAf8CAQMwDgYDVR0PAQH/BAQDAgEGMA0GCSqGSIb3
DQEBBQUAA4IBAQCFDF2O5G9RaEIFoN27TyclhAO992T9Ldcw46QQF+vaKSm2eT92
9hkTI7gQCvlYpNRhcL0EYWoSihfVCr3FvDB81ukMJY2GQE/szKN+OMY3EU/t3Wgx
jkzSswF07r51XgdIGn9w/xZchMB5hbgF/X++ZRGjD8ACtPhSNzkE1akxehi/oCr0
Epn3o0WC4zxe9Z2etciefC7IpJ5OCBRLbf1wbWsaY71k5h+3zvDyny67G7fyUIhz
ksLi4xaNmjICq44Y3ekQEe5+NauQrz4wlHrQMz2nZQ/1/I6eYs9HRCwBXbsdtTLS
R9I4LtD+gdwyah617jzV/OeBHRnDJELqYzmp
—–END CERTIFICATE—–
I will drop you an email as this looks good to me. My hunch is your IOT Device may not be setup correctly or perhaps its your SAS token, ensue it has the hostname of your IOTHub in there.