
Storage can be one of those big rocks in terms of cost in the cloud, regardless of which public cloud you choose. By using platforms such as Azure Monitor you can validate actual I/O usage versus procured performance.
So why this post? I am currently working with an organisation driving efficiency in to their tech stack. You hopefully have read my many posts on Cloud Cost Optimisation (FinOps) in both AWS and Azure. (Part 1, Part 2, Part 3) It is something I have practiced for many years, but there is nothing like moving from theoretical in to the real world helping customers reduce their bills.
I recently ran in to a challenge where our monitoring data in Azure Monitor)stated there was no need for Premium SSD V2 disks, but there currently is no easy downgrade path in Azure and to compound the need for this post (and solution), these machines were pets and not something that could be re-created with a pipeline.
Shifting from Premium SSD to Standard SSD / Standard HDD is a relatively simple process and you can read about it on Microsoft’s website here.
How ever if you have provisioned Premium SSD v2 or Ultra Disks Microsoft does not provide a simple downgrade path.
You can’t yet switch from or to an Ultra Disk or a Premium SSD v2, you must deploy a new one. However, you can switch from existing disks to a Premium SSD v2. See Convert Premium SSD v2 disks for details.
https://learn.microsoft.com/en-us/azure/virtual-machines/disks-convert-types?tabs=azure-cli#convert-premium-ssd-v2-disks
The technical roadblock here is sector sizes
- Premium SSD v2/Ultra Disks: 512 byte sectors (Based on NVMe)
- Standard disks: 4096 byte sectors (Based on SAS SSD)
Whilst there is a path for upgrading to Premium SSD V2 / Ultra Disks, to date Microsoft haven’t invested the engineering effort to craft a process to downgrade.
With the pivot from Premium SSD V2 to Standard SSD reducing storage costs by approximately 400%, I needed to investigate this further.
So in this months blog post I am going to walk you through a process I developed that will allow you to downgrade from either Ultra Disks or Premium SSD V2 to Standard SSD / HDD in a manner that is transparent to applications and your operating system
Just to be clear, this is not a simple one line command. This process does not convert your disks, we are we are creating new disks and then copying data, permissions and changing LUN’s ID’s.
The time taken to perform this conversion is dependant on the size and number of files on your volumes. Larger files will increase throughput whilst smaller files will reduce throughput.
I would allow 1 hours per 1TB in to volume you are converting as a safe conversion speed, in reality I have seen closer to 2TB per hour and approximately speeds of 250mb/second
This process will not result in data loss, how ever given the number of steps involved, its advisable that you have a means to recover data in the form of a backup.
Our High Level Process
The code below process at a high level performs the following
- Stops the VM (or checks to ensure it is stopped)
- Creates a new Standard LRS disk based on source Premium SSD V2 / Ultra Disk name
- Attaches new managed disk to VM temporarily alongside the original disk
- Starts VM
- Detects OS type (Windows or Linux)
- Script halts and displays instructions on screen based on OS
- Windows – Commands for computer management and RoboCopy
- Linux – Command for mount and rsyc
- Disk Swap
- VM powered down
- Original Premium SSD V2 / Ultra Disk removed from VM configuration (option to delete)
- New Standard LRS disk LUN ID changed to the original LUN ID
- VM Powered on
In order to maker this transparent to the operating system, we need to persevere LUN ID’s, meaning if the source disk has LUN ID 0, by the time we finish our new disk also has to have LUN ID 0.
The Code
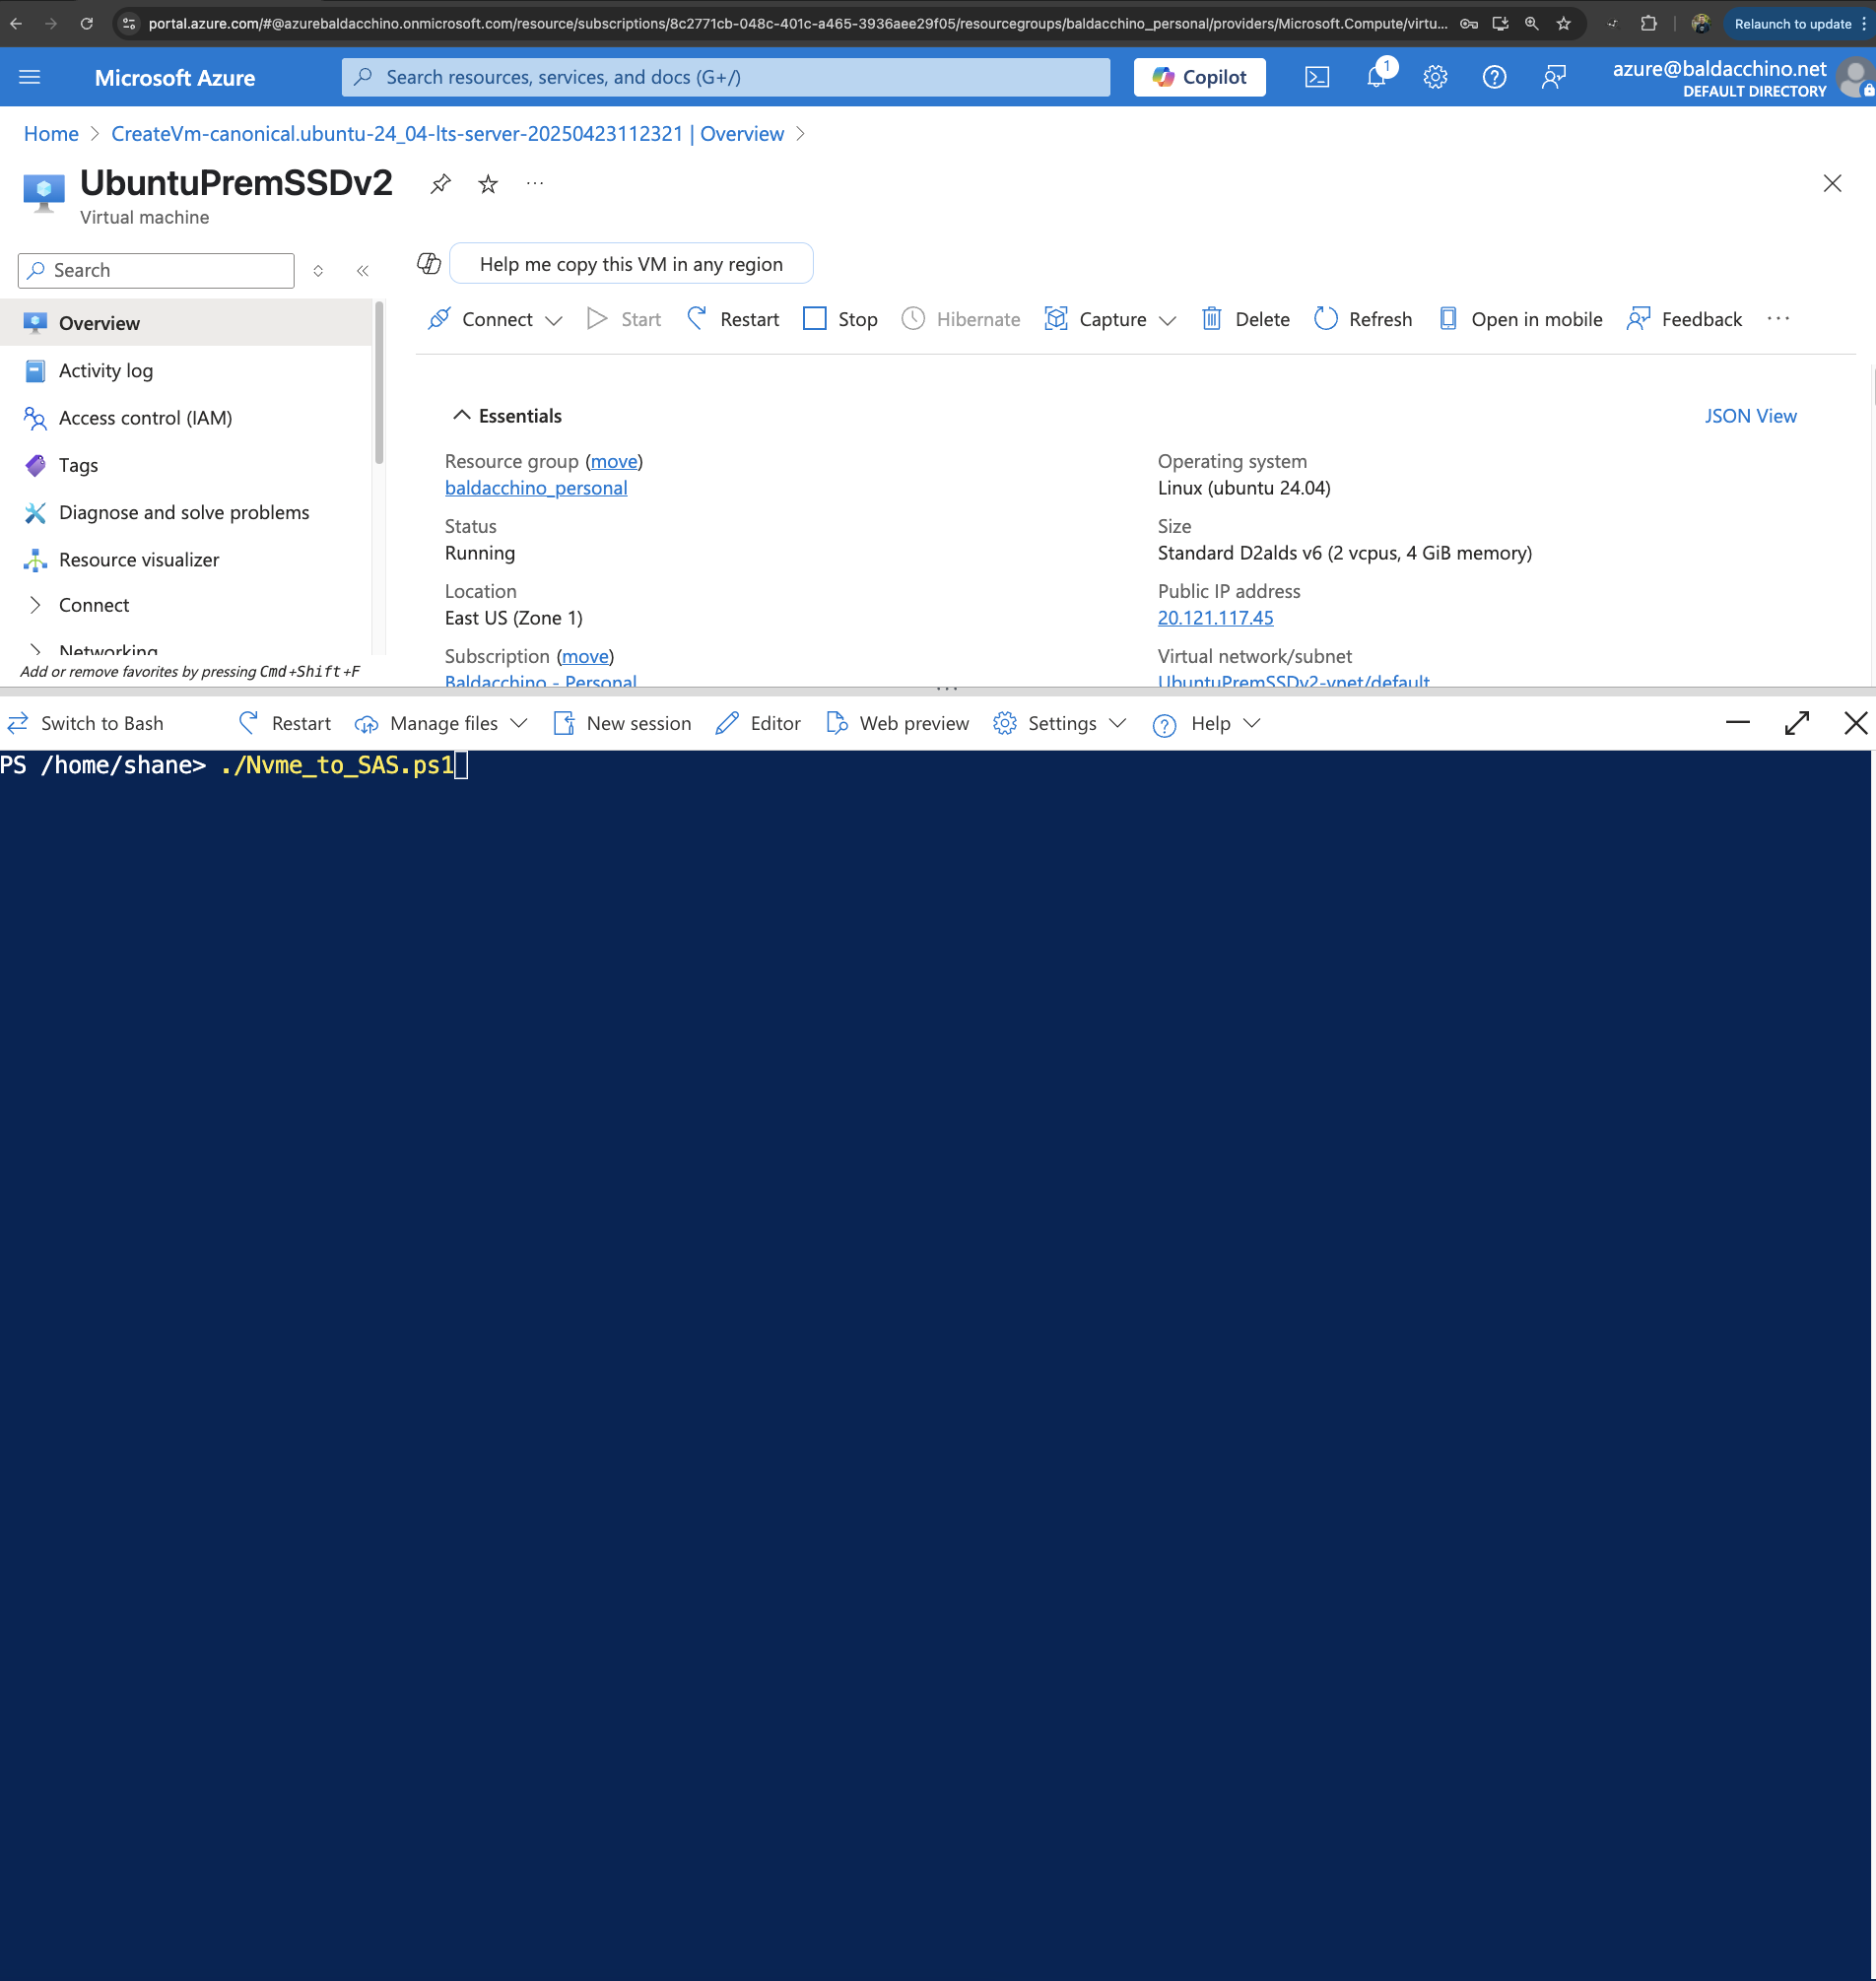
This code uses PowerShell to run. In terms of execution you can use your client OS (Windows or OSX / Linux). how ever I have used Azure Command Shell in the example images below.
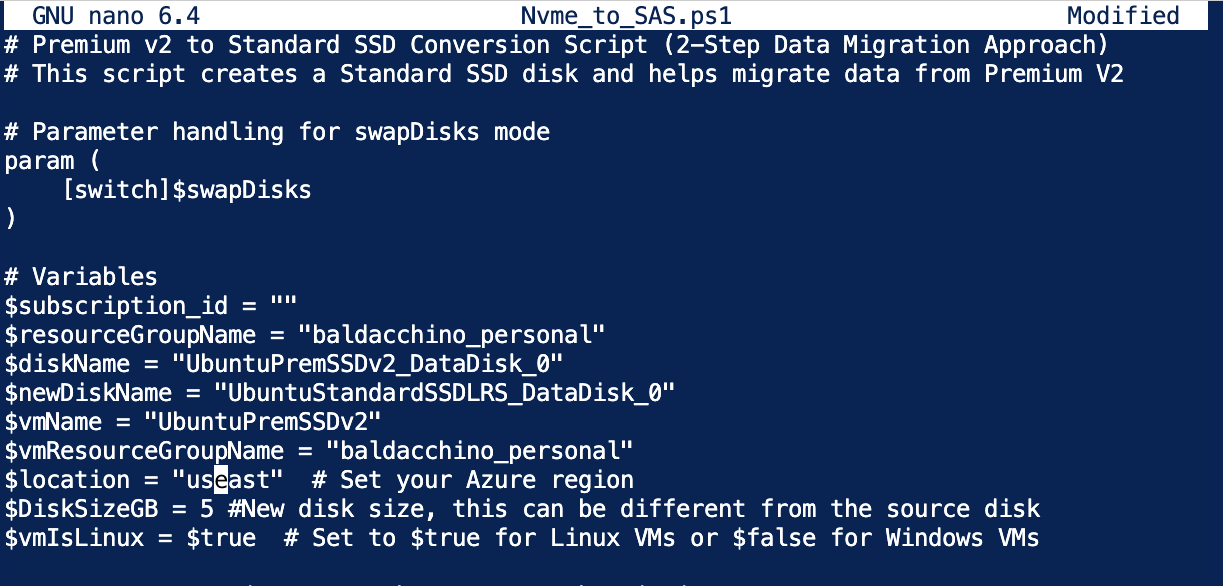
You will need to edit the variable block in this code. All of the information can be gathered from the Azure Portal or CLI and you can adjust the new disk size, ensuring it is suitable for your needs.
Save the script below as ‘Nvme_to_SAS.ps1″ and execute.
# Premium v2 to Standard SSD Conversion Script (2-Step Data Migration Approach)
# This script creates a Standard SSD disk and helps migrate data from Premium V2

# Parameter handling for swapDisks mode
param (
    [switch]$swapDisks
)

# Variables
$subscription_id = ""
$resourceGroupName = "baldacchino_personal"
$diskName = "UbuntuPremSSDv2_DataDisk_0"
$newDiskName = "UbuntuStandardSSDLRS_DataDisk_0"
$vmName = "UbuntuPremSSDv2"
$vmResourceGroupName = "baldacchino_personal"
$location = "australiaeast"  # Set your Azure region
$DiskSizeGB = 10 #New disk size, this can be different from the source disk
$vmIsLinux = $true  # Set to $true for Linux VMs or $false for Windows VMs

# Ensure context is set to the correct subscription
try {
    Set-AzContext -SubscriptionId $subscription_id
    Write-Output "Set to subscription: $subscription_id"
}
catch {
    Write-Error "Failed to set Azure subscription context: $_"
    exit 1
}

# Step 1: Check the source disk exists and is Premium V2
try {
    Write-Output "Step 1: Checking source disk..."
    $sourceDisk = Get-AzDisk -ResourceGroupName $resourceGroupName -DiskName $diskName -ErrorAction SilentlyContinue

    if ($null -eq $sourceDisk) {
        Write-Error "Source disk $diskName not found in resource group $resourceGroupName"
        exit 1
    }

    Write-Output "Found source disk: $diskName (Size: $($sourceDisk.DiskSizeGB) GB, SKU: $($sourceDisk.Sku.Name))"

    # Store location of the source disk
    $location = $sourceDisk.Location
}
catch {
    Write-Error "Error checking source disk: $_"
    exit 1
}

# Step 2: Check if the VM is using the disk and store its configuration
try {
    Write-Output "Step 2: Checking VM disk configuration..."
    $vm = Get-AzVM -ResourceGroupName $vmResourceGroupName -Name $vmName -ErrorAction SilentlyContinue

    if ($null -eq $vm) {
        Write-Error "VM $vmName not found"
        exit 1
    }

    $diskAttached = $vm.StorageProfile.DataDisks | Where-Object { $_.Name -eq $diskName }

    if ($null -ne $diskAttached) {
        Write-Output "Disk is attached to VM $vmName at LUN $($diskAttached.Lun)"
        $diskInfo = @{
            IsAttached = $true
            Lun = $diskAttached.Lun
            Caching = $diskAttached.Caching
        }
    } else {
        Write-Output "Disk $diskName is not attached to VM $vmName"
        $diskInfo = @{
            IsAttached = $false
            Lun = 0
            Caching = "ReadWrite"
        }
    }
}
catch {
    Write-Error "Error checking VM configuration: $_"
    exit 1
}

# If swapDisks parameter is specified, skip to disk swap steps
if ($swapDisks) {
    Write-Output "Running in swap mode - proceeding directly to disk swap..."
    $createdDisk = Get-AzDisk -ResourceGroupName $resourceGroupName -DiskName $newDiskName -ErrorAction SilentlyContinue
    if ($null -eq $createdDisk) {
        Write-Error "New disk $newDiskName not found! Cannot proceed with swap."
        exit 1
    }
    # Handle swap disks operation (since goto isn't supported in PowerShell Core on Linux)
    $performSwap = $true
} else {
    $performSwap = $false
}

# If not performing swap immediately, do steps 3-5
if (-not $performSwap) {
    # Step 3: Create a new empty Standard SSD disk
    try {
        Write-Output "Step 3: Creating empty Standard SSD disk..."

        # First check if target disk already exists
        $existingTarget = Get-AzDisk -ResourceGroupName $resourceGroupName -DiskName $newDiskName -ErrorAction SilentlyContinue
        if ($null -ne $existingTarget) {
            # Check if the disk is attached to a VM first
            Write-Output "Target disk $newDiskName already exists. Checking if it's attached to a VM..."

            # Get all VMs
            $allVMs = Get-AzVM
            $isAttached = $false
            $attachedVM = $null

            foreach ($checkVM in $allVMs) {
                $attachedDisk = $checkVM.StorageProfile.DataDisks | Where-Object { $_.Name -eq $newDiskName }
                if ($null -ne $attachedDisk) {
                    $isAttached = $true
                    $attachedVM = $checkVM.Name
                    break
                }
            }

            if ($isAttached) {
                Write-Output "Disk is attached to VM $attachedVM. Please detach it first or use -swapDisks parameter."
                exit 1
            } else {
                Write-Output "Removing existing target disk..."
                Remove-AzDisk -ResourceGroupName $resourceGroupName -DiskName $newDiskName -Force
            }
        }

        # Create disk config for a new empty StandardSSD_LRS disk
        $diskConfig = New-AzDiskConfig -Location $location `
                                      -CreateOption Empty `
                                      -DiskSizeGB $DiskSizeGB `
                                      -SkuName StandardSSD_LRS

        # Add zone information only if the source disk has zones configured
        if ($null -ne $sourceDisk.Zones -and $sourceDisk.Zones.Count -gt 0) {
            # The correct way to set zones
            $diskConfig.Zones = $sourceDisk.Zones
        }

        # Create the new disk
        $newDisk = New-AzDisk -ResourceGroupName $resourceGroupName -DiskName $newDiskName -Disk $diskConfig
        Write-Output "✅ Created empty Standard SSD disk: $newDiskName"

        # Verify disk was created
        $createdDisk = Get-AzDisk -ResourceGroupName $resourceGroupName -DiskName $newDiskName -ErrorAction SilentlyContinue
        if ($null -eq $createdDisk) {
            Write-Error "Disk creation appeared to succeed but disk not found."
            exit 1
        } else {
            Write-Output "Verified new disk exists: $($createdDisk.Name) with SKU: $($createdDisk.Sku.Name)"
        }
    }
    catch {
        Write-Error "Error creating Standard SSD disk: $_"
        exit 1
    }

    # Step 4: Attach both disks to the VM for data migration
    try {
        Write-Output "Step 4: Setting up VM for data migration..."

        # Ensure VM is stopped before modifying disks
        $vmStatus = (Get-AzVM -ResourceGroupName $vmResourceGroupName -Name $vmName -Status).Statuses |
                    Where-Object {$_.Code -like "PowerState/*"} |
                    Select-Object -ExpandProperty DisplayStatus

        if ($vmStatus -ne "VM deallocated") {
            Write-Output "Stopping VM $vmName..."
            Stop-AzVM -ResourceGroupName $vmResourceGroupName -Name $vmName -Force
            Write-Output "✅ VM $vmName stopped."
        } else {
            Write-Output "VM $vmName is already stopped."
        }

        # Get fresh VM object
        $vm = Get-AzVM -ResourceGroupName $vmResourceGroupName -Name $vmName

        # If the source disk isn't attached (which appears to be the case), attach it
        if (-not $diskInfo.IsAttached) {
            $sourceDiskAttached = $vm.StorageProfile.DataDisks | Where-Object { $_.Name -eq $diskName }
            if ($null -eq $sourceDiskAttached) {
                Write-Output "Attaching source disk to VM..."
                $vm = Add-AzVMDataDisk -VM $vm -Name $diskName -ManagedDiskId $sourceDisk.Id -Lun 0 -Caching ReadWrite -CreateOption Attach
                Update-AzVM -ResourceGroupName $vmResourceGroupName -VM $vm
                Write-Output "✅ Source disk attached to VM at LUN 0"
                $diskInfo.Lun = 0
                $diskInfo.IsAttached = $true

                # Get fresh VM object again
                $vm = Get-AzVM -ResourceGroupName $vmResourceGroupName -Name $vmName
            }
        }

        # Attach the new disk to the VM (temporarily alongside the old disk)
        # Use a different LUN for the new disk to avoid conflicts
        $tempLun = if ($diskInfo.Lun -eq 0) { 1 } else { 0 }

        # Check if a disk is already on the temp LUN
        $existingDisk = $vm.StorageProfile.DataDisks | Where-Object { $_.Lun -eq $tempLun }
        if ($null -ne $existingDisk) {
            # Find another free LUN
            for ($i = 2; $i -lt 64; $i++) {
                $existingDisk = $vm.StorageProfile.DataDisks | Where-Object { $_.Lun -eq $i }
                if ($null -eq $existingDisk) {
                    $tempLun = $i
                    break
                }
            }
        }

        # Attach the new empty disk to the VM
        $vm = Add-AzVMDataDisk -VM $vm -Name $newDiskName -ManagedDiskId $createdDisk.Id -Lun $tempLun -Caching ReadWrite -CreateOption Attach
        Update-AzVM -ResourceGroupName $vmResourceGroupName -VM $vm
        Write-Output "✅ New empty disk attached to VM at LUN $tempLun"

        # Start VM
        Write-Output "Starting VM $vmName..."
        Start-AzVM -ResourceGroupName $vmResourceGroupName -Name $vmName
        Write-Output "✅ VM $vmName started with both disks attached."
    }
    catch {
        Write-Error "Error setting up VM for data migration: $_"
        exit 1
    }

    # Step 5: Generate data migration script for the VM
    try {
        Write-Output "Step 5: Generating data migration commands..."

        # Get the Linux/Windows OS disk to determine OS type
        $osType = $vm.StorageProfile.OsDisk.OsType
        Write-Output "Detected OS type: $osType"

        $srcDiskLun = $diskInfo.Lun
        $dstDiskLun = $tempLun

        Write-Output "Source disk LUN: $srcDiskLun"
        Write-Output "Destination disk LUN: $dstDiskLun"

        # Generate appropriate commands based on OS type
        if ($vmIsLinux -or $osType -eq "Linux") {
            Write-Output ""
            Write-Output "==== LINUX DATA MIGRATION INSTRUCTIONS ===="
            Write-Output "Run these commands in the VM to migrate data:"
            Write-Output ""
            Write-Output "# 1. Find the disk devices:"
            Write-Output "lsblk"
            Write-Output ""
            Write-Output "# 2. Format the new disk (if not already formatted):"
            Write-Output "# Replace 'sdX' with the correct device name (e.g., 'sdc')"
            Write-Output "sudo mkfs -t ext4 /dev/sdX"
            Write-Output ""
            Write-Output "# 3. Create mount points:"
            Write-Output "sudo mkdir -p /mnt/source"
            Write-Output "sudo mkdir -p /mnt/target"
            Write-Output ""
            Write-Output "# 4. Mount both disks:"
            Write-Output "# Replace 'sdY' with source disk device name (e.g., 'sdb')"
            Write-Output "# Replace 'sdX' with target disk device name (e.g., 'sdc')"
            Write-Output "sudo mount /dev/sdY /mnt/source"
            Write-Output "sudo mount /dev/sdX /mnt/target"
            Write-Output ""
            Write-Output "# 5. Copy all data:"
            Write-Output "sudo rsync -av /mnt/source/ /mnt/target/"
            Write-Output ""
            Write-Output "# 6. Verify data:"
            Write-Output "ls -la /mnt/target"
            Write-Output ""
            Write-Output "# 7. Unmount disks:"
            Write-Output "sudo umount /mnt/source"
            Write-Output "sudo umount /mnt/target"
            Write-Output ""
        } else {
            # Windows OS
            Write-Output ""
            Write-Output "==== WINDOWS DATA MIGRATION INSTRUCTIONS ===="
            Write-Output "Run these commands in the VM to migrate data:"
            Write-Output ""
            Write-Output "# 1. Open Disk Management (diskmgmt.msc)"
            Write-Output ""
            Write-Output "# 2. Initialize the new disk if it's not initialized"
            Write-Output ""
            Write-Output "# 3. Create a new simple volume and format it (e.g., as E:)"
            Write-Output ""
            Write-Output "# 4. Note the drive letters for both the source (old) and target (new) disks"
            Write-Output "# Let's say old disk is D: and new disk is E:"
            Write-Output ""
            Write-Output "# 5. Copy all data using robocopy (preserves permissions):"
            Write-Output "robocopy D:\ E:\ /MIR /COPYALL /R:1 /W:1"
            Write-Output ""
            Write-Output "# 6. Verify data:"
            Write-Output "dir E:\"
            Write-Output ""
        }

        # Ask user if they want to proceed with disk swap after migration
        Write-Output ""
        Write-Output "After you have migrated the data, run this script again with the -swapDisks flag to complete the disk swap operation."
        Write-Output ""

        $proceed = Read-Host "Have you completed the data migration? Type 'yes' to proceed with disk swap or 'no' to exit"

        if ($proceed -ne 'yes') {
            Write-Output "Exiting script. Run the script again with -swapDisks parameter after data migration is complete."
            exit 0
        } else {
            # If user says yes, continue to disk swap steps
            $performSwap = $true
        }
    }
    catch {
        Write-Error "Error generating migration instructions: $_"
        exit 1
    }
}

# Step 6: Swap disks (after data has been copied)
if ($performSwap -or $swapDisks) {
    try {
        Write-Output "Step 6: Swapping disks on VM..."

        # Ensure VM is stopped
        $vmStatus = (Get-AzVM -ResourceGroupName $vmResourceGroupName -Name $vmName -Status).Statuses |
                    Where-Object {$_.Code -like "PowerState/*"} |
                    Select-Object -ExpandProperty DisplayStatus

        if ($vmStatus -ne "VM deallocated") {
            Write-Output "Stopping VM $vmName..."
            Stop-AzVM -ResourceGroupName $vmResourceGroupName -Name $vmName -Force
            Write-Output "✅ VM $vmName stopped."
        }

        # Get fresh VM object
        $vm = Get-AzVM -ResourceGroupName $vmResourceGroupName -Name $vmName

        # Check which disks are attached
        $oldDiskAttached = $vm.StorageProfile.DataDisks | Where-Object { $_.Name -eq $diskName }
        $newDiskAttached = $vm.StorageProfile.DataDisks | Where-Object { $_.Name -eq $newDiskName }

        # Store LUN and caching info before detaching
        if ($null -ne $oldDiskAttached) {
            $targetLun = $oldDiskAttached.Lun
            $targetCaching = $oldDiskAttached.Caching
            Write-Output "Found old disk attached at LUN $targetLun with caching $targetCaching"
        } elseif ($null -ne $newDiskAttached) {
            # If only new disk is attached, use its LUN
            $targetLun = $newDiskAttached.Lun
            $targetCaching = $newDiskAttached.Caching
            Write-Output "Found new disk attached at LUN $targetLun with caching $targetCaching"
        } else {
            # Default values if no disk is found
            $targetLun = 0
            $targetCaching = "ReadWrite"
            Write-Output "No disks found attached, using default LUN 0 with ReadWrite caching"
        }

        # Detach both disks to ensure clean state
        if ($null -ne $oldDiskAttached) {
            $vm = Remove-AzVMDataDisk -VM $vm -Name $diskName
            Write-Output "Detached old disk: $diskName"
        }

        if ($null -ne $newDiskAttached) {
            $vm = Remove-AzVMDataDisk -VM $vm -Name $newDiskName
            Write-Output "Detached new disk: $newDiskName"
        }

        # Update VM after detaching
        Update-AzVM -ResourceGroupName $vmResourceGroupName -VM $vm
        Write-Output "✅ Disks detached."

        # Get fresh VM object
        $vm = Get-AzVM -ResourceGroupName $vmResourceGroupName -Name $vmName

        # Make sure we have a reference to the new disk
        $createdDisk = Get-AzDisk -ResourceGroupName $resourceGroupName -DiskName $newDiskName

        # Attach the new disk at the original LUN
        $vm = Add-AzVMDataDisk -VM $vm -Name $newDiskName -ManagedDiskId $createdDisk.Id -Lun $targetLun -Caching $targetCaching -CreateOption Attach
        Update-AzVM -ResourceGroupName $vmResourceGroupName -VM $vm
        Write-Output "✅ New disk attached to VM at LUN $targetLun"

        # Start VM back up
        Write-Output "Starting VM $vmName..."
        Start-AzVM -ResourceGroupName $vmResourceGroupName -Name $vmName
        Write-Output "✅ VM $vmName started with new disk attached."

        # Step 7: Verify final configuration
        Write-Output "Step 7: Verifying final configuration..."
        $vm = Get-AzVM -ResourceGroupName $vmResourceGroupName -Name $vmName
        $disks = $vm.StorageProfile.DataDisks
        Write-Output "Current disks attached to VM:"
        $disks | Format-Table Name, Lun, DiskSizeGB, Caching

        # Cleanup option
        $cleanup = Read-Host "Do you want to remove the original Premium V2 disk? (y/n)"
        if ($cleanup -eq 'y') {
            Write-Output "Removing original disk: $diskName"
            Remove-AzDisk -ResourceGroupName $resourceGroupName -DiskName $diskName -Force -ErrorAction SilentlyContinue
            Write-Output "✅ Original disk removed."
        } else {
            Write-Output "Original disk retained for safety."
        }

        Write-Output "Migration process completed successfully!"
    }
    catch {
        Write-Error "Error swapping disks: $_"
        exit 1
    }
}
Demo
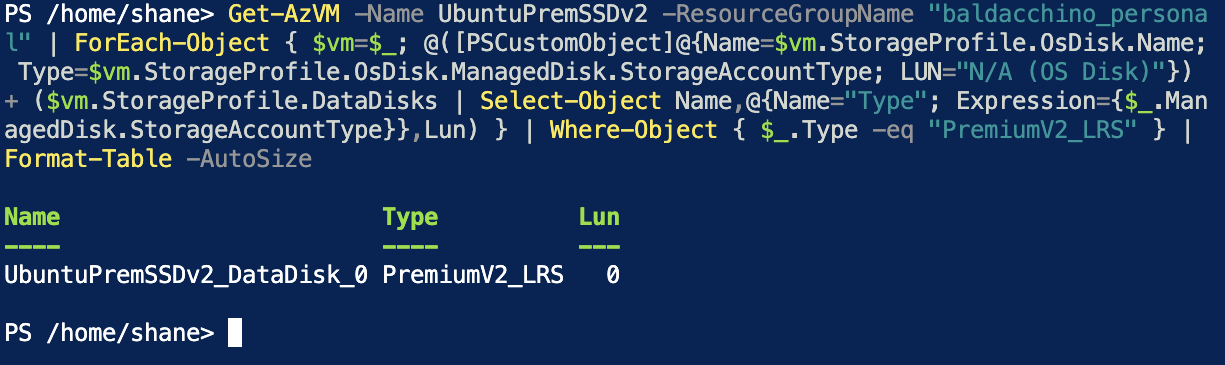
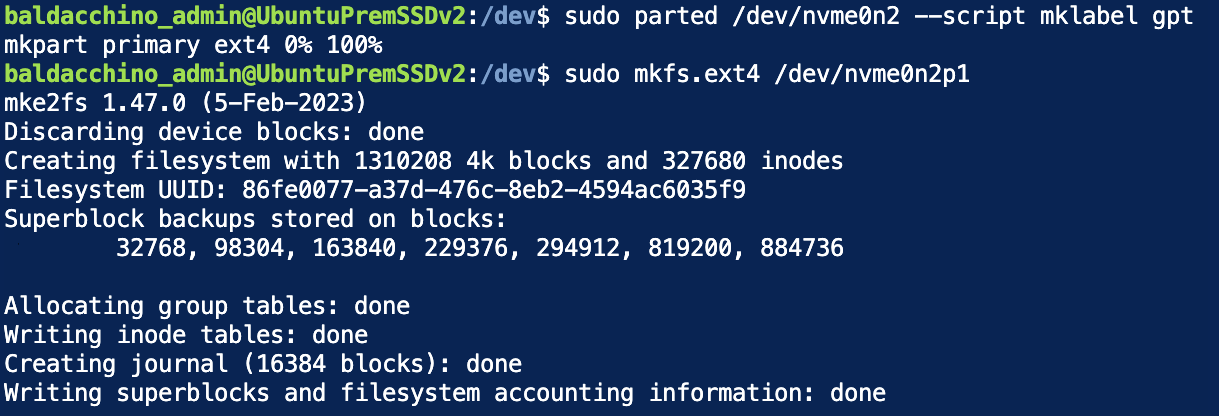
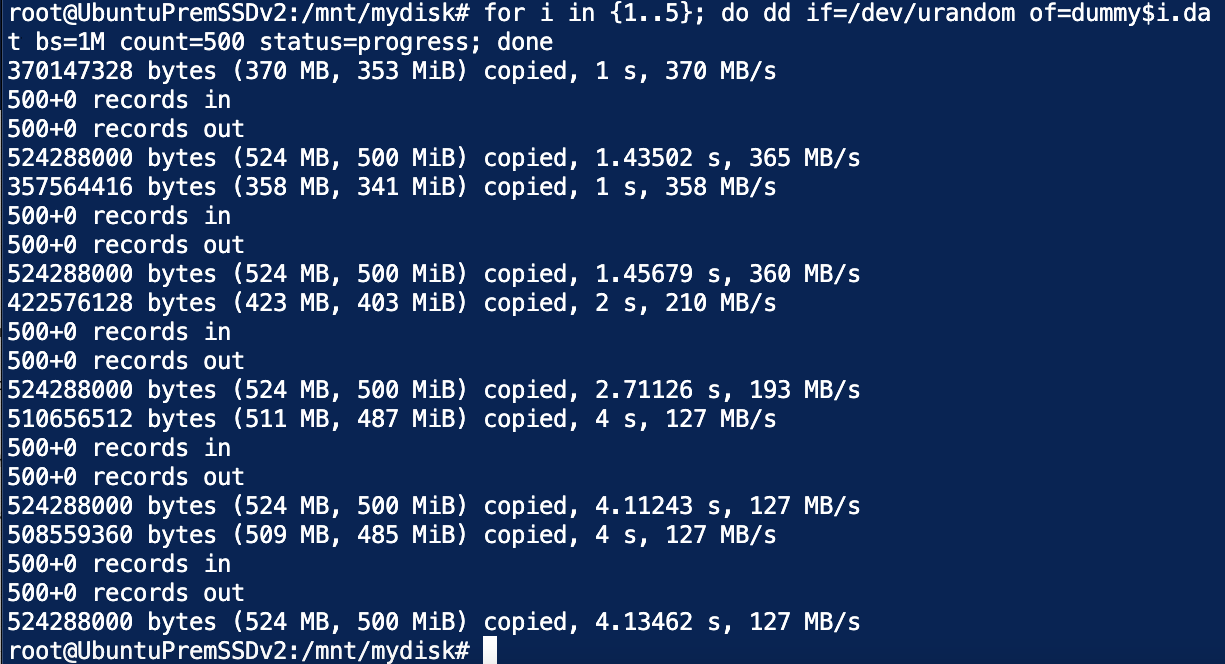
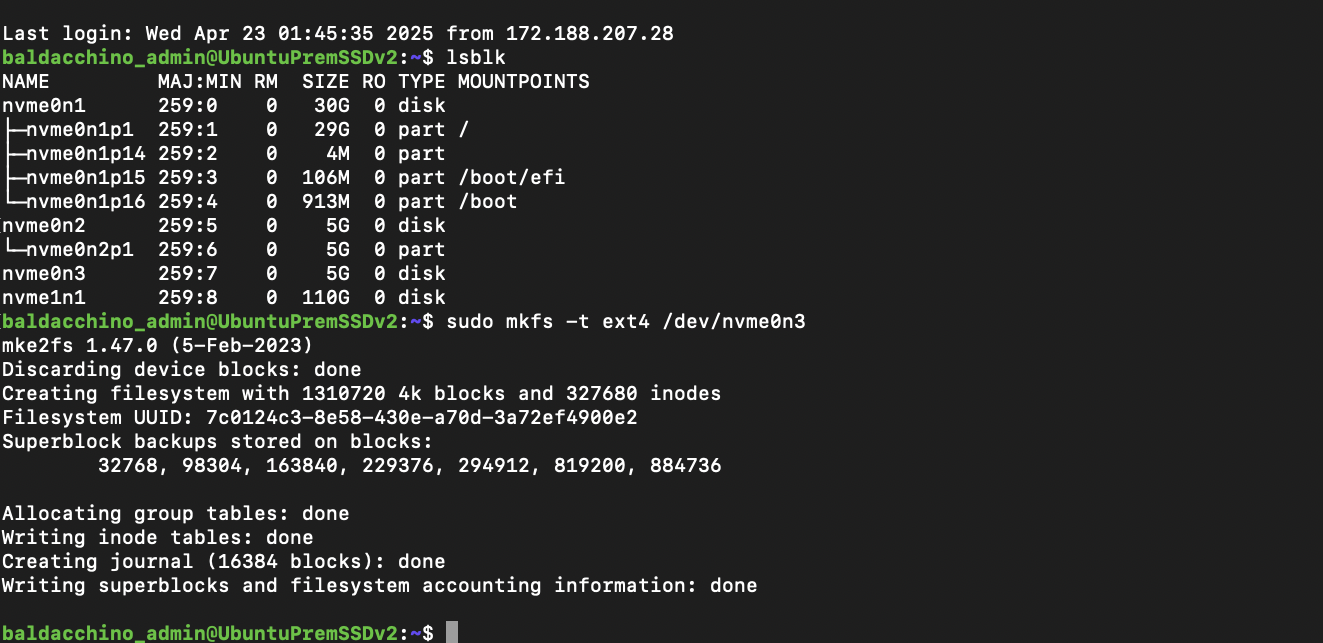
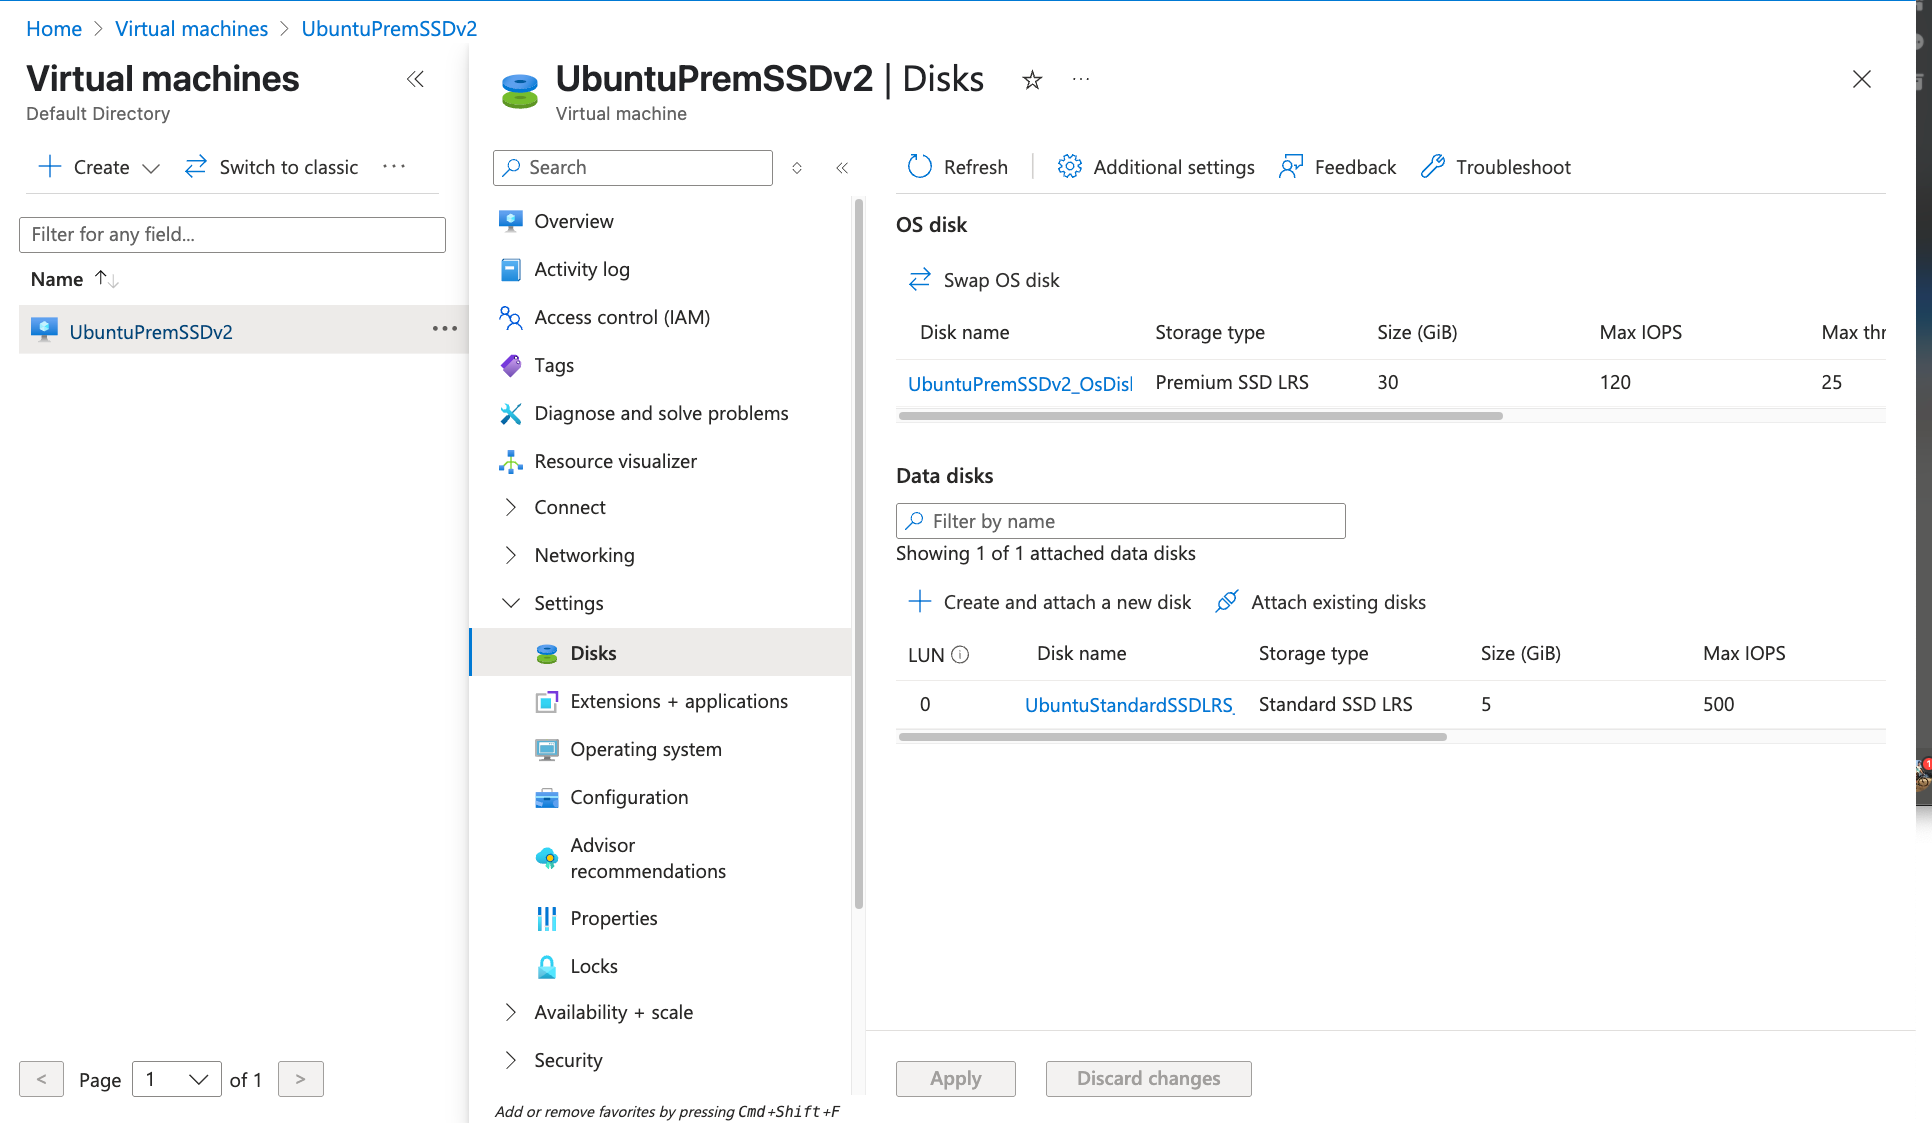
Lets see this in operation. I am using an a VM with a single Premium SSD V2 disk in LUN ID 0. I have validated that instance has a Premium SSD V2 disk in LUN 0. From here I am inserting my variables, formatting the disk, and mounting it in the OS. For the sake of this demonstration I have created 5 x 500mb dummy files using DD.
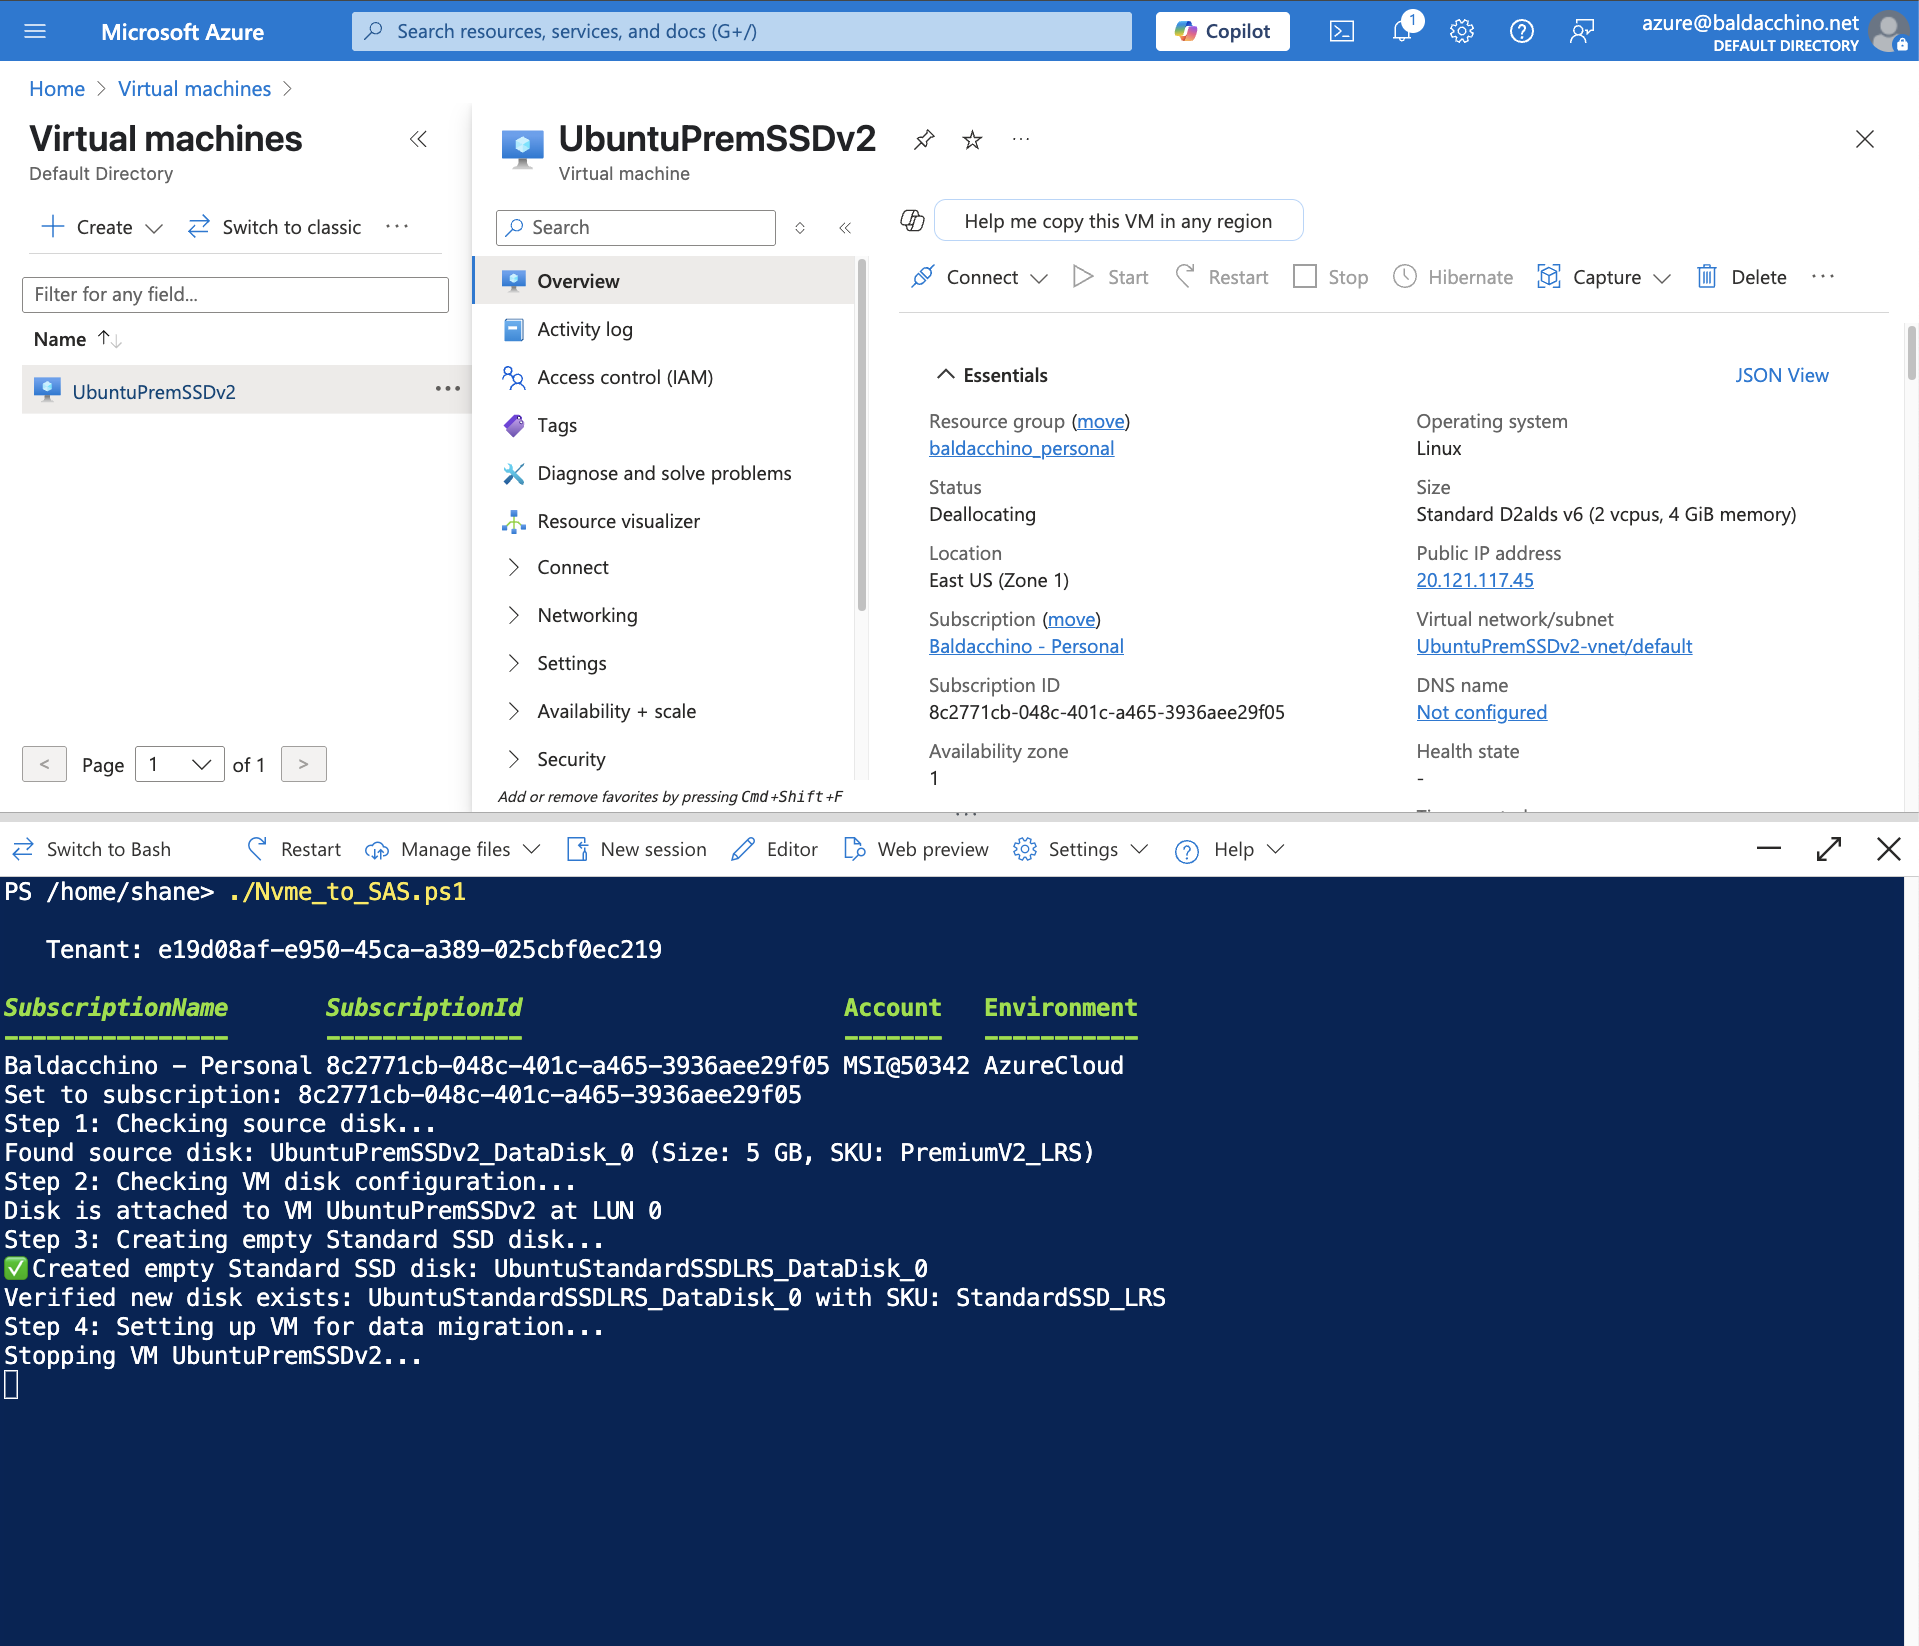
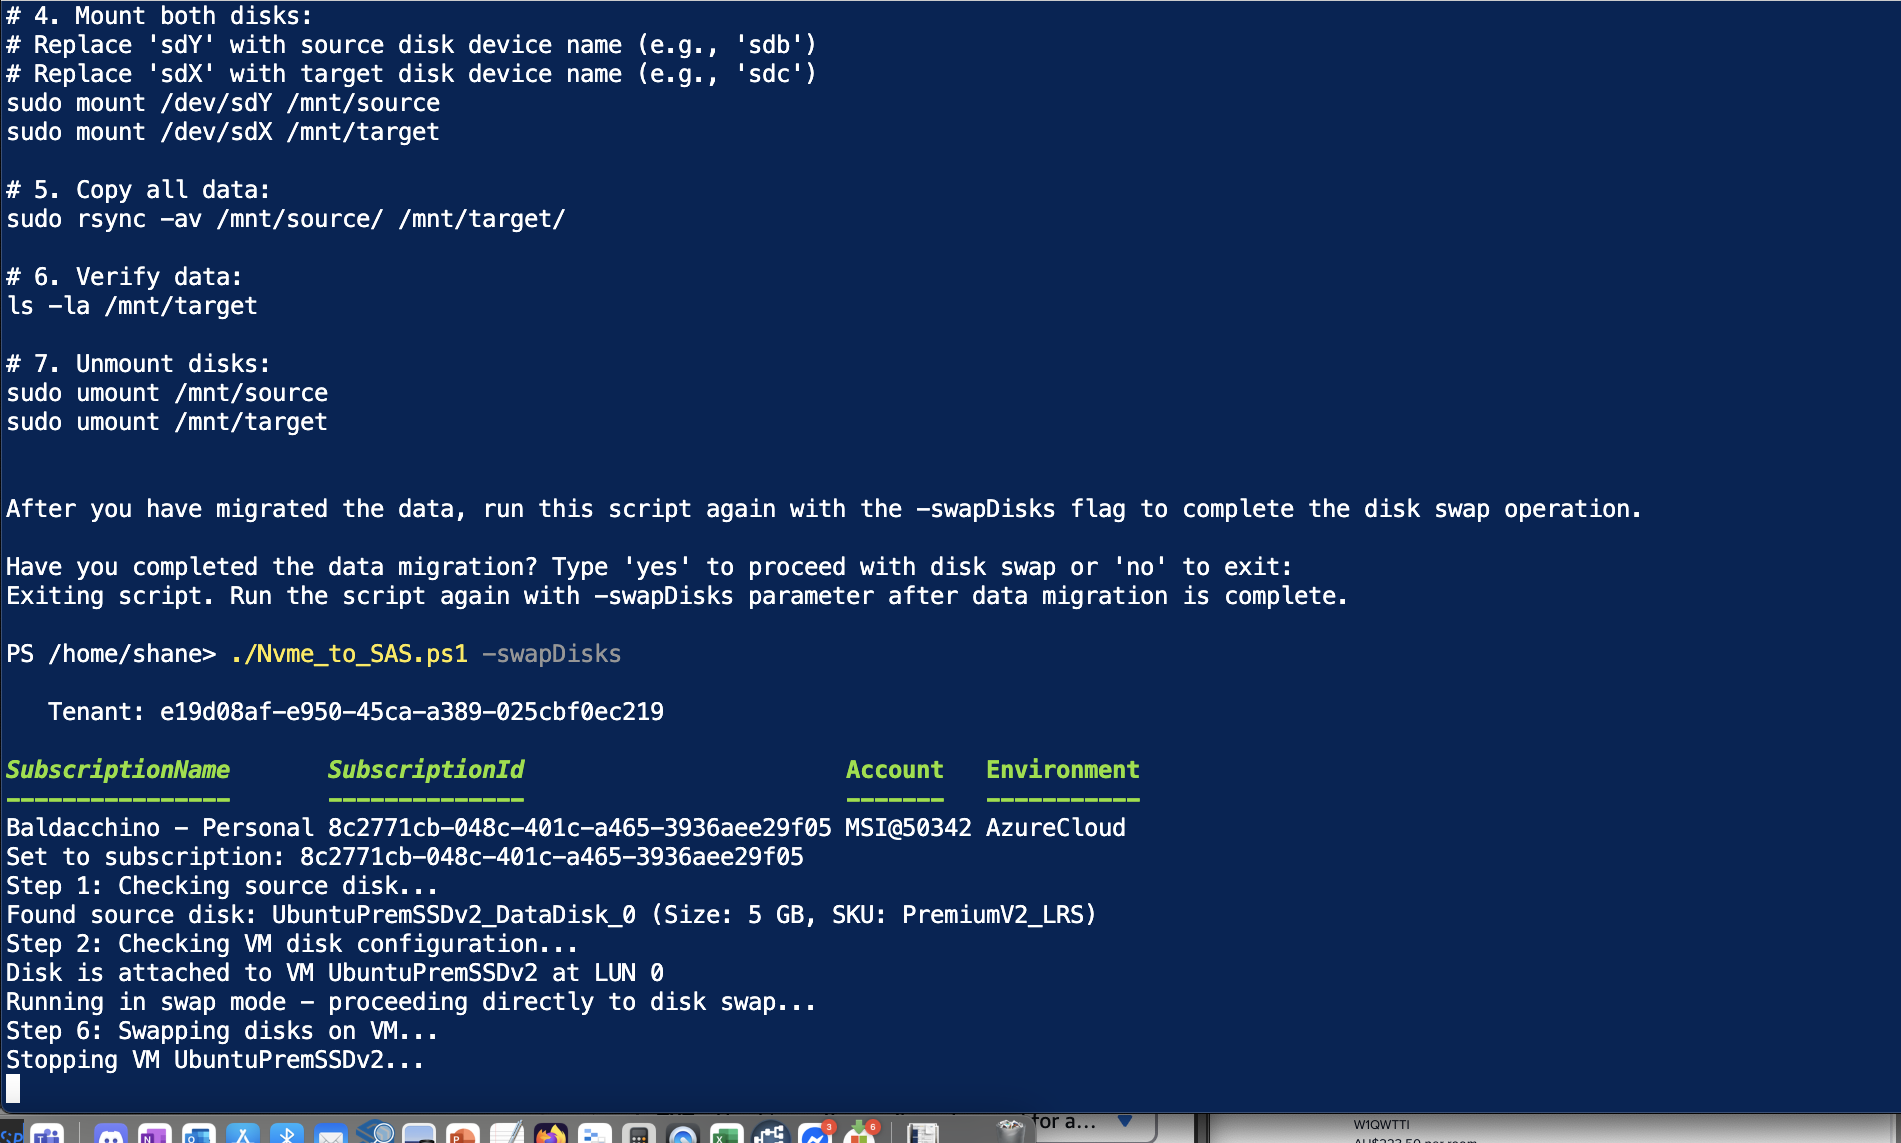
I am using Azure Command Shell to execute my Powershell code. The code firstly stops the VM, creates a new disk, attaches it as a new LUN ID and pauses for user input.
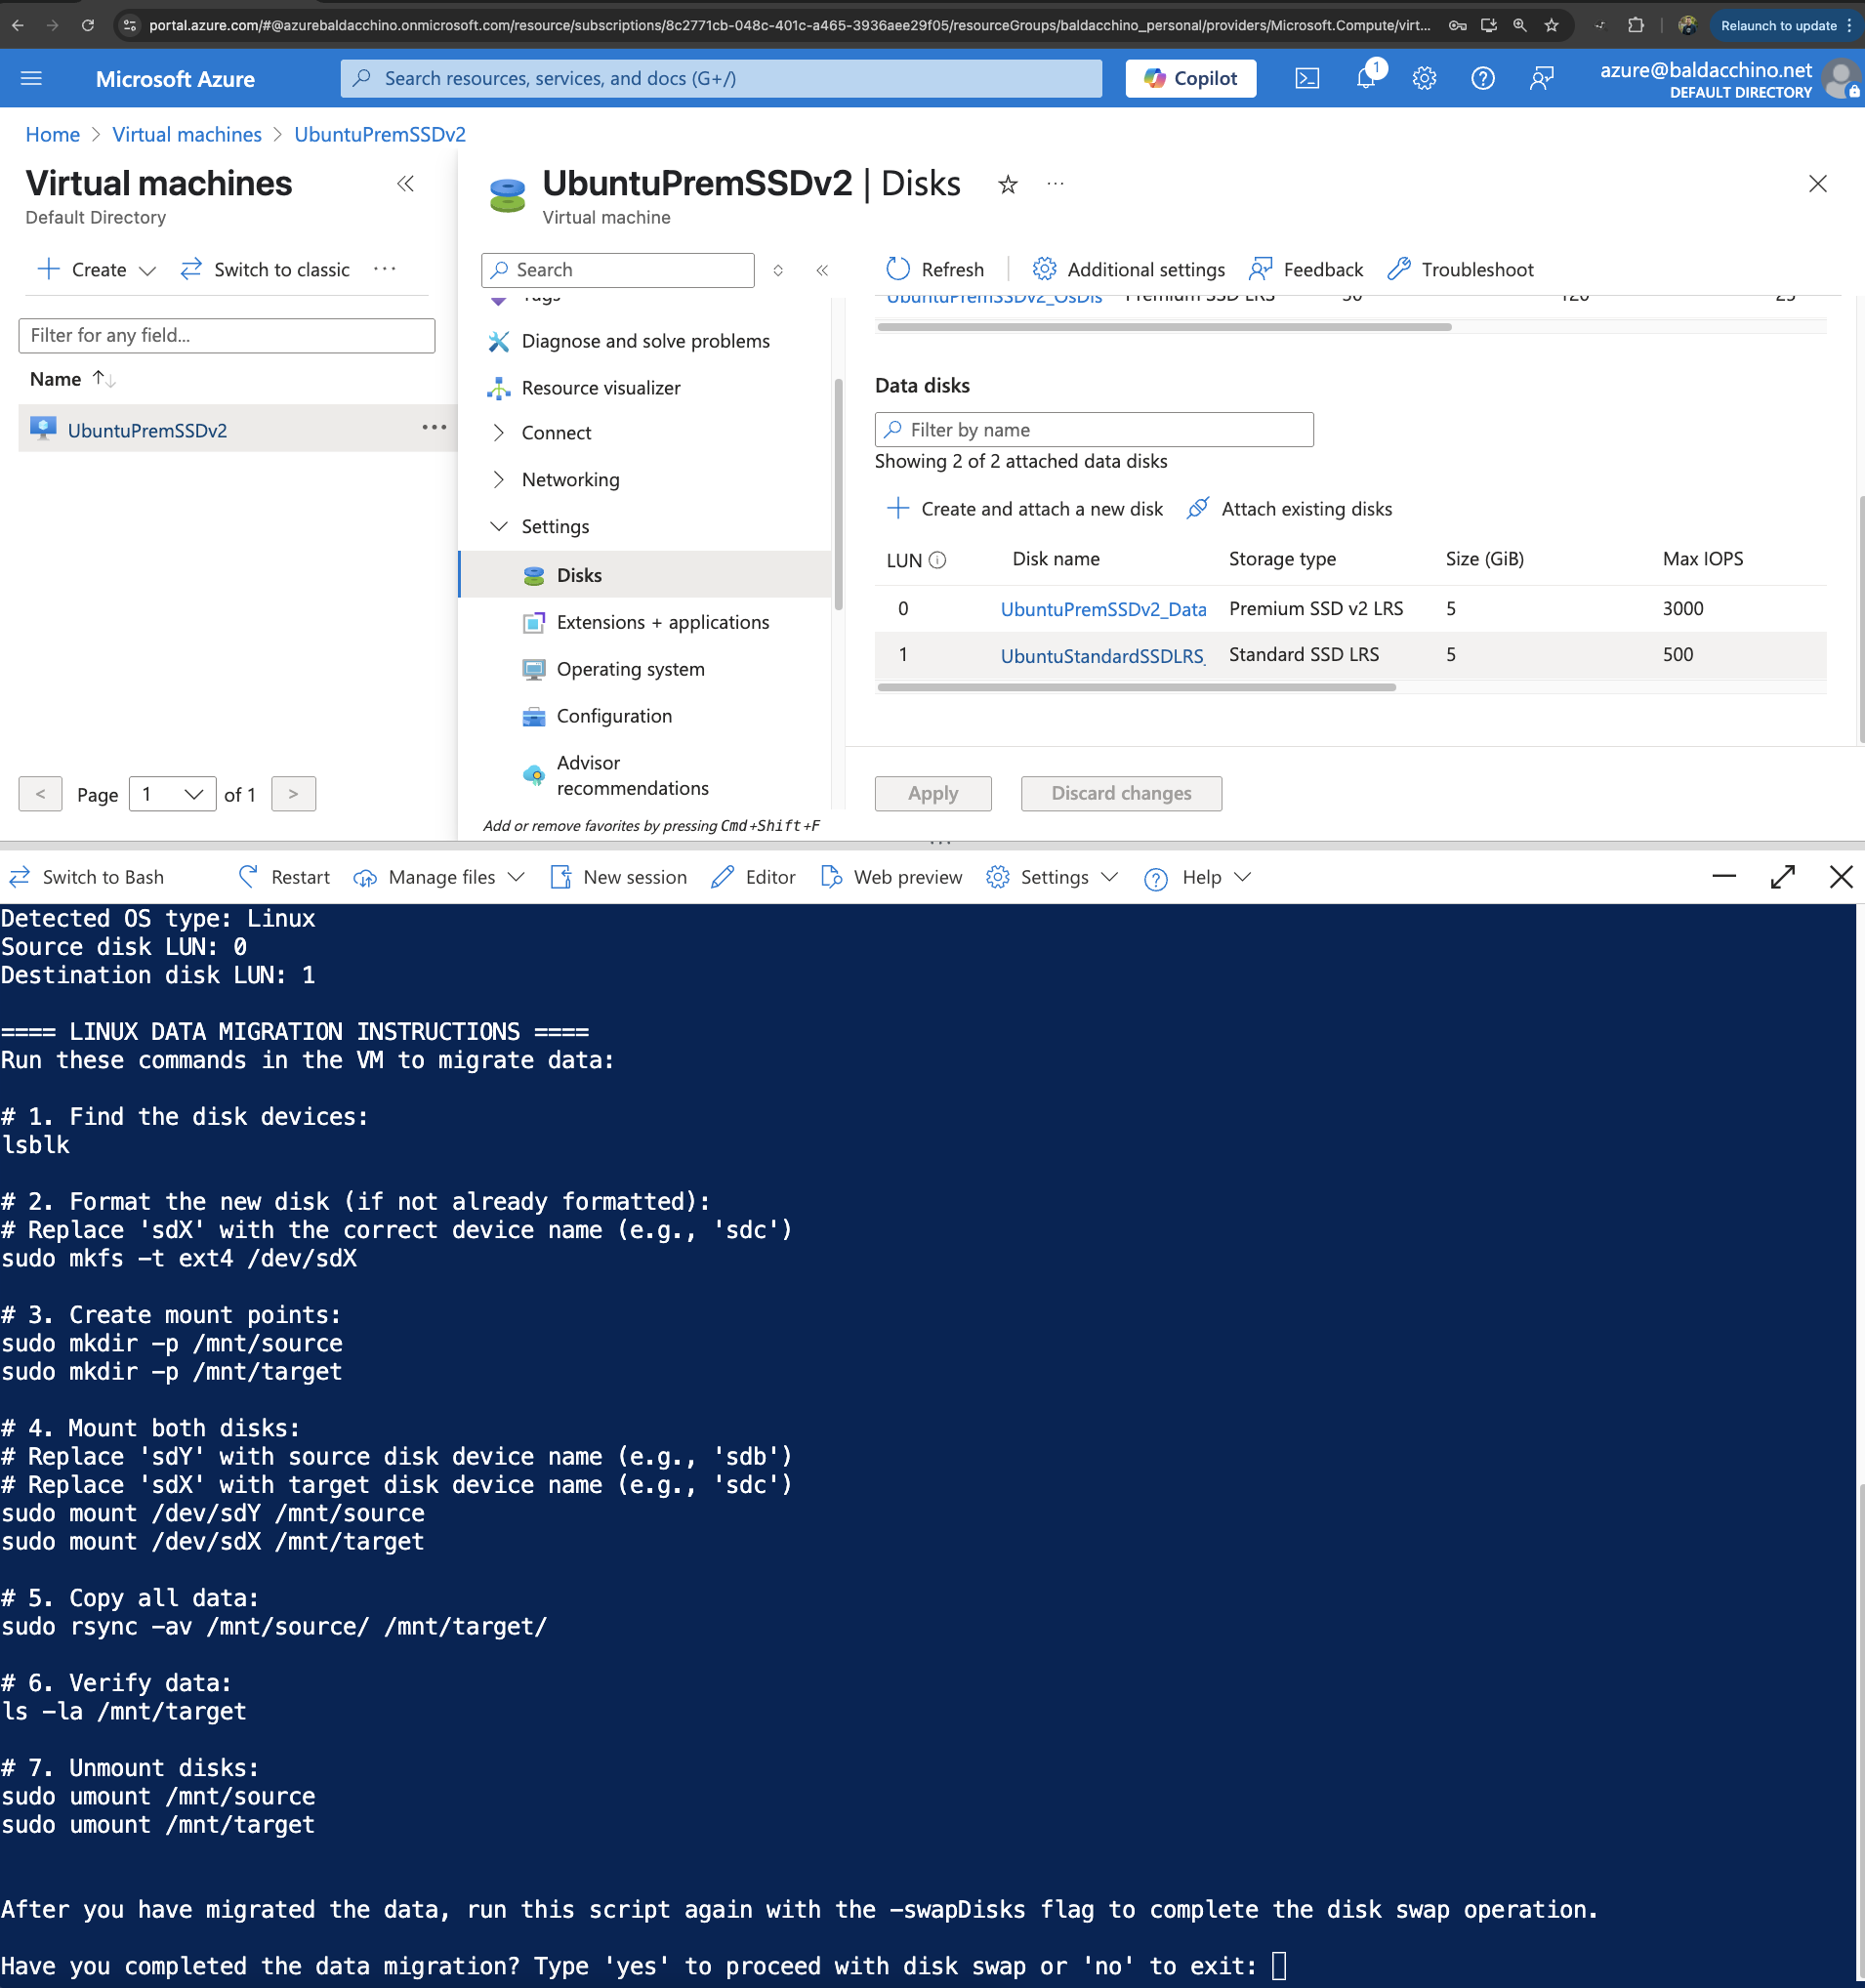
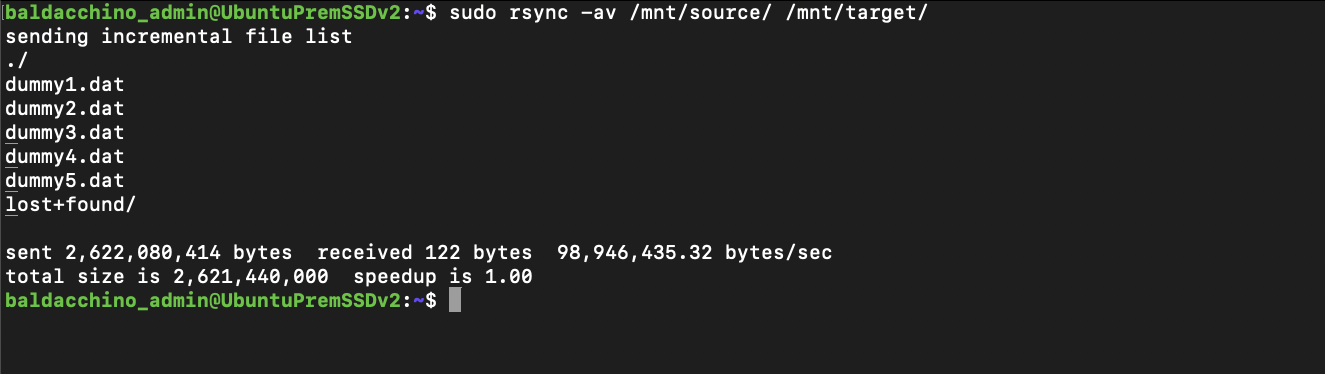
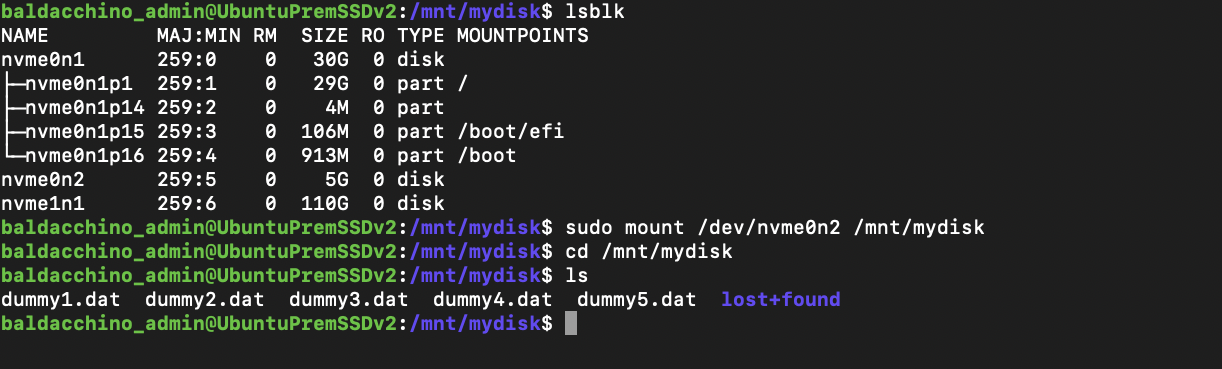
In this phase I am having to use rsync and basic linux commands to mount and copy data from the source disk to the target disk. If you are using Windows, the script will instruct you to use robocopy. Just note all permissions will be copied using the relevant parameters for either rsync or robocopy.
- rsync – sudo rsync -av /mnt/source/ /mnt/target/
- robocopy – robocopy D:\ E:\ /MIR /COPYALL /R:1 /W:1
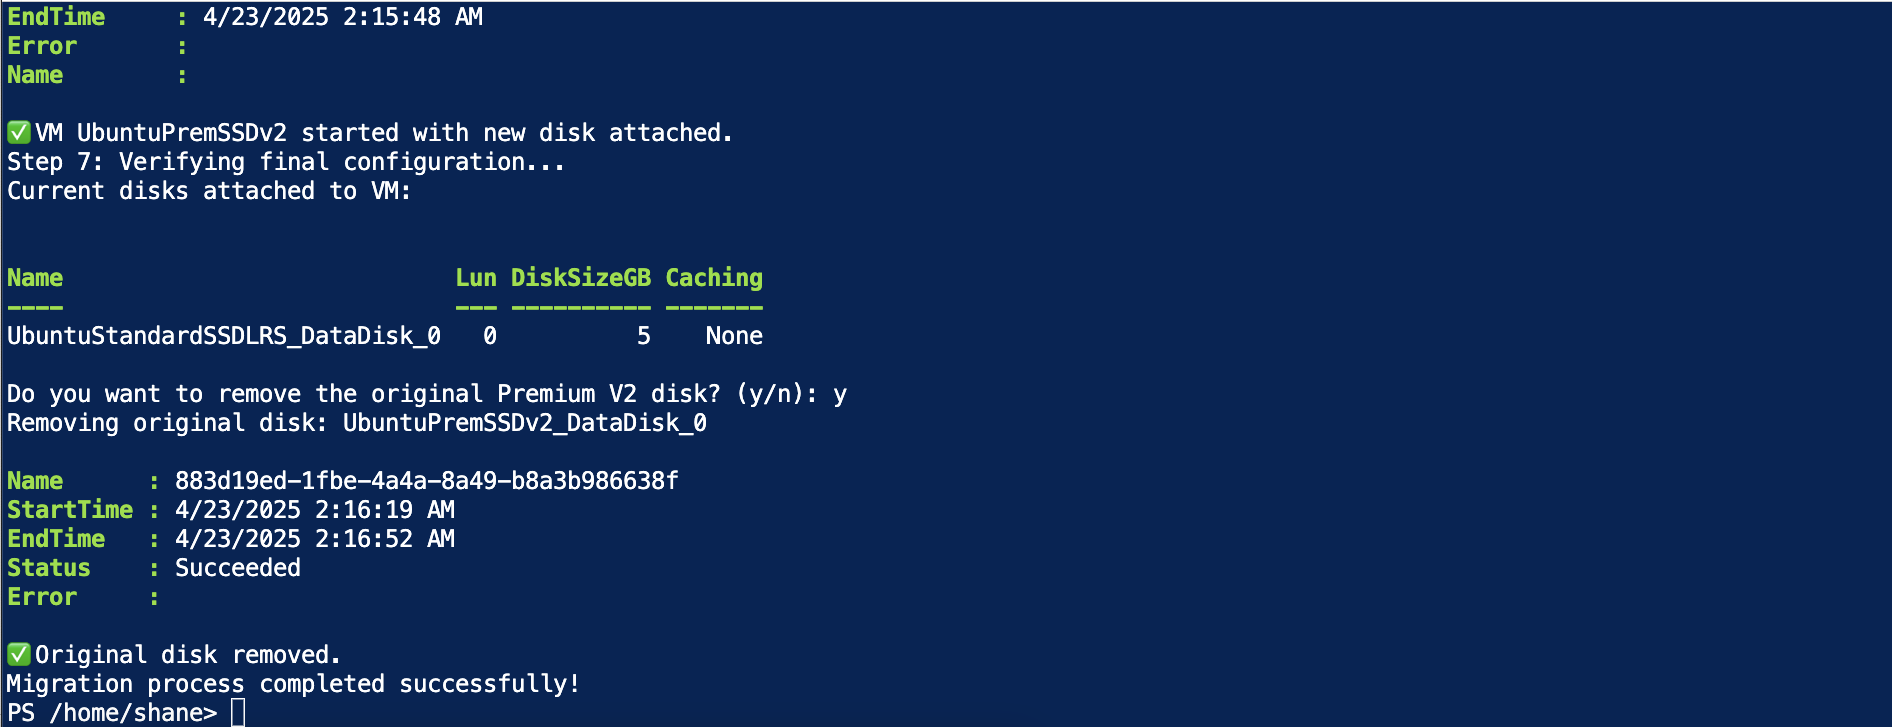
The final process of this script will re-adjust the LUN ID’s ensuring that the new disk maintains the original disks LUN ID
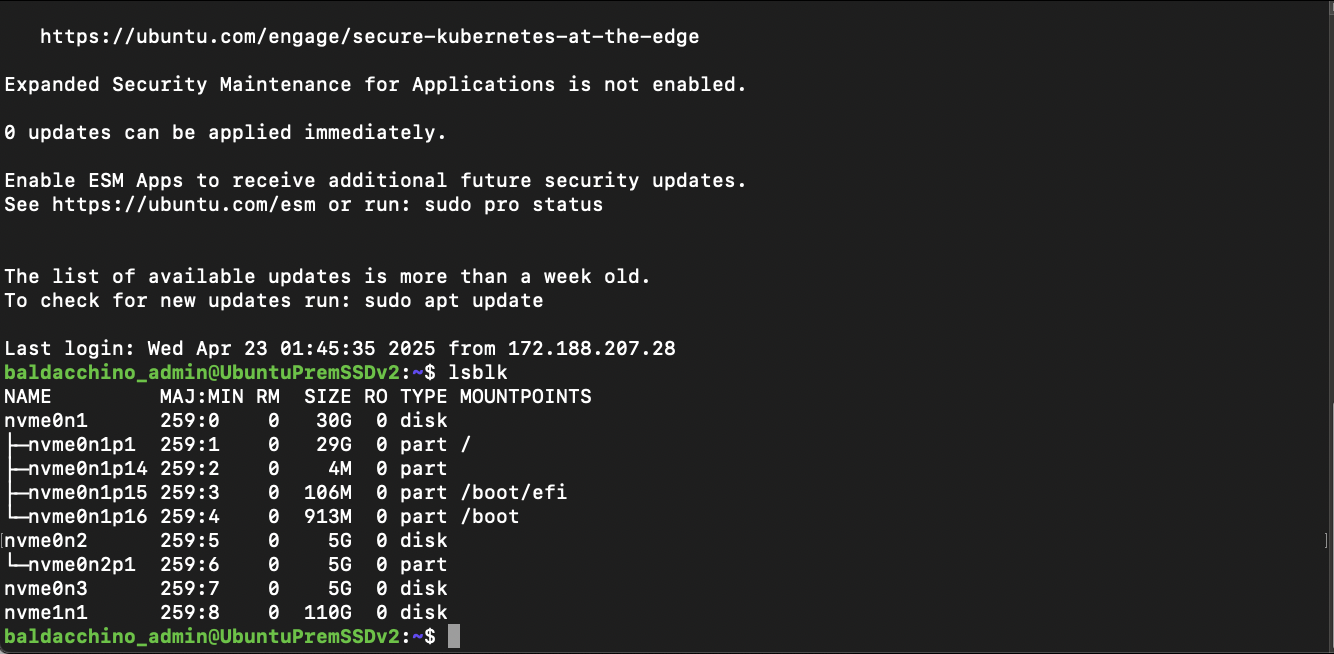
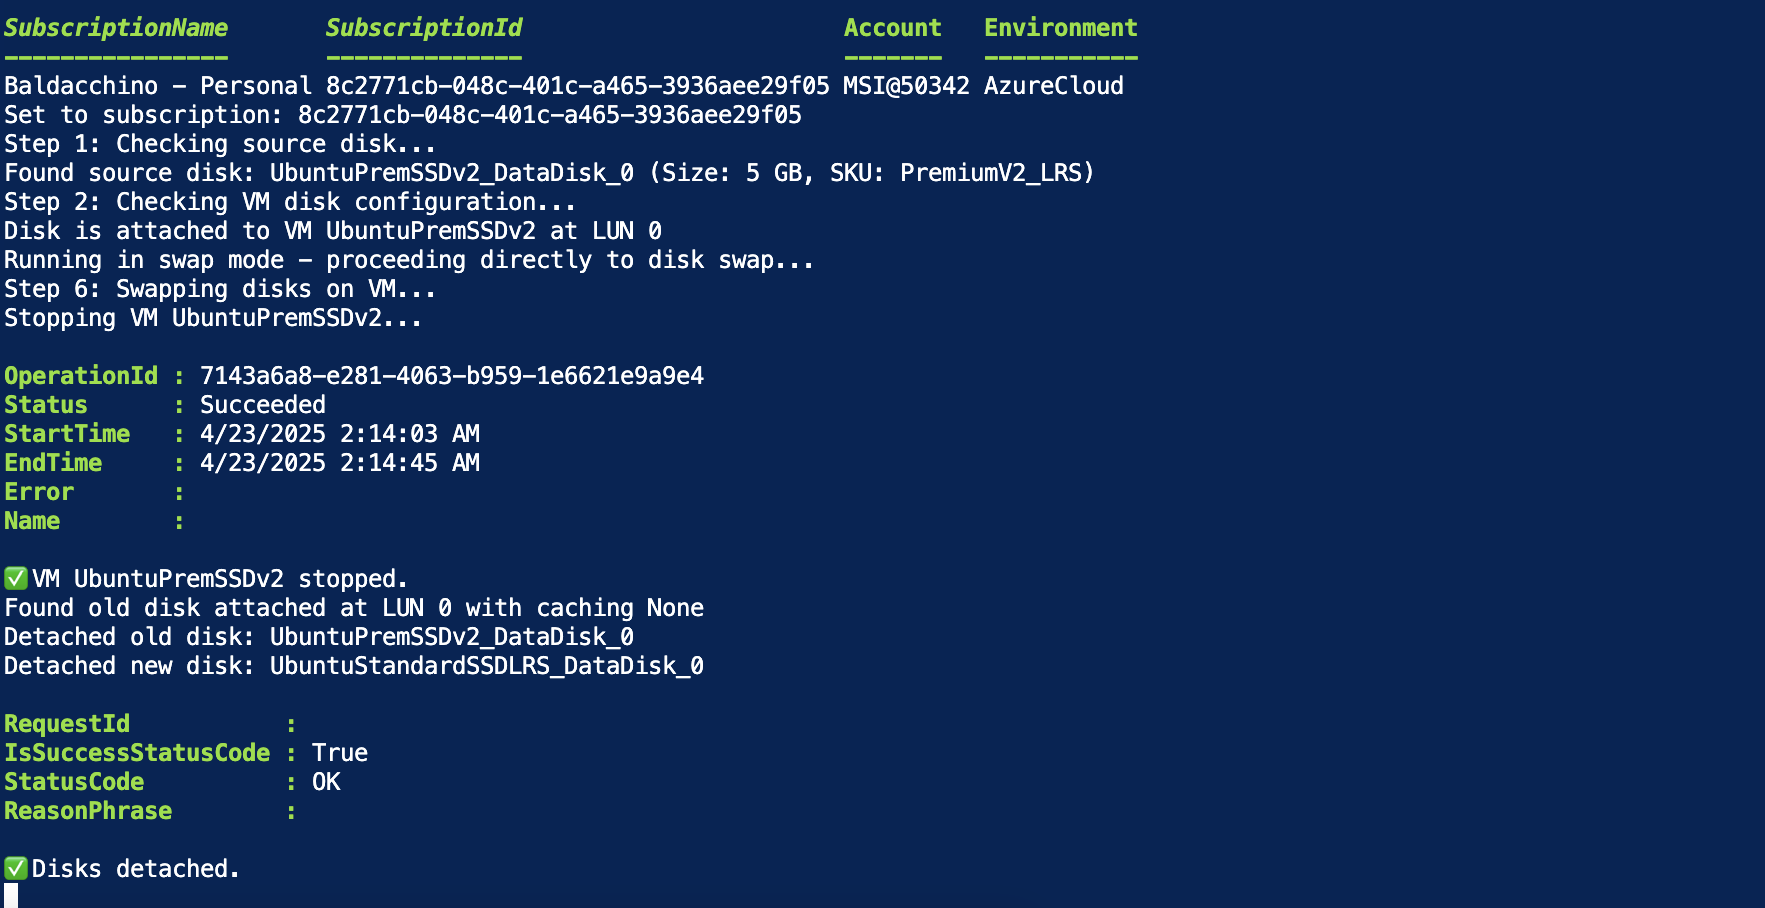
Lastly we need to validate this process. Firstly via the Azure Portal (see the LUN ID’s) but secondly via the VM itself to ensure our original data is there at the original mount point.
Summary
Whilst Microsoft does not provide you a process to downgrade from Ultra Disks & Premium SSD V2, dont let that stop you. The juice is worth the squeeze as these are expensive disks. If you have a VM that doesn’t need such high levels of performance, align your data requirements accordingly. I would recommend keeping the old volume for 24 hours before deleting and monitoring latency changes in Azure Monitor, that way if you do meed to go backwards you can relatively easily.
The cloud is an API call away for most changes, but sometimes we need to get creative in the absence of a downgrade path. Stay creative and keep on building.
Thanks
Shane Baldacchino