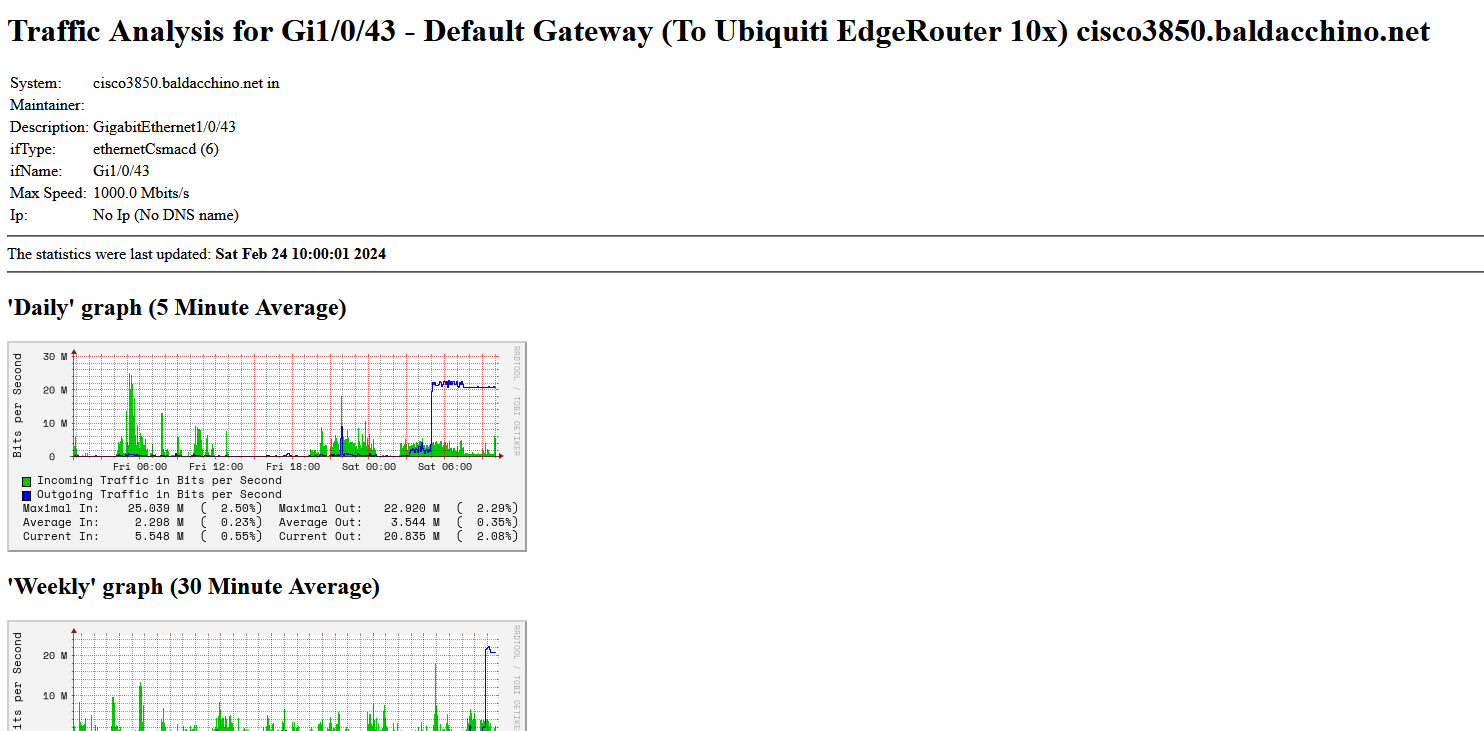
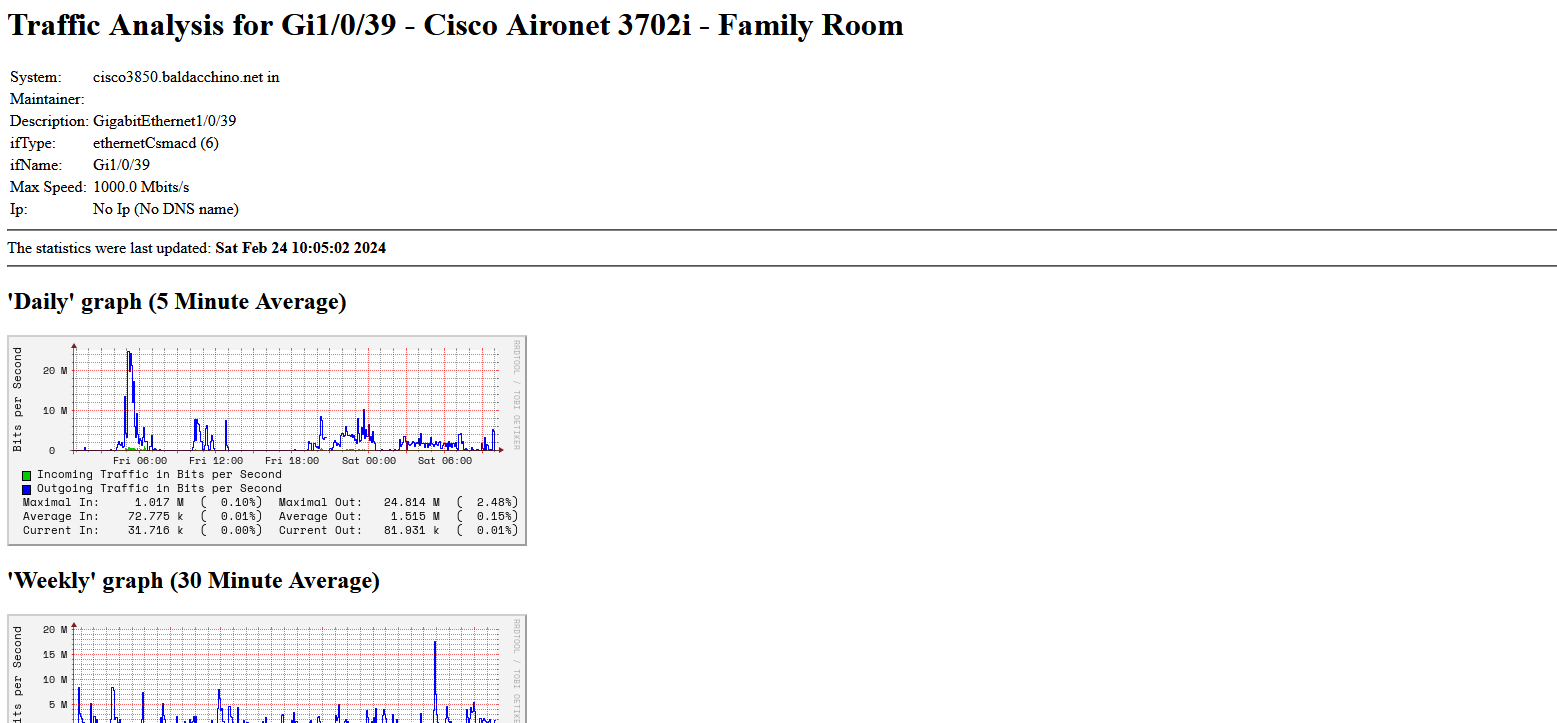
Before we get into this post. Let’s start with the solution. Let me show you my installation and what you will build. You can access my installation of MRTG here, and click through my ports. Have a play.
Traffic monitoring, do you monitor your switch ports? If you don’t I urge you to. In a past post I was being brute force attacked at home, traffic monitoring provides triangulation, another data point to correlate against.
Data allows you to make finely honed decisions, you don’t want to fly blind.
Perhaps you are trying to troubleshoot an issue, keep your ISP or colocation honest. In these cases and more you must have telemetry over your network traffic.
Today, there are a lot of choices, Prometheus and other platforms are popular, or perhaps you are in the cloud where you don’t have access to the underlying hardware. But I wanted to kick this old school and bring it back to something you can do at home.
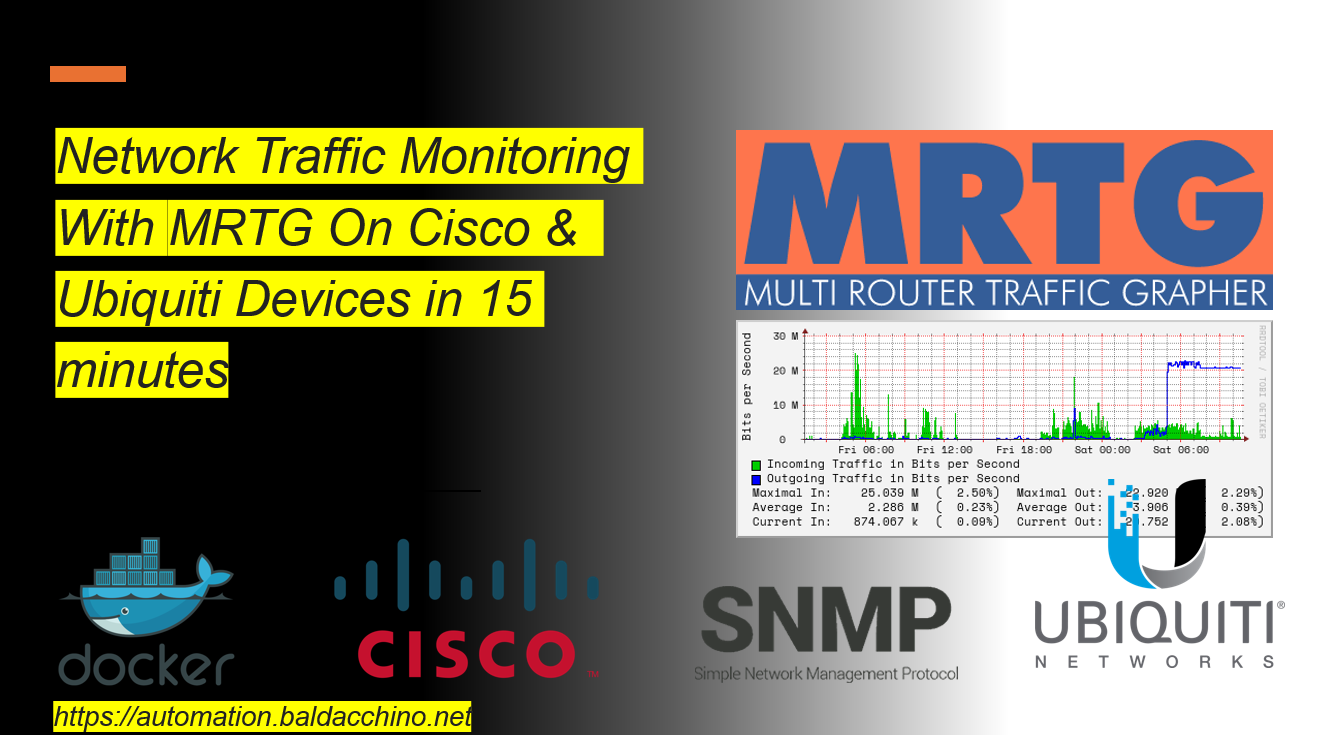
Retro you could say. MRTG or Multi Router Traffic Generator, the OG (Original Gangster).

I have picked MRTG because while old, I would say it’s the standard. You can find a good catalog of traffic graphs with just a quick search. Here is one I just found.
Written by Tobi Oetiker, here is how MRTG is described.
You have a router, you want to know what it does all day long? Then MRTG is for you. It will monitor SNMP network devices and draw pretty pictures showing how much traffic has passed through each interface.
MRTG is written in perl and works on Unix/Linux as well as Windows and even Netware systems. MRTG is free software licensed under the Gnu GPL.
https://oss.oetiker.ch/mrtg/
So in this post, I am going to show you how you can set up an MRTG traffic logger (using RRD Tool) and Docker, then we will target my Cisco 3850 48 port POE switch and I will show you how to set this up on a Ubiquiti Edge Router.
What Is MRTG?
MRTG is free software for monitoring and measuring the traffic load on network links. It allows you to see traffic load on a network over time in graphical form. I have known MRTG since my days of web hosting (30 years approaching now) and has been a staple. Why because its just so simple. Rendered static images, are simple fast, and lightweight.
It was originally developed by Tobias Oetiker and Dave Rand to monitor router traffic but has developed into a tool that can create graphs and statistics for almost anything. I am going to focus on switching and routing traffic, but there are SNMP MIB’s (Simple Network Monitoring Protocol Management Information Base) to monitor everything from CPU to RAM and beyond.
As I said, MRTG is written in Perl (yes time to dust off cgi-bin, perhaps not I say, but read on)
Looking at this in 2024 there is a beauty in its simplicity over a modern application that needs to ‘think/wait’ when you ask it to do anything. Static PNGs are just awesome.
MRTG records this data in a log on the client along with previously recorded data for the device. The software then creates an HTML document from the logs, containing a list of graphs detailing traffic for the selected devices in the server.
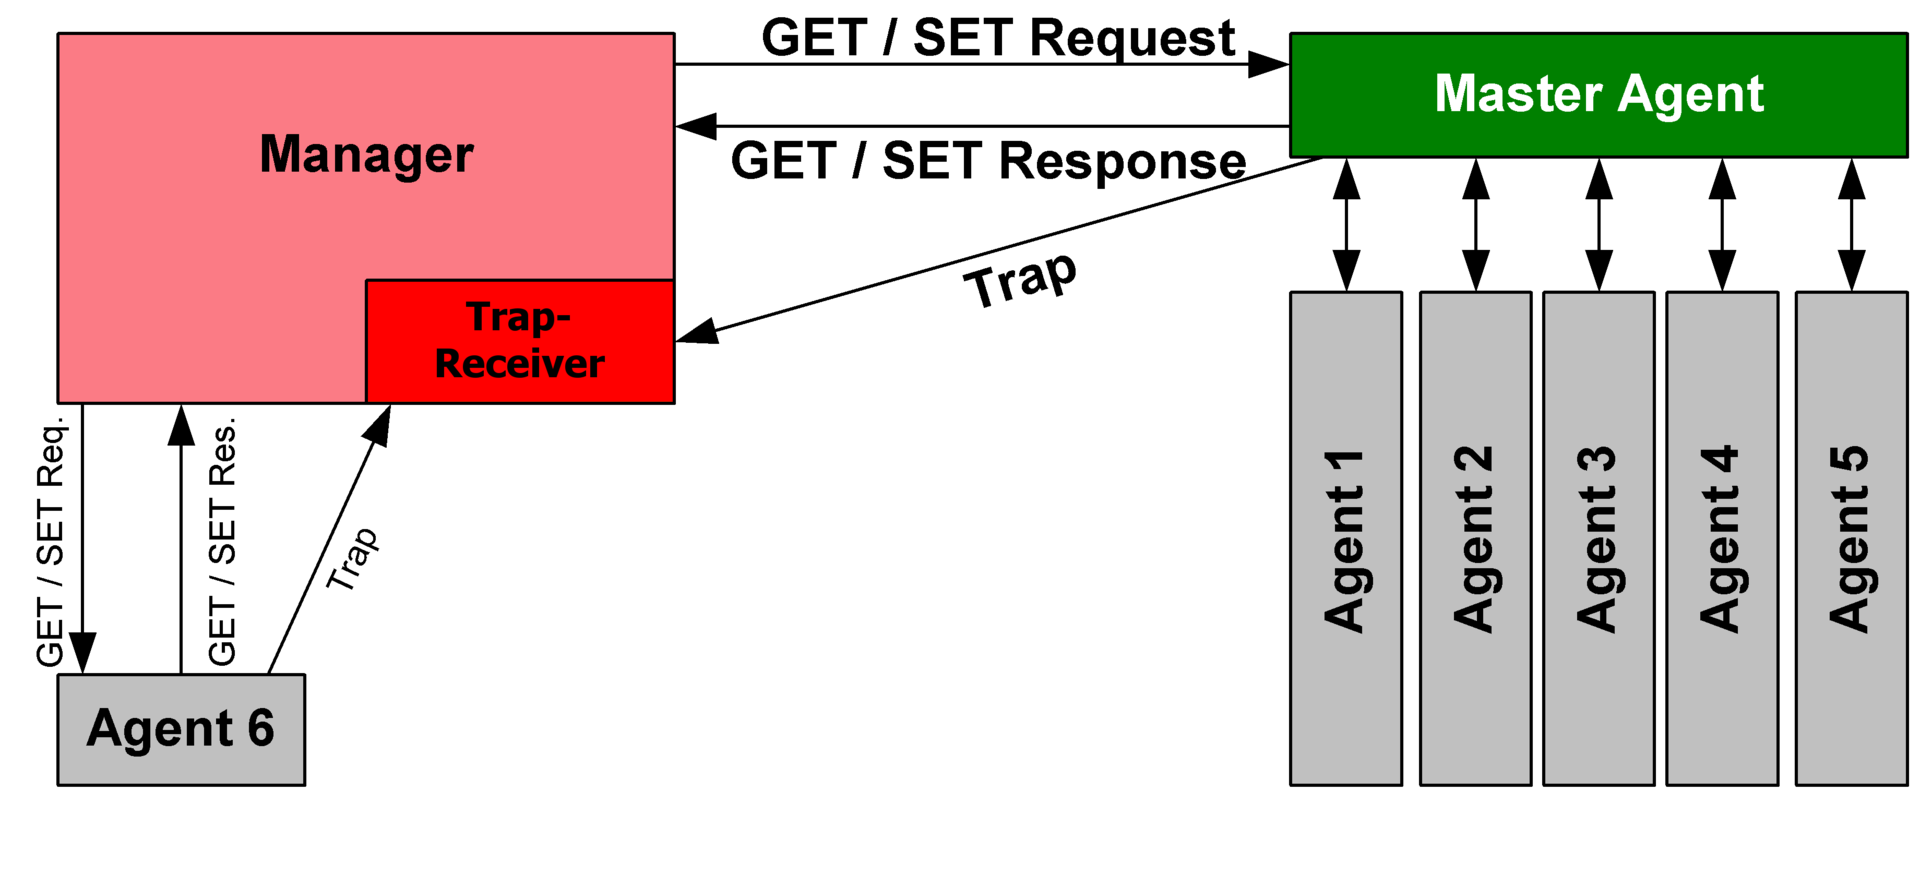
SNMP – It All Starts Here
MRTG uses the Simple Network Management Protocol (SNMP) to send requests with two object identifiers (OIDs) to a device. The device must be SNMP-enabled and have a management information base (MIB) to look up the OIDs specified. After collecting the information it will send back the raw data encapsulated in an SNMP protocol. In this post, I will show you how to enable SNMP on both Cisco and Ubiquiti devices. From Windows OS’es and beyond, there is an SNMP daemon/service out there, what the SNMP trap provides is another story.
SNMP is an Application Layer protocol and you need UDP 161/162 (Trap) open on your devices and they need to be configured with an appropriate ‘SNMP Community String’. This will not be a post that goes into the details of SNMP, and I assume you have your head around the basics. If not some homework for you
SNMP Configuration
Today I will focus on these two common platforms. Cisco and Ubiquiti. Common enough that those of you who are reading this will be able to relate, and if you don’t have either platform then as long as your device supports SNMP, setting this up is possible, but you are on your own. For both platforms, I will assume you have SSH access and we will be doing this via the CLI. On my Ubiquiti, this is possible via the web interface but there is no web interface on my Cisco.
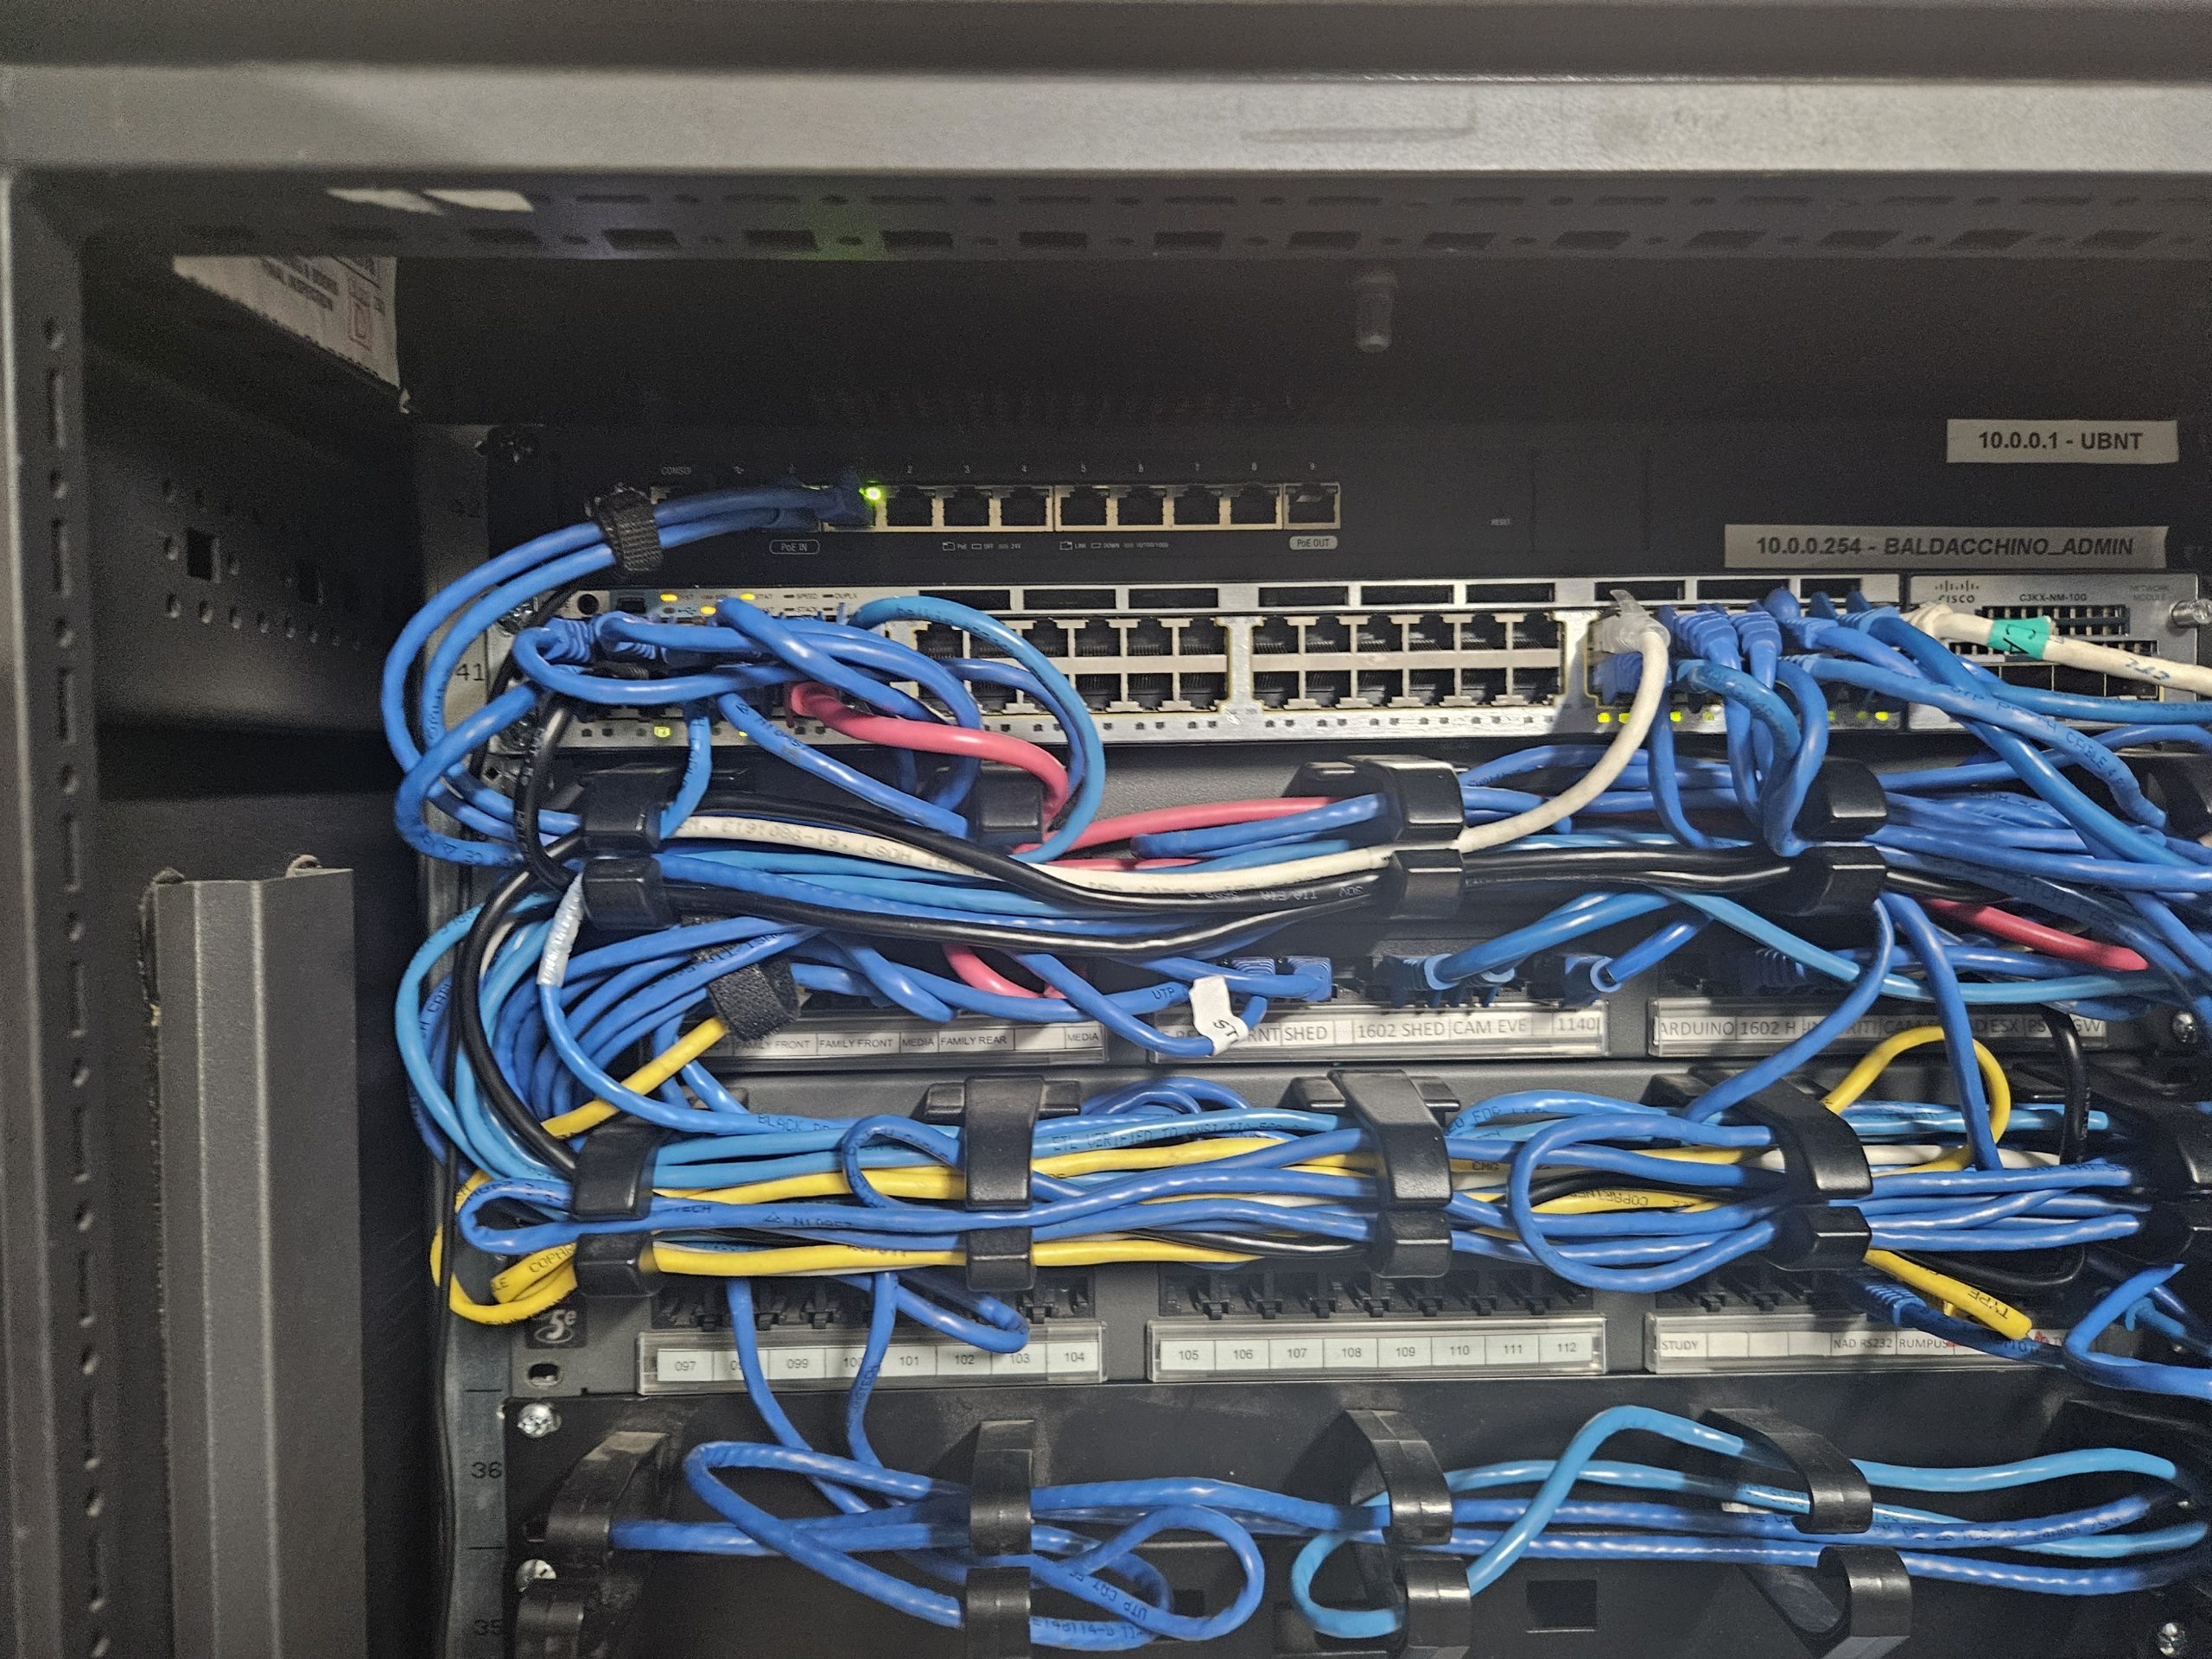
Note, that we will be setting up SNMP before configuring MRTG. You will need to know the IP address you will be running your MRTG server from, as this will form part of the SNMP configuration. In my specific configuration, my SNMP Community String is ‘baldacchino‘ and my SNMP server host is 10.0.0.200
Cisco IOS
ssh username@ip_address
enable
configure terminal
snmp-server community YOUR_COMMUNITY_STRING RO
snmp-server host HOST_IP_ADDRESS traps version 2c YOUR_COMMUNITY_STRING
exit
write memory
Replace YOUR_COMMUNITY_STRING with your desired community string. RO stands for Read-Only access.
Replace HOST_IP_ADDRESS with the IP address of the host (where MRTG will be installed)
Ubiquiti
configure
set service snmp community YOUR_COMMUNITY_STRING authorization ro
set service snmp community YOUR_COMMUNITY_STRING network a.b.c.d/24
commit
save
exit
Replace YOUR_COMMUNITY_STRING and a.b.c.d/24 with your actual values. In my case this is 10.0.0.200/32
MRTG Installation
Whilst I am nostalgic about the past life, there is a reason technology advances. Firstly I appreciate how easy things are today, do I miss the past? Not really. It was hard work having to compile applications. Makefiles, GCC. No thanks.
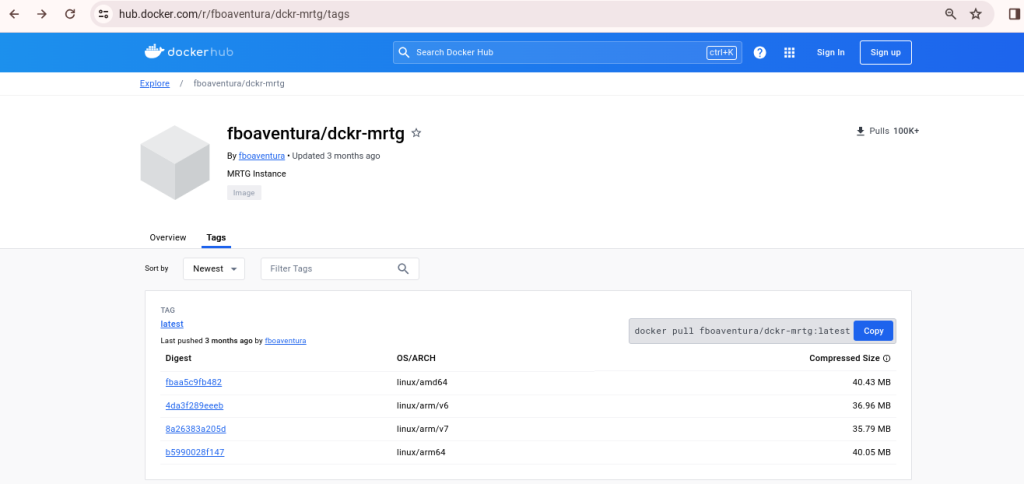
For this reason, I am going to use a Docker container. This is going to be the easiest and quickest way to get started. I am using the container image fboaventura/dckr-mrtg
This container supports AMD64, ARM64, ARMV6, and ARMV7 which should mean from PC through to MAC and SBCs (Single Board Computers) this has you covered.
I am going to be using my Synology NAS (AMD64) to run this container. There is an assumption you have Docker installed. If you haven’t got Docker installed, pause here
To pull this container issue use ‘docker pull’
docker pull fboaventura/dckr-mrtg:latest
To run this container we use ‘docker run’, but it’s not as simple as this so please read on.
docker run -d -p 8880:80 -e "HOSTS='public:localhost:2,community:ipaddress'" fboaventura/dckr-mrtg:latest
In the example above, port 8880 on the host is being mapped to port 80 on the container (Nginx) and it is using the SNMP Community String of ‘public‘ and the SNMP IP Address of ‘localhost‘. These will need to be changed to the values you used above.
The variable HOSTS is where you may set the hosts that MRTG will monitor, it could be one device, it could be many. The format to be used is community:host[:version[:port]],community:host[:version:[port]],...
Where:
- community: is the SNMP community with read access
- host: is the IP address or hostname (if Docker can resolve it)
- version: can be
1or2for SNMP 1 or 2c. If left empty it will assume 2c. - port: can be any custom port. There is one point of attention, if the port is needed, then the version must be set.
Enter your values and start your container.
You will find this starts up, but there is going to be a problem. Can you guess? Persistence. We are generating files, and having a basic database. We need to externalise storage.
Externalising Docker Storage
The container will create the following directories:
/mrtg/etc: where the configuration files are stored/mrtg/html: where the HTML files are stored/mrtg/rrd: where the RRD files are stored
If we don’t externalise storage, as soon as the container restarts, well you are back to square one, all history is lost. To ensure we don’t lose our generated graphs we need to map the three directories above outside of the container and to our host file system (which I hope you backup)
$ mkdir /docker/mrtg/html
$ mkdir /docker/mrtg/etc
$ mkdir /docker/mrtg/rrd
$ docker run -d -p 8880:80 -e "HOSTS='public:localhost,community:ipaddress'" -v `pwd`/docker/mrtg/html:/mrtg/html -v `pwd`/docker/mrtg/rrd:/mrtg/rrd -v `pwd`/docker/mrtg/etc:/mrtg/etc fboaventura/dckr-mrtg:late
Via DockerCompose my settings are as follows.
{
   "CapAdd" : null,
   "CapDrop" : null,
   "cmd" : "/usr/sbin/mrtg.sh",
   "cpu_priority" : 50,
   "enable_publish_all_ports" : false,
   "enable_restart_policy" : true,
   "enable_service_portal" : null,
   "enabled" : false,
   "env_variables" : [
      {
         "key" : "PATH",
         "value" : "/usr/local/sbin:/usr/local/bin:/usr/sbin:/usr/bin:/sbin:/bin"
      },
      {
         "key" : "TZ",
         "value" : "UTC"
      },
      {
         "key" : "ENABLE_V6",
         "value" : "no"
      },
      {
         "key" : "HOSTS",
         "value" : "baldacchino:10.0.0.254"
      },
      {
         "key" : "USERID",
         "value" : "100"
      },
      {
         "key" : "GROUPID",
         "value" : "101"
      },
      {
         "key" : "REGENERATEHTML",
         "value" : "yes"
      },
      {
         "key" : "INDEXMAKEROPTIONS",
         "value" : " "
      }
   ],
   "exporting" : false,
   "id" : "cfa911b97fdf059ffac14c0530859a27a983a4366c9878c734eb4f9da08f5472",
   "image" : "fboaventura/dckr-mrtg:latest",
   "is_ddsm" : false,
   "is_package" : false,
   "labels" : {
      "org.label-schema.author" : "",
      "org.label-schema.build-date" : "2023-11-26T00:00:01Z",
      "org.label-schema.description" : "Multi\\ Router\\ Traffic\\ Grapher.",
      "org.label-schema.docker.dockerfile" : "/Dockerfile",
      "org.label-schema.license" : "MIT",
      "org.label-schema.name" : "MRTG",
      "org.label-schema.schema-version" : "1.0",
      "org.label-schema.url" : "https://fboaventura.dev",
      "org.label-schema.vcs-ref" : "090cff6",
      "org.label-schema.vcs-url" : "https://github.com/fboaventura/dckr-mrtg",
      "org.label-schema.vendor" : "",
      "org.label-schema.version" : "2.5.3"
   },
   "links" : [],
   "memory_limit" : 0,
   "name" : "dckr-mrtg",
   "network" : [
      {
         "driver" : "bridge",
         "name" : "bridge"
      }
   ],
   "network_mode" : "bridge",
   "port_bindings" : [
      {
         "container_port" : 80,
         "host_port" : 8888,
         "type" : "tcp"
      }
   ],
   "privileged" : false,
   "service_portals" : [],
   "services" : [],
   "shortcut" : {
      "enable_shortcut" : false,
      "enable_status_page" : false,
      "enable_web_page" : false,
      "web_page_url" : ""
   },
   "use_host_network" : false,
   "version" : 2,
   "volume_bindings" : [
      {
         "host_volume_file" : "/docker/mrtg/html",
         "is_directory" : true,
         "mount_point" : "/mrtg/html",
         "type" : "rw"
      },
      {
         "host_volume_file" : "/docker/mrtg/conf.d",
         "is_directory" : true,
         "mount_point" : "/etc/mrtg/conf.d",
         "type" : "rw"
      },
      {
         "host_volume_file" : "/docker/mrtg/rrd",
         "is_directory" : true,
         "mount_point" : "/mrtg/rrd",
         "type" : "rw"
      }
   ]
}
Assuming your settings are correct your container should start up and hitting this on the port specified should yield a default webpage of MRTG. You will notice I have an auto restart policy to ensure this container is always running.
Configuration
From here you may have a few questions. I know I did. I had two
- Where are all my switch ports? [By default only active|online ports are graphed]
- Why didn’t my interface names carry over from the switch? [You will need to edit the configuration file]
We need to edit the configuration file to name our ports and change which ports are and are not monitored. This is done by remarking out or in lines. The configuration file will be in /mrtg/conf.d and will be named devicename.cfg where the device name is the fully qualified device name of your switch. In my case, the file name was called cisco3850.baldacchino.net.cfg.
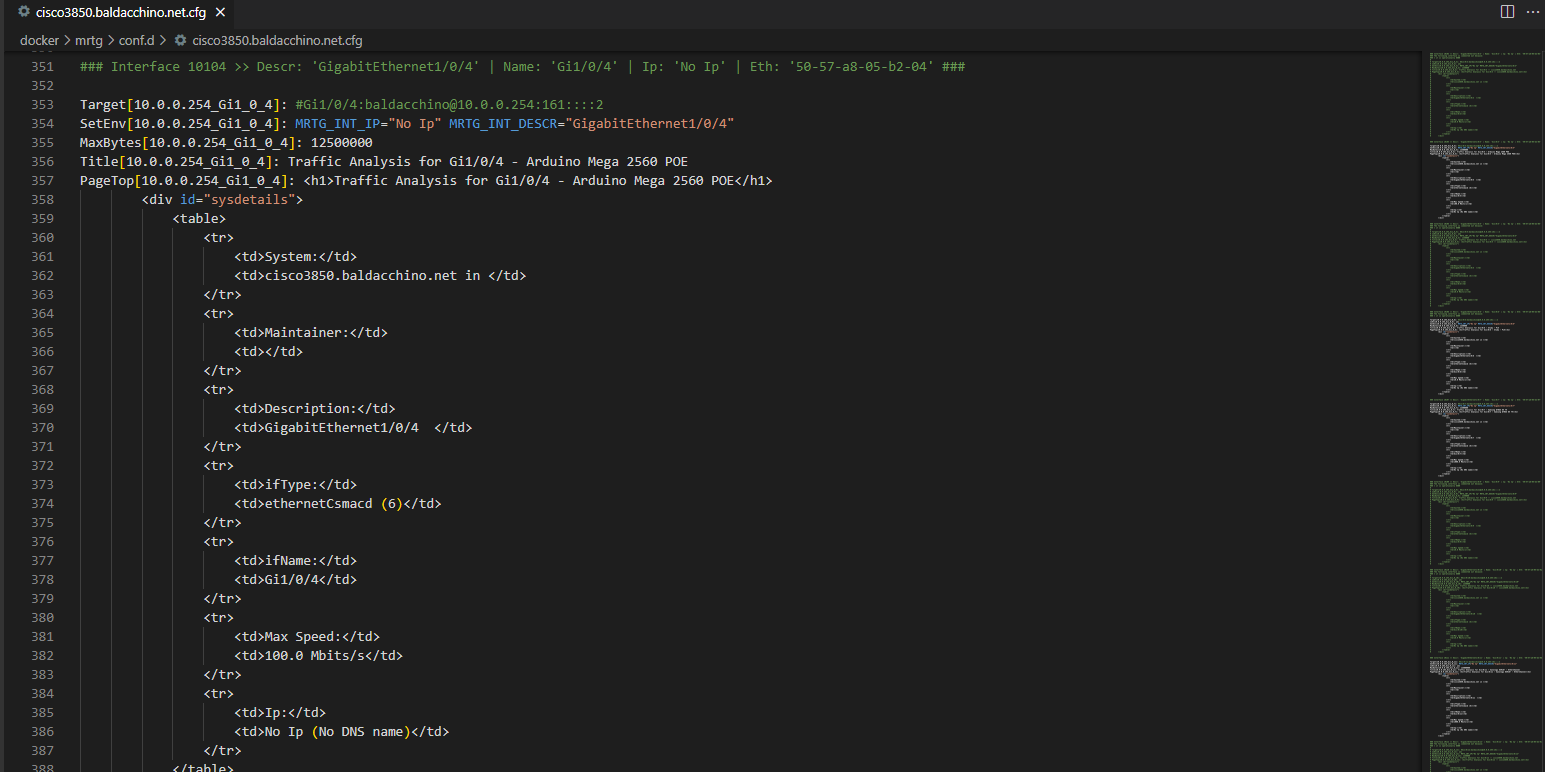
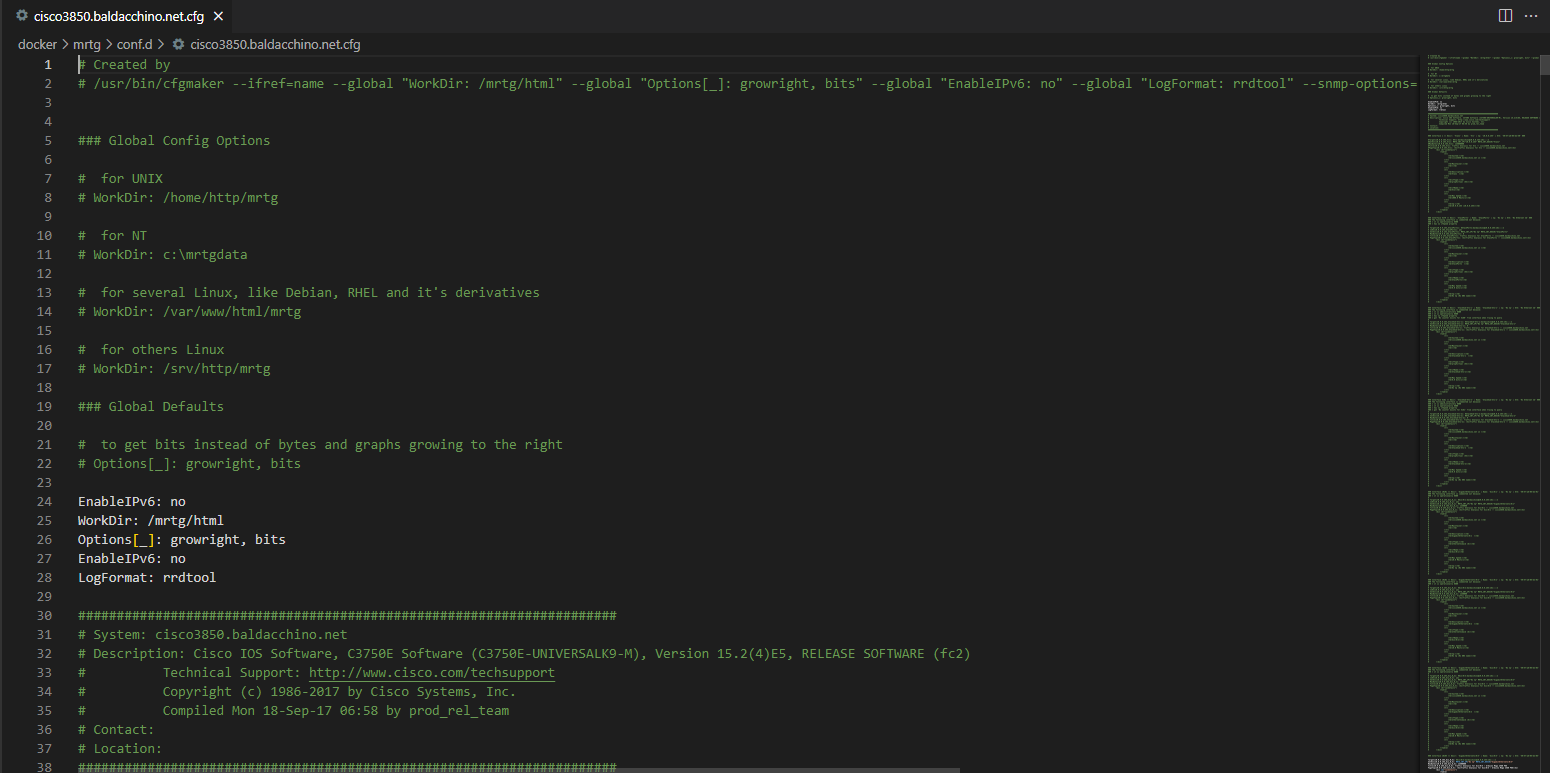
Editing the configuration file is like most things, fraught with danger. If you enable a switch port that is not active, the container will not start (I haven’t debugged) and if you do not adhere to the format, well yes, MRTG will not start. Be careful and version control if need be. Alternatively, just delete the configuration file and it will auto-recreate but without your data.
Summary
How cool was that, 15 minutes and you have granular network monitoring on a per port basis with granularity (daily, weekly, monthly, yearly). MRTG is lightweight (26 MB of RAM), and simple (when dockerised). Let’s face it, there is a reason why MRTG is still the standard by major ISPs and organisations who run large networks and you can set it up to. Give it a go, get your hands dirty, and learn a bit more about the traffic patterns in your network.
Thanks
Shane Baldacchino