
Cycling has always been something I have been passionate about. With the COVID-19 induced lockdowns I finally decided to purchase an indoor trainer (Garmin TACX Neo 2T) and like so many people around the world, I use Zwift as a means to hit my distance targets each week.
Spoiler – Want to see a demo? Click here
You may be wondering what Zwift is. Wikipedia best describes Zwift as.
Zwift allows players to ride their bicycles on stationary trainers while navigating through virtual worlds. Players may cycle freely around the game world and join organized group rides, races, or workouts with other users. Zwift uses ANT+ or Bluetooth Low Energy technologies to transmit data that, in combination with athlete weight and equipment choices, is used to convert the athlete’s efforts as speed and power. “Smart” trainers, which include a built-in power meter, permit accuracy in the measurement of watts as well as enabling an immersive technology experience, where resistance is applied or lessened to simulate the gradient encountered on the virtual course.
Zwift – Wikipedia
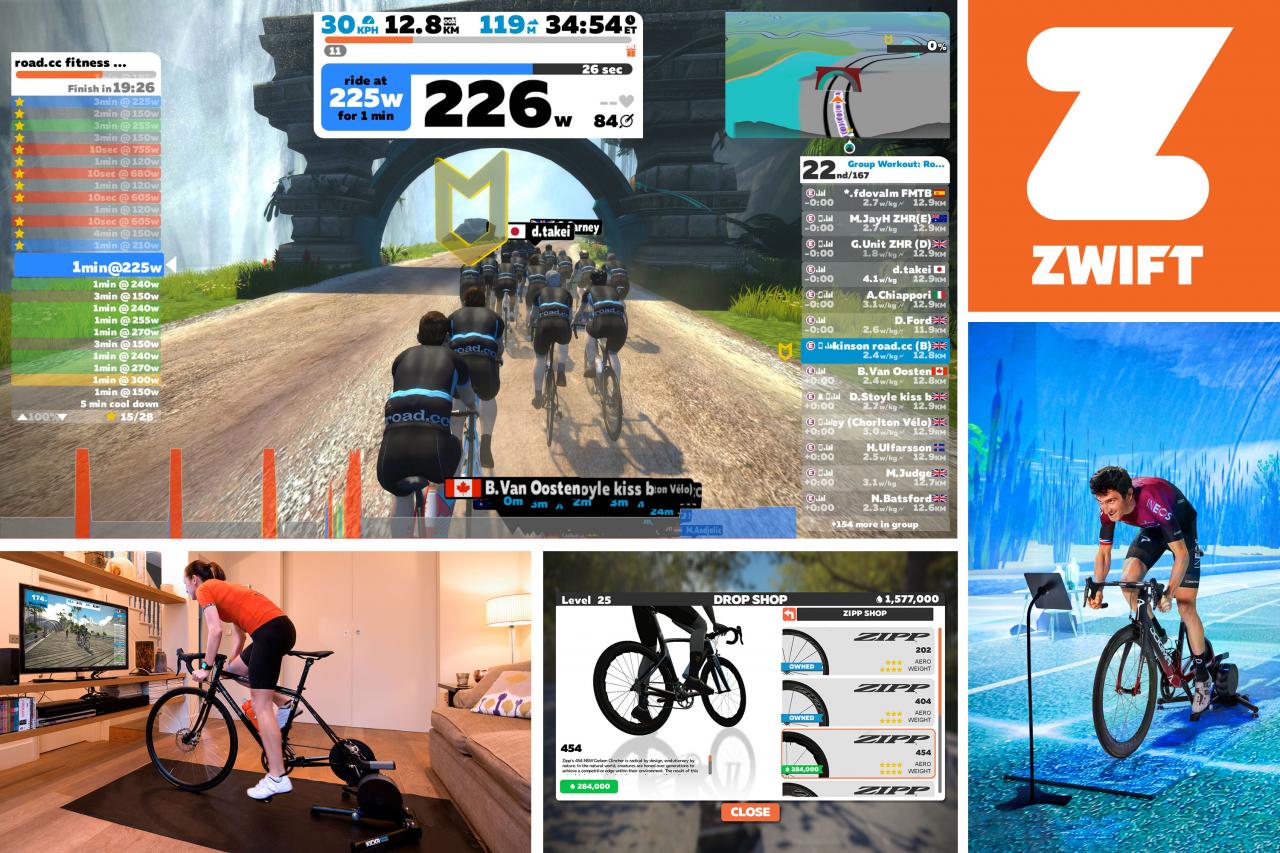
My summary is, it’s as close to riding on the road as it can be, and with fancy ($$$) trainers you can simulate cobblestones, wooden planks, sand and a variety of surfaces and your bike can be physically pivoted to simulate elevation changes. You can spend as little as $500 on a trainer through to close to $10,000 on a setup.
What makes Zwift so appealing is the fact that you can use your bike, there is a community aspect, for example I am going on a group ride with a person in Perth on Friday, yet I am in Melbourne, and for us builders it has a rich API. I found out just how rich this API was, as I started to build.
Oh, and did I mention it logs to Strava, because if it’s not on Strava, did it even happen? 🙄
My problem and why this post
So, it all sounds great, but with cycling in the real world or in Zwift I often ask myself, what I am going to wear. To hot and I will overheat and to cold I will freeze.
In Zwift starting with fan on, and you will freeze, but don’t start with a fan on, it’s only going to be minutes (usually 3km) before you will need to stop, unclip and turn on a fan.
There needs to be a better way. And there is!
Buy vs. Build, that ol’chestnut.
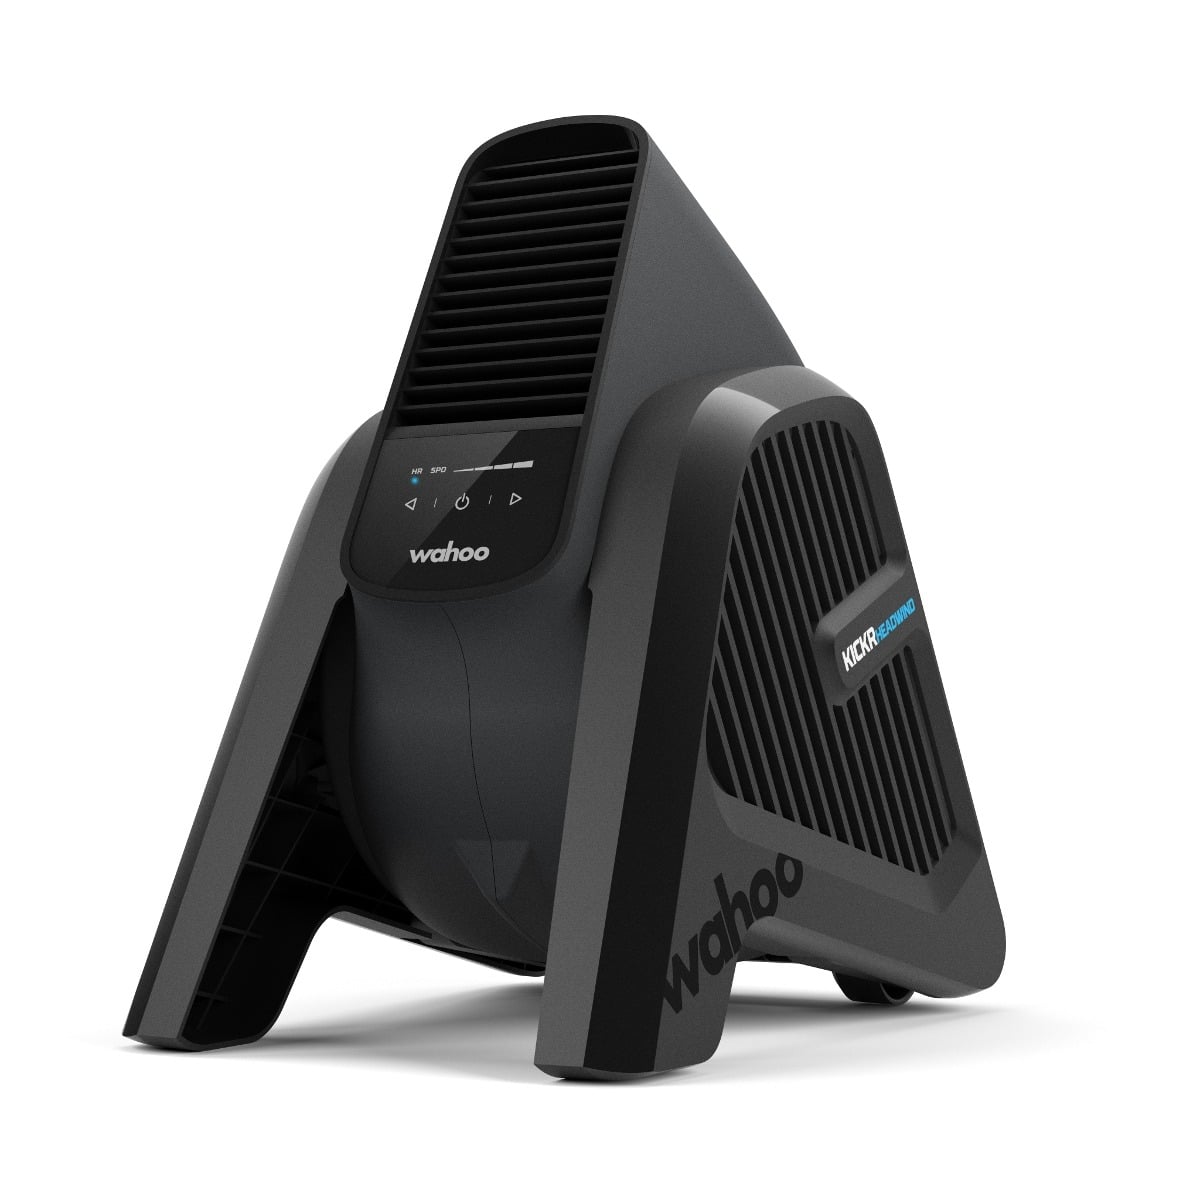
This problem has been solved by the main players. In the buy camp we have Wahoo, which have their Kickr Headwind which links into Zwift and adjusts fan speed based on HR (Heart Rate) or speed. The reviews are great, but I already have an industrial fan, and whilst I would like a Wahoo Kickr Headwind, I can’t justify the $449AUD of this device. To me, it’s just more e-waste.
Building – What a time to be alive
There are two distinct things the Wahoo Kickr Headwind does.
- It’s fan and it can be turned on by a signal (Heart rate, speed)
- It can read telemetry from Zwift
If we are building we need address both points here. It is 2022 and APIs are more important than ever. They are truly enabling, and Zwift exposes a heap of telemetry as soon as you authenticate to their endpoints.
Altitude - Meters climbed
Cadence  - RPM
Cycle Progress - Progress within given circuit
Distance  - Distance cycled
Gradient  - Current gradient
Heart Rate  - Current HR
Level  - What level are you within the game
Online  - Are you online or note
Power  - Watts
Run Level  - Same as level above but for running
Run Progress  - Same as progress above but for running
Speed  - Km/hr
Number of followers
Number of ride on's received on last/current ride
Start & End Date of the last/current activity
Total all time statistics (watt hours, distance, elevation etc)
Current FTP (Functional Threshold Power)
Reading Data
After looking , for no more than 10 minutes I found various options for both Python and NodeJS and 10 minutes later in both camps I was able to authenticate and start receiving telemetry. It was really that easy. Pip this, in the case of Python and NPM that in the case of NodeJS
Code wise what do you prefer? Within 15 minutes I was able to start receiving telemetry in both NodeJS and Python
NodeJS – zwift-mobile-api – npm (npmjs.com)
npm install --save zwift-mobile-api
npm WARN config global `--global`, `--local` are deprecated. Use `--location=global` instead.

added 32 packages, and audited 33 packages in 2s

7 packages are looking for funding
  run `npm fund` for details

found 0 vulnerabilities
npm notice
npm notice New minor version of npm available! 8.11.0 -> 8.15.1
npm notice Changelog: https://github.com/npm/cli/releases/tag/v8.15.1
npm notice Run npm install -g npm@8.15.1 to update!
npm notice
And after plugging in my details, I started receiving JSON based objects of my telemertry. I decided to go no further as I wanted to experiment with Python.
var ZwiftAccount = require("zwift-mobile-api");
var account = new ZwiftAccount(username, password);
Rider Profiles
// Get profile for "me"
account.getProfile().profile().then(p => {
    console.log(p);  // JSON of rider profile (includes id property you can use below)
});

// Get profile data for a particular rider (requires Zwift player id)
var profile = account.getProfile(playerId);

profile.followers().then(followers => {
    console.log(followers); // JSON array of rider's followers
});

profile.followees().then(followees => {
    console.log(followees); // JSON array of rider's followees
});

// Give a RideOn (from 'playerId' to 'otherRiderId')
// Can lookup 'activityId' from 'currentActivityId' of profile() response
profile.giveRideOn(otherRiderId, activityId);

// Retrieve the goals you have
profile.goals().then(goal=> {
    console.log(goal); //JSON array of goals
})

//Rider Status
// (note: currently all riders are listed in world '1',
// so worlds 2 and 3 are empty no matter the schedule)

var world = account.getWorld(1);

// Get the status of the specified rider
// (includes x,y position, speed, power, etc)
world.riderStatus(playerId).then(status => {
    console.log(status); // JSON of rider status
});
Python – jsmits/zwift-client: Zwift Mobile API client written in Python. (github.com)
Being more familiar with python this is where I gravitated towards after experimenting with NodeJS, I didn’t start here as this python library was inspired by the NodeJS offering and I wanted to try what NodeJs has in offer.
After finding some boilerplate code on GitHub (thanks @Clyra) I extended on this to send a stream of JSON messages in to my local MQTT broker. Very very cool! 😎
I modified this to meet my needs and before too long I was pushing JSON based messages over MQTT.
#!/bin/python3

from zwift import Client
import paho.mqtt.client as mqtt
import time
import json

# i know... this is not elegant!
from settings import *

OFFLINE_MSG = json.dumps({ 'is_online': 0, 'hr': 0, 'power': 0,  'speed': 0.0 })

def check_online(players):

   is_online = filter(lambda person: person['playerId'] == player_id, world.players['friendsInWorld'])

   if len(list(is_online)) > 0:
      return True
   else:
      return False

def players(players):

    for player in players['friendsInWorld']:
       print(player)

if __name__ == "__main__":


   mqtt_client = mqtt.Client(mqtt_client_name)
   #mqtt_client.username_pw_set(mqtt_login, mqtt_pw)
   mqtt_client.will_set(mqtt_topic_will, payload="Offline", retain=True)
   mqtt_client.connect(mqtt_host_name)
   mqtt_client.publish(mqtt_topic_will, payload="Online", retain=True)

   client = Client(username, password)
   world = client.get_world(1)

   #players(world.players)

   if check_online(world.players):
       while(True):
         try:
           status = world.player_status(player_id)
           error = 0
         except:
           error += 1
           #print("error while retrieving player status. Error count = " + str(error))
           if error > 5:
              break
           msg_dict = { 'is_online': 1, 'sport': 'cycling', 'hr': status.heartrate, 'power': status.power,  'speed': float("{:.2f}".format(float(status.speed)/1000000.0)) }
         mqtt_client.publish(mqtt_topic, payload=json.dumps(msg_dict), retain=False)
         time.sleep(3)
   else:
         #print("not online yet")
         mqtt_client.publish(mqtt_topic, payload=OFFLINE_MSG, retain=False)
   time.sleep(60)
Which resulted in messages being published every 3 seconds into my broker (Mosquitto) and it was at this stage I thought, this is going to be perfect. How could it get any better?
{
  "is_online": 1,
  "hr": 143,
  "power": 322,
  "speed": 46.4
}
Home Assistant – zwift_hass/sensor.py at master · snicker/zwift_hass (github.com)
Yes, Home Assistant. It is fast becoming a staple in my house and low and behold in the HACS (Home Assistant Community Store) the community had authored a plugin and of course I had to try.
After setting this up, the benefits are clear. Just like Cloud Computing offering higher value services (Like Managed Databases) vs. rolling your own, I didn’t want to author my own code and ensure it was scheduled (CRON). The heavy lifting has already been done.
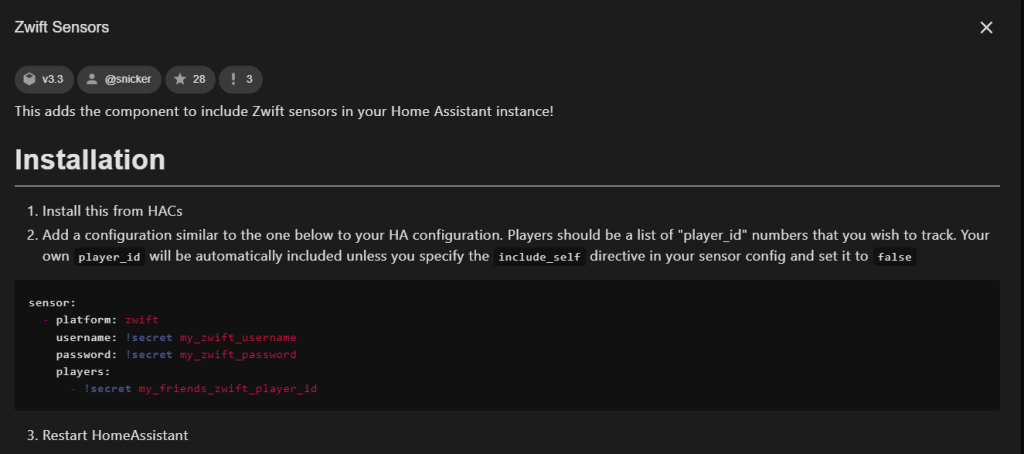
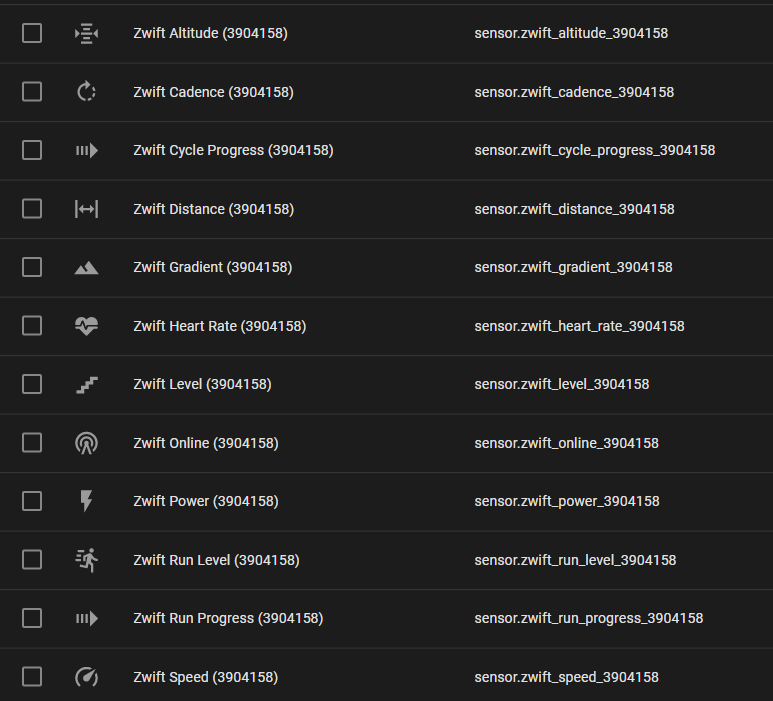
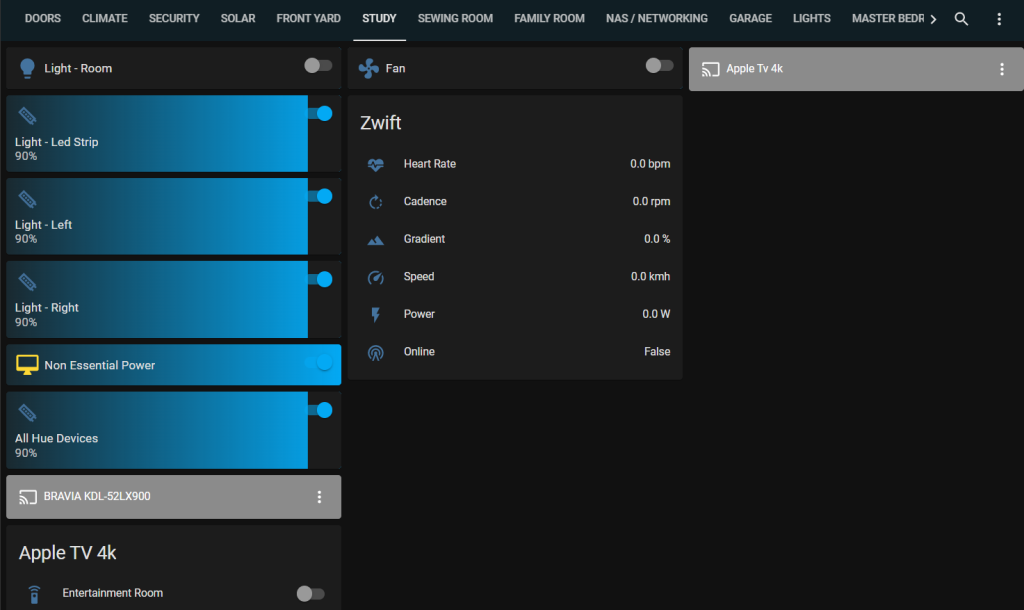
And with that I have a list of entities I can act on
Controlling the fan
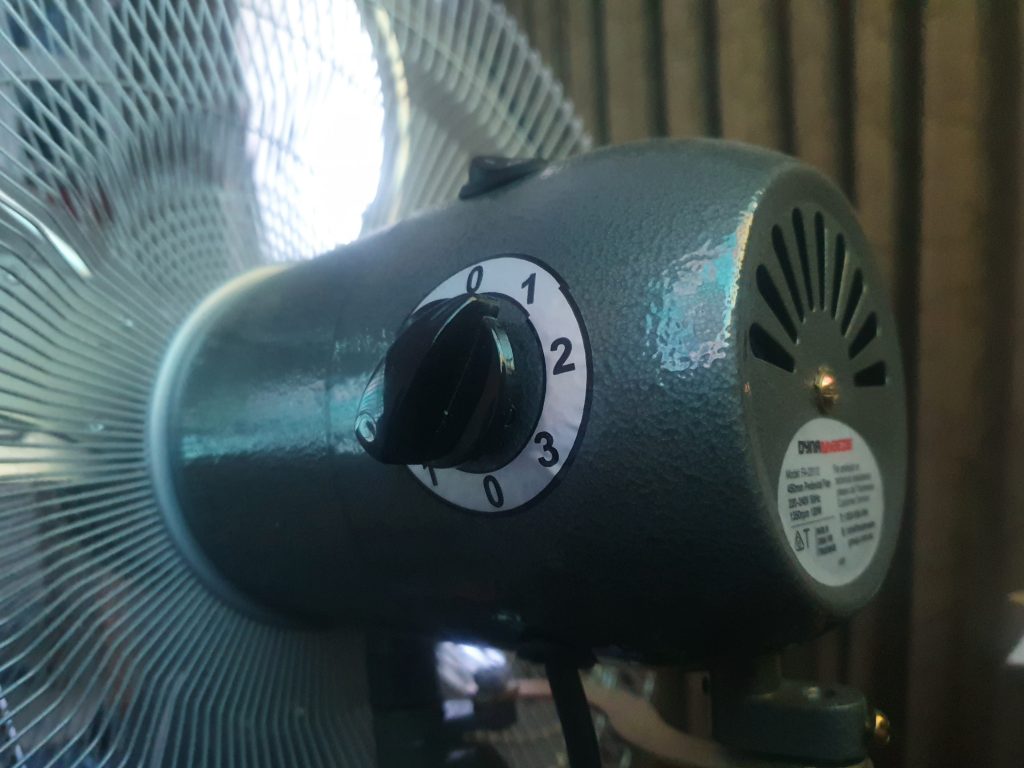
This is the easy part, it’s a process I am familiar with. But how far do you take this? Ever since I moved to this industrial fan (my kids broke my old one), the lowest fan speed is more the capable of keeping me cool, even if I am riding at near my max FTP (Functional Threshold Power). This section is pretty light on details as this blog dives into many of the topics to be discussed below in other posts (so please read my blog) in greater detail. Feel free to leave a comment and I will be sure to respond.
Because of this I decided I don’t need variable fan control and will just turn the fan off and on, with the rotary dial being statically defined. So, my fan is On or OFF and not exactly like a Wahoo Kickr, but I don’t need this capability. I also decided I did not want to modify the fan at all. I want this to be clean and un-modified.
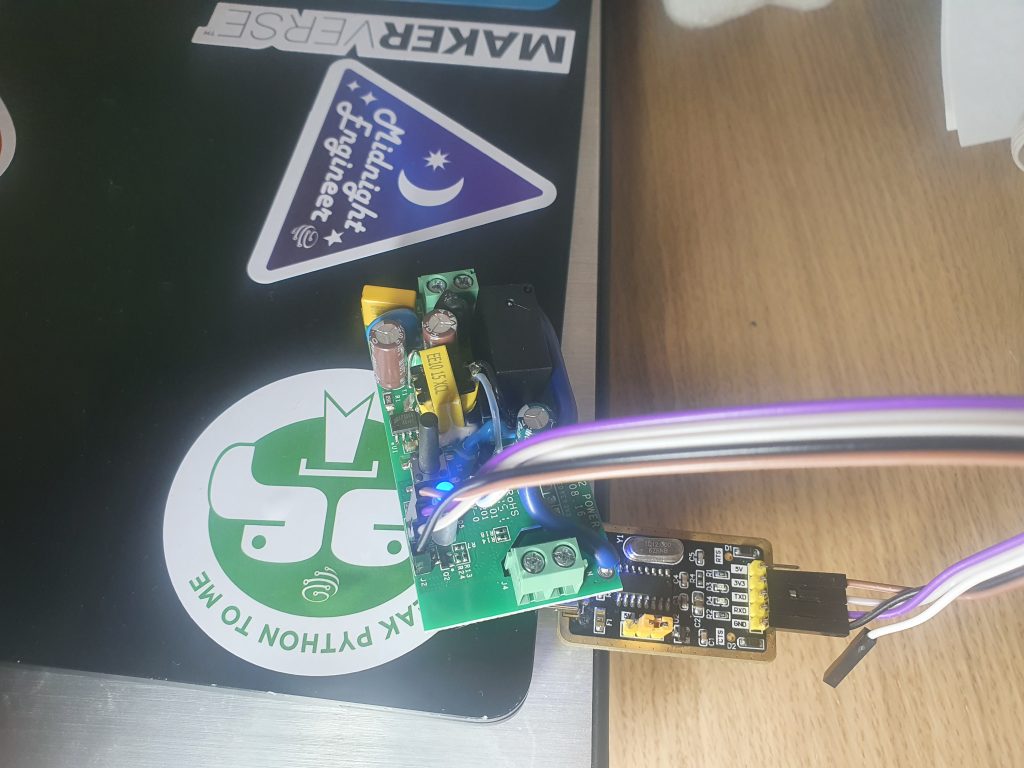
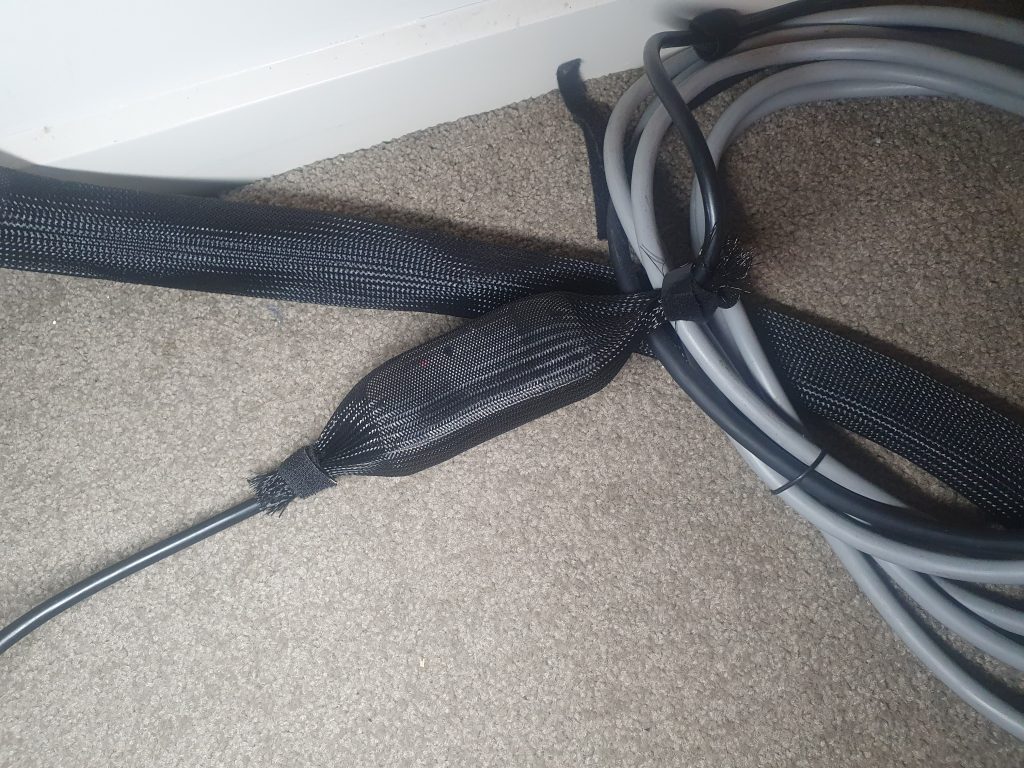
I am using a Sonoff Basic R2 which I have made a loom for using various power cables and have flashed Tasmota firmware to provide MQTT capability to the device. Tasmota is an opensource firmware for ESP devices. Total local control with quick setup and updates. Control using MQTT, Web UI, HTTP or serial. Incredibly expandable and flexible.
I am using MQTT calls, and this will require a MQTT broker such as Mosquitto that is IP routable to the device.
Depending on your jurisdiction, please ensure you use a licensed electrician and use approved devices.
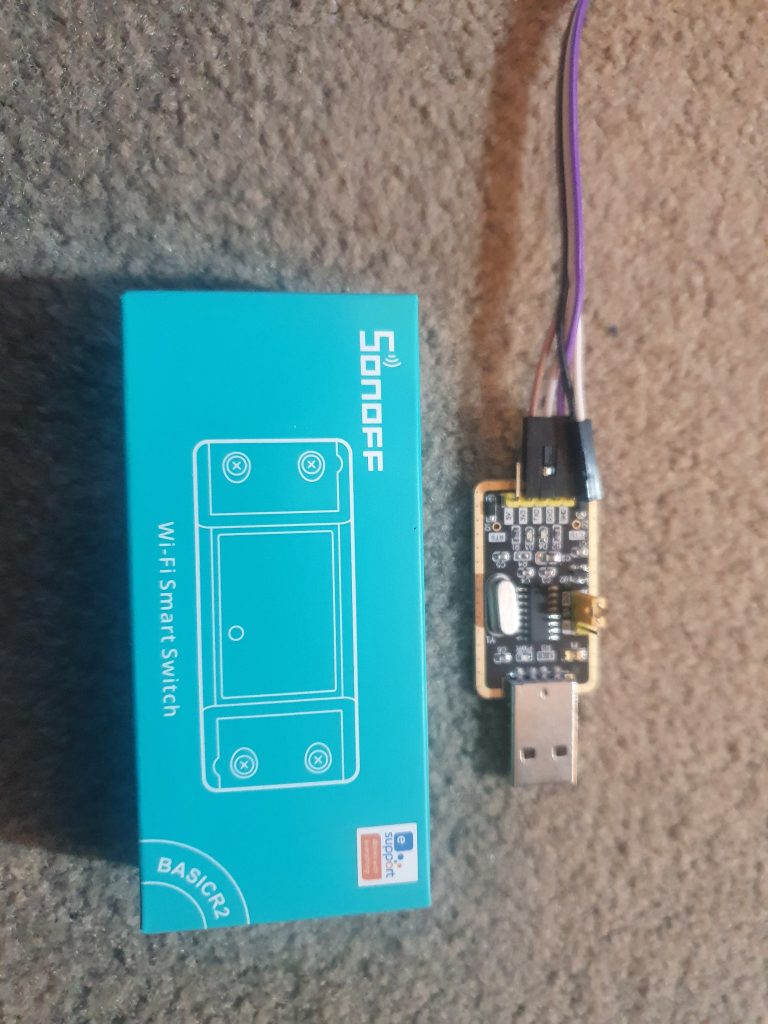
In order to flash Tasmota I will need to dissemble the Sonoff Basic R2 and connect it to the USB TTL. This is low voltage (3.3v DC) and I must stress that you are not to connect AC voltage whilst performing this procedure.
Connect the Sonoff via a USB TTL, being sure to reverse the RX and TX pins. Being sure to hold in GPIO 0 (the button) upon connecting ground. It can be a bit fiddly but with a bit of practice it becomes second nature.
| Sonoff Basic R2 | USB TTL |
| 3V3 | Vcc/3.3v |
| GND | GND |
| RX | TX |
| TX | RX |
And finally you will need to flash Tasmota to this device. There are many ways to do this but for any ESP8266 device, Tasmotizer is by far the easiest tool. It is a wrapper for the command line tool ESPtool by Espressif.
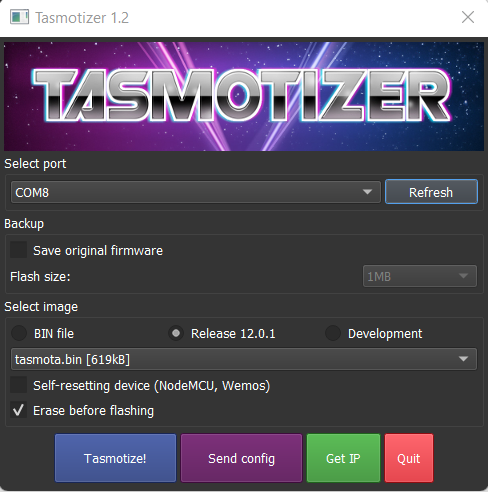
After flashing Tasmota, browse to the devices HTTP interface and setup. I recommend setting up at a minimum the device name, the type (Sonoff Basic in this case), if you want Phillips Hue and/or Belkin Wemo emulation (Alexa / Google) and finally and most importantly your MQTT broker settings.
Inside HomeAssistant in your configuration.yaml add an entry for your new devices
  - platform: mqtt
    unique_id: sonoff_tasmota_study_fan
    name: "Sonoff - Study Fan"
    state_topic: "stat/SONOFF_Tasmota_StudyFan/POWER"
    command_topic: "cmnd/SONOFF_Tasmota_StudyFan/POWER"
    value_template: "{{ value_json.STATE }}"
    payload_on: "ON"
    payload_off: "OFF"
    state_on: "ON"
    state_off: "OFF"
    qos: 2
Once you have validated everything is working (I would add a card to your LoveLace) you can then connect your loom to your fan.
Wiring it Up Logically
Physically everything is in place. If you have read thus far, we have accomplished two things.
- Home Assistant can poll Zwift for telemetry
- Home Assistant can control our fan indirectly via MQTT and the Sonoff Basic R2 appliance module
We now need to create a Home Assistant Automation to automatically start the fan when I get hot and turn it off when I am either cool or I have left the room. I like to keep things simple so, rather than taking into consideration my room temperature and other metrics, I’m just going to use my heart rate as the only trigger to the fan on.
My heart rate is read by heart rate strap connected to Zwift (via the Apple TV 4k) over BLE (Bluetooth Low Energy). I am going to turn the fan on at 120BPM (Beats Per Minute) by publishing a MQTT message to my Sonoff devices MQTT Topic to turn ON
- id: '1657337249057'
  alias: Zwift - Fan On > 120BPM
  description: ''
  trigger:
  - platform: numeric_state
    entity_id: sensor.zwift_heart_rate_3904158
    above: '100'
  condition: []
  action:
  - service: mqtt.publish
    data:
      topic: cmnd/SONOFF_Tasmota_StudyFan/POWER
      payload: 'ON'
  mode: single
And then I publish another message to turn OFF either when my heart rate goes below 100BPM or when I turn the Apple TV4k off.
- id: '1657337921918'
  alias: Zwift - Fan Off < 100BPM
  description: ''
  trigger:
  - platform: numeric_state
    entity_id: sensor.zwift_heart_rate_3904158
    below: '100'
  - platform: device
    device_id: a7e1bd2ee3bbd44bd0f33280d8fbe313
    domain: media_player
    entity_id: media_player.entertainment_room_2
    type: turned_off
  condition: []
  action:
  - service: mqtt.publish
    data:
      topic: cmnd/SONOFF_Tasmota_StudyFan/POWER
      payload: 'OFF'
  mode: single
And it’s as simple as that, and yes, I know this was long winded
The Demo
What sort of post would this be without a demonstration. So here it is. I have not demoed the Python or NodeJS snippets above as I never took these to the point of driving my fan. This demonstration illustrates the Zwift Home Assistant integration driving a Tasmota output, my fan.
Summary
Thanks for sticking this out. This was a long post. It illustrates the point that there are always multiple ways to solve a problem. Do you buy, or do you build or are there even more options?
I am going to tackle that last point first, with the advent of Home Assistant and a ready-made plugin on HACS. If you are reading this and are a Home Assistant user, then I recommend you use the HACS plugin unless you have some very specific needs. The HACS plugin will feed Home Assistant with telemetry that you can act on.
If you are a builder and/or dont have Home Assistant, the Python and NodeJS paths are also very simple and will allow you to extract that telemetry and with some more code, you could easily start publishing MQTT messages to your upstream control planes (MQTT is mine, it may not be yours), but you will need some form of always on compute.
Products like the Waho Kickr Headwind serve a purpose, and if you don’t have a fan, or can afford the high price and you don’t like to build, it’s a solid product.
It’s never been a better time to be a builder with API’s and SDK‘s making the art of the possible, possible. Drop me a message, I would love to hear from you.
I work for @Microsoft but opinions expressed are my own.
Thanks
Shane Baldacchino
hello for zwift-mobile-api do you user a zwift developer account?
thanks.
Apologies for the long reply there Felipe, yes I am using a Zwift developer account. I ‘think’ since I posted this article, Zwift have changed their API usage model. I use the Home Assistant plugin these days.
Hi,
I am problems activating the Zwift HA integration.
The configuration.yaml has a section:
template:
– sensor:
– platform: zwift
username: “email”
password: “password”
But this does work:
Invalid config for ‘template’ at configuration.yaml, line 29: ‘platform’ is an invalid option for ‘template’, check: sensor->0->platform Invalid config for ‘template’ at configuration.yaml, line 29: required key ‘state’ not provided Invalid config for ‘template’ at configuration.yaml, line 30: ‘username’ is an invalid option for ‘template’, check: sensor->0->username Invalid config for ‘template’ at configuration.yaml, line 31: ‘password’ is an invalid option for ‘template’, check: sensor->0->password
Can anyone assist?
Have you indented correctly, the configuration.yaml file is yaml and as such needs to have correct indents.
I just looked at my configuration.yaml file and all I have is
sensor:
– platform: zwift
username: !secret my_zwift_username
password: !secret my_zwift_password
for the zwift-api-mobile do you use a zwift developer account?
thanks.