In a previous post, I spoke about using Mosquitto client tools to publish to Azure IOT Hub, that was the beginning and I am on a journey in my new role to explore Azure IoT and understand the art of the possible. What is possible, I guess we will find out.
Who has the longest showers? Who wakes up first? Which devices are powered on, yet their is no activity? These questions and many can all be answered from the thousands events occurring each day in my house, but first we need to get these events in to Azure and whilst using Mosquitto client tools (mosquitto_pub / mosquitto_sub) proved it could be done, its not tenable for volume.
Speaking of volume, 10,250 flowed through Mosquitto on a Saturday over a 24 hour period. Not an insignificant volume.
The easiest path here is to not have these devices publish to Azure IoT Hub, but to have Mosquitto replicate all messages locally through to Azure IoT Hub.
But is there a better way? Perhaps there is. Enter Azure IoT Edge
What is Azure IoT Edge?
Azure IoT Edge was new to myself as I embarked on this journey, and you know what, it makes a lot of sense. My take on Azure IoT Edge is, that it’s a modern bridge / broker, for the modern age. After all all Mosquitto does is talk MQTT, which is great for my needs, but there are other protocols out there, that whilst I may not use today, I could use tomorrow with the inclusion of new devices.
They say a picture describes 1000 words, to me this picture accurately describes Azure IoT Edge
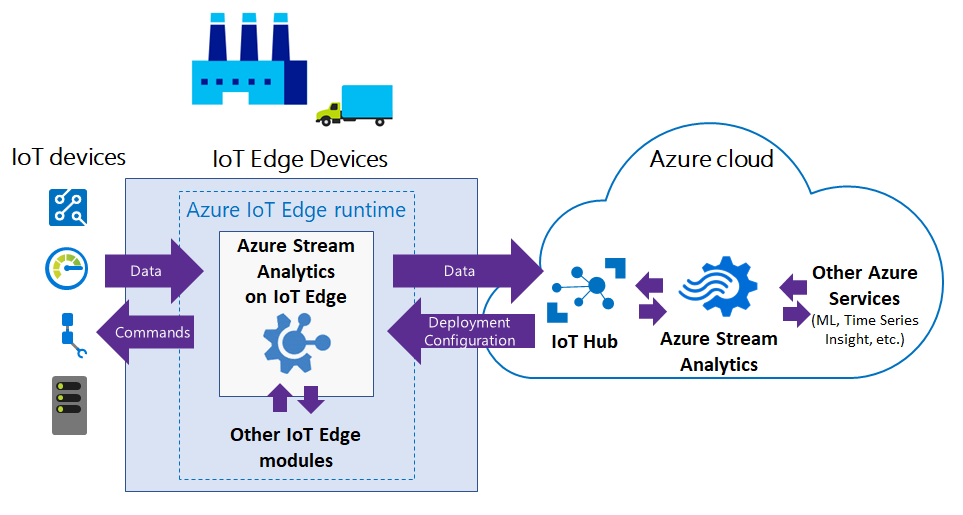
But that was my take, officially this is how Microsoft describes Azure IoT Edge
Azure IoT Edge is a fully managed service built on Azure IoT Hub. Deploy your cloud workloads – artificial intelligence, Azure and third-party services, or your own business logic – to run on Internet of Things (IoT) edge devices via standard containers. By moving certain workloads to the edge of the network, your devices spend less time communicating with the cloud, react more quickly to local changes and operate reliably even in extended offline periods.
The merits of this platform is hard to deny
- Operate offline or with intermittent connectivity
- Modules for multiple protocols (MQTT being one of them, that said it is in public preview)
- Code using SDK’s (C, C#, Node, Python, Java)
- Manipulate and control IoT Edge using the same tools one uses to manage Azure (AZ-CLI)
- Zero-touch provisioning of edge devices
- Modules run containers via the Moby engine
So many ticks for my needs and more. I want to replace Mosquitto as a local MQTT broker and I want to get these messages in to Azure IoT Hub. Azure IoT Edge will enable me to do this.
Before we get started its worth talking about the modular approach of IoT Edge, and that becomes evident when you issue a ‘docker ps’ to list containers. IoT Edge is made up of the following 3 components
- IoT Edge modules are containers that run Azure services, third-party services or custom code. They are deployed to IoT Edge-enabled devices and execute locally on those devices.
- The IoT Edge runtime runs on each IoT Edge-enabled device and manages the modules deployed to each device.
- The Cloud-based interface remotely monitors and manages IoT Edge-enabled devices.
Lets get in to this, but if the picture I painted in your head above was not clear, perhaps this diagram will help, and yes we are going to run IoT Edge on a Raspberry Pi
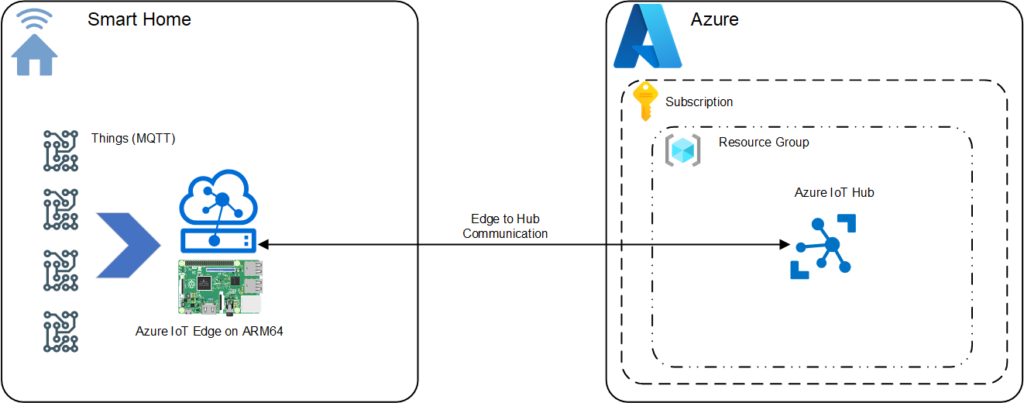
That’s right we are going to build out Azure IoT Edge using a Raspberry Pi, configure it with Azure IoT Hub. Today we will be following the Microsoft documentation (3 articles in total) in order to install Azure IoT Edge but along the way I will provide you some insights to guide you through this process
High Level Steps
As we walk through this guide, there is quite a lot to do to make this ‘magic’ happen. At a high level they are.
- Install Requirements
- Install The Container Engine
- Install Azure IoT Edge
- Create Edge IoT Device & Extract Connection String
- Configure And Start Azure IoT Edge
- Validate Azure IOT Edge Is Running
- Enable MQTT
- Define Local MQTT Device
- Test Publishing
Variables You Will Need To Substitute
This post serves as a high level walkthrough for establishing communication between your local MQTT devices and Azure IoT Edge and through to Azure IoT Hub. You will be presented with outputs from CLI from your Azure subscription, you will need to substitute these values. Some key values you need to substitute.
Resource-group
IOT-Hub name
Device name
Child device name
IP address of edge hub
SAS token
Connection string
Public Preview Warning
It must be noted that at the time of authoring this post (November 2021) this is not a supported architecture, but it will be, and as a such we need to make a few tweaks to our configuration to make this work. This process should only get easier.
- Support for ARM64 (Raspberry Pi) is in public preview
- Support for MQTT is in public preview
Step 1: Install Requirements
Under Raspbian a ‘sudo apt-get’ install will not be able to install IoT Edge because it lacks details to the Microsoft repository. This can be remedied with a few simple commands.
curl https://packages.microsoft.com/config/debian/stretch/multiarch/prod.list > ./microsoft-prod.listWe will then copy the generated list to the sources.list.d directory.
sudo cp ./microsoft-prod.list /etc/apt/sources.list.d/and install the Microsoft GPG public key
curl https://packages.microsoft.com/keys/microsoft.asc | gpg --dearmor > microsoft.gpg
sudo cp ./microsoft.gpg /etc/apt/trusted.gpg.d/
We will now install the container engine Azure IoT Edge relies upon
sudo apt-get updateIf we look at the output of the ‘apt-get update’ we can see the Microsoft repositories are now listed.
pi@raspberrypi:~ $ sudo apt-get update
Get:1 https://packages.microsoft.com/debian/stretch/multiarch/prod stretch InRelease [29.8 kB]
Get:2 http://raspbian.raspberrypi.org/raspbian buster InRelease [15.0 kB]
Get:3 http://archive.raspberrypi.org/debian buster InRelease [32.6 kB]
Get:4 https://packages.microsoft.com/debian/stretch/multiarch/prod stretch/main arm64 Packages [3,904 B]
Get:5 http://phoscon.de/apt/deconz buster InRelease [2,857 B]
Get:6 https://packages.microsoft.com/debian/stretch/multiarch/prod stretch/main all Packages [546 B]
Get:7 https://packages.microsoft.com/debian/stretch/multiarch/prod stretch/main armhf Packages [14.7 kB]
Get:8 https://packages.microsoft.com/debian/stretch/multiarch/prod stretch/main amd64 Packages [11.9 kB]
Get:9 http://raspbian.raspberrypi.org/raspbian buster/main armhf Packages [13.0 MB]
Get:10 http://archive.raspberrypi.org/debian buster/main armhf Packages [393 kB]
Get:11 http://phoscon.de/apt/deconz buster/main armhf Packages [716 B]
Get:12 http://raspbian.raspberrypi.org/raspbian buster/contrib armhf Packages [58.8 kB]
Get:13 http://raspbian.raspberrypi.org/raspbian buster/non-free armhf Packages [104 kB]
Fetched 13.7 MB in 11s (1,204 kB/s)
Reading package lists... Done
N: Repository 'http://raspbian.raspberrypi.org/raspbian buster InRelease' changed its 'Suite' value from 'stable' to 'oldstable'
Step 2: Install The Container Engine
Raspbian now knows where to look for packages so we can get started installing the container engine (Moby) to which Azure IoT Edge relies upon. Azure IoT Edge relies on an OCI-compatible container runtime. The Moby engine is the only container engine officially supported with Azure IoT Edge.
I am installing the latest version of Azure IoT Edge, if you need to install older versions please see Microsoft’s documentation.
sudo sudo apt-get install moby-engineThis will provide output similar to that below
Reading package lists... Done
Building dependency tree
Reading state information... Done
The following package was automatically installed and is no longer required:
  python-colorzero
Use 'sudo apt autoremove' to remove it.
The following additional packages will be installed:
  apparmor moby-cli
Suggested packages:
  apparmor-profiles-extra apparmor-utils cgroupfs-mount | cgroup-lite
The following NEW packages will be installed:
  apparmor moby-cli moby-engine
0 upgraded, 3 newly installed, 0 to remove and 87 not upgraded.
Need to get 51.9 MB of archives.
After this operation, 198 MB of additional disk space will be used.
Do you want to continue? [Y/n] y
Get:1 https://packages.microsoft.com/debian/stretch/multiarch/prod stretch/main armhf moby-cli armhf 3.0.13+azure-0 [18.5 MB]
Get:2 http://mirror.internode.on.net/pub/raspbian/raspbian buster/main armhf apparmor armhf 2.13.2-10 [438 kB]
Get:3 https://packages.microsoft.com/debian/stretch/multiarch/prod stretch/main armhf moby-engine armhf 3.0.13+azure-0 [33.0 MB]
Fetched 51.9 MB in 6s (8,476 kB/s)
Preconfiguring packages ...
Selecting previously unselected package apparmor.
(Reading database ... 105747 files and directories currently installed.)
Preparing to unpack .../apparmor_2.13.2-10_armhf.deb ...
Unpacking apparmor (2.13.2-10) ...
Selecting previously unselected package moby-cli.
Preparing to unpack .../moby-cli_3.0.13+azure-0_armhf.deb ...
Unpacking moby-cli (3.0.13+azure-0) ...
Selecting previously unselected package moby-engine.
Preparing to unpack .../moby-engine_3.0.13+azure-0_armhf.deb ...
Unpacking moby-engine (3.0.13+azure-0) ...
Setting up apparmor (2.13.2-10) ...
Created symlink /etc/systemd/system/sysinit.target.wants/apparmor.service → /lib/systemd/system/apparmor.service.
Setting up moby-engine (3.0.13+azure-0) ...
Adding group `docker' (GID 124) ...
Done.
Created symlink /etc/systemd/system/multi-user.target.wants/docker.service → /lib/systemd/system/docker.service.
Created symlink /etc/systemd/system/sockets.target.wants/docker.socket → /lib/systemd/system/docker.socket.
Setting up moby-cli (3.0.13+azure-0) ...
Processing triggers for man-db (2.8.5-2) ...
Processing triggers for systemd (241-7~deb10u7+rpi1) ...
Step 3: Install Azure IoT Edge
After the installation of the container engine, we are now set to install Azure IoT Edge
sudo apt-get install aziot-edgeThis will provide output similar to that below.
Reading package lists... Done
Building dependency tree
Reading state information... Done
The following package was automatically installed and is no longer required:
  python-colorzero
Use 'sudo apt autoremove' to remove it.
The following additional packages will be installed:
  aziot-identity-service
The following NEW packages will be installed:
  aziot-edge aziot-identity-service
0 upgraded, 2 newly installed, 0 to remove and 87 not upgraded.
Need to get 7,937 kB of archives.
After this operation, 35.9 MB of additional disk space will be used.
Do you want to continue? [Y/n] y
Get:1 https://packages.microsoft.com/debian/stretch/multiarch/prod stretch/main armhf aziot-identity-service armhf 1.2.3-1 [3,063 kB]
Get:2 https://packages.microsoft.com/debian/stretch/multiarch/prod stretch/main armhf aziot-edge armhf 1.2.4-1 [4,874 kB]
Fetched 7,937 kB in 2s (4,133 kB/s)
Selecting previously unselected package aziot-identity-service.
(Reading database ... 105939 files and directories currently installed.)
Preparing to unpack .../aziot-identity-service_1.2.3-1_armhf.deb ...
Unpacking aziot-identity-service (1.2.3-1) ...
Selecting previously unselected package aziot-edge.
Preparing to unpack .../aziot-edge_1.2.4-1_armhf.deb ...
Unpacking aziot-edge (1.2.4-1) ...
Setting up aziot-identity-service (1.2.3-1) ...
Created symlink /etc/systemd/system/sockets.target.wants/aziot-certd.socket → /lib/systemd/system/aziot-certd.socket.
Created symlink /etc/systemd/system/sockets.target.wants/aziot-identityd.socket → /lib/systemd/system/aziot-identityd.socket.
Created symlink /etc/systemd/system/sockets.target.wants/aziot-keyd.socket → /lib/systemd/system/aziot-keyd.socket.
Created symlink /etc/systemd/system/sockets.target.wants/aziot-tpmd.socket → /lib/systemd/system/aziot-tpmd.socket.
Setting up aziot-edge (1.2.4-1) ...
===============================================================================

                              Azure IoT Edge

  IMPORTANT: Please configure the device with provisioning information.

  Please create a new system configuration.

  You can quickly configure the device for manual provisioning with
   a connection string using:

    sudo iotedge config mp --connection-string '...'

  For other provisioning options, copy the template file
  at /etc/aziot/config.toml.edge.template to /etc/aziot/config.toml,
  update it with your device information, then apply the configuration to
  the IoT Edge services with:

    sudo iotedge config apply

===============================================================================
Created symlink /etc/systemd/system/sockets.target.wants/aziot-edged.mgmt.socket → /lib/systemd/system/aziot-edged.mgmt.socket.
Created symlink /etc/systemd/system/multi-user.target.wants/aziot-edged.service → /lib/systemd/system/aziot-edged.service.
Created symlink /etc/systemd/system/sockets.target.wants/aziot-edged.workload.socket → /lib/systemd/system/aziot-edged.workload.socket.
Processing triggers for man-db (2.8.5-2) ...
Step 4: Create Edge IoT Device & Extract Connection String
We are going to pivot away from our SSH terminal here to Azure CLI (you could use the Azure portal) as we need to create an Edge IoT Device in Azure IoT Hub and create a SAS Policy for authentication.
az iot hub device-identity create --device-id Pi-IOTEdge --hub-name Baldacchino-IOTHub --edge-enabledThis will provide output similar to that below (keys redacted)
{
  "authentication": {
    "symmetricKey": {
      "primaryKey": "*******",
      "secondaryKey": "*******"
    },
    "type": "sas",
    "x509Thumbprint": {
      "primaryThumbprint": null,
      "secondaryThumbprint": null
    }
  },
  "capabilities": {
    "iotEdge": true
  },
  "cloudToDeviceMessageCount": 0,
  "connectionState": "Disconnected",
  "connectionStateUpdatedTime": "0001-01-01T00:00:00",
  "deviceId": "Pi-IOTEdge",
  "deviceScope": "ms-azure-iot-edge://PiIotEdge-637698647485926814",
  "etag": "MTIwNTI0NjYy",
  "generationId": "637698647485926814",
  "lastActivityTime": "0001-01-01T00:00:00",
  "parentScopes": [],
  "status": "enabled",
  "statusReason": null,
  "statusUpdatedTime": "0001-01-01T00:00:00"
}
We now need to extract the device connection string which will then be passed in to the Azure IoT Edge config.toml file.
az iot hub device-identity connection-string show --device-id Pi-IOTEdge --hub-name Baldacchino-IOTHub
This will provide output similar to that below (keys redacted). Copy and paste this in to your favourite IDE as we will soon need this connection string.
{
  "connectionString": "HostName=Baldacchino-IOTHub.azure-devices.net;DeviceId=Pi-IOTEdge;SharedAccessKey=**********"
}
Step 5: Configure And Start Azure IoT Edge
So we have just installed Azure IoT Edge Hub but at this stage it is sitting dormant waiting for configuration. Specifically it needs its cloud identity and authentication information. Use the connection string value from the prior step. I am using the –force value as if you do make a mistake with your connection string the –force parameter will allow you to reset this. SAS Key has been redacted.
sudo iotedge config mp --connection-string 'HostName=Baldacchino-IOTHub.azure-devices.net;DeviceId=Pi-IOTEdge;SharedAccessKey=*************' --forceThis will provide output similar to that below.
Azure IoT Edge has been configured successfully!
The configuration has been written to /etc/aziot/config.toml
To apply the new configuration to services, run:

    sudo iotedge config apply -c '/etc/aziot/config.toml'

WARNING: This configuration is not suitable when using IoT Edge as a gateway.
We now are ready to start Azure Iot Edge and apply the configuration in the toml file.
sudo iotedge config apply -c '/etc/aziot/config.toml'This will provide output similar to that below.
Note: Symmetric key will be written to /var/secrets/aziot/keyd/device-id
Azure IoT Edge has been configured successfully!

Restarting service for configuration to take effect…
Stopping aziot-edged.service…Stopped!
Stopping aziot-identityd.service…Stopped!
Stopping aziot-keyd.service…Stopped!
Stopping aziot-certd.service…Stopped!
Stopping aziot-tpmd.service…Stopped!
Starting aziot-edged.mgmt.socket…Started!
Starting aziot-edged.workload.socket…Started!
Starting aziot-identityd.socket…Started!
Starting aziot-keyd.socket…Started!
Starting aziot-certd.socket…Started!
Starting aziot-tpmd.socket…Started!
Starting aziot-edged.service…Started!
Done.
Step 6: Validate Azure IOT Edge Is Running
So, I had a lot of issues with IoT Edge initially. What the documentation doesn’t easily tell you is how to view the logs. Remember IoT Edge is modular. These two commands will help you view the status of both IoT EdgeHub and IoT EdgeAgent.
These two commands are case sensitive and I suggest you run these and frequently
iotedge logs edgeHub
iotedge logs edgeAgent
If you are seeing stack traces or errors here, there are problems. During this journey I received errors due to a process being bound to TCP 443 (as seen below) and incorrectly trying to enable MQTT. The logs are your friends.
<3> 2021-10-19 21:53:58.311 +00:00 [ERR] - Edge agent plan execution failed.
System.AggregateException: One or more errors occurred. (Error calling start module edgeHub: Could not start module edgeHub
        caused by: Could not start module edgeHub
        caused by: driver failed programming external connectivity on endpoint edgeHub (63137b88b3877ab069523c3ccd2c5f2dc1f031b3232e0d6f6c89da66bf349c78): Error starting userland proxy: listen tcp 0.0.0.0:443: bind: address already in use)
Step 7: Enable MQTT
Since IoT Edge MQTT broker is currently in public preview, you need to also set the following environment variables to true on the edgeHub module to enable the MQTT broker. We have been using AZ-CLI during our journey, thats great because there is no way to enable MQTT in the Azure Portal.
experimentalFeatures__enabled = true
experimentalFeatures__mqttBrokerEnabled = true
We need to deploy a JSON manifest file and this file can be found in the Microsoft Docs website in the following article –Communicate with your IoT hub using the MQTT. Below is the JSON you need. Copy and paste this and save it as a JSON file to which we will pass in to AZ CLI. You will see both experimental features are set to true and that TCP 1833 and 8883 (TLS) are being bound.
{
   "modulesContent":{
      "$edgeAgent":{
         "properties.desired":{
            "schemaVersion":"1.1",
            "runtime":{
               "type":"docker",
               "settings":{
                  "minDockerVersion":"v1.25",
                  "loggingOptions":"",
                  "registryCredentials":{

                  }
               }
            },
            "systemModules":{
               "edgeAgent":{
                  "type":"docker",
                  "settings":{
                     "image":"mcr.microsoft.com/azureiotedge-agent:1.2",
                     "createOptions":"{}"
                  }
               },
               "edgeHub":{
                  "type":"docker",
                  "status":"running",
                  "restartPolicy":"always",
                  "settings":{
                     "image":"mcr.microsoft.com/azureiotedge-hub:1.2",
                     "createOptions":"{\"HostConfig\":{\"PortBindings\":{\"5671/tcp\":[{\"HostPort\":\"5671\"}],\"8883/tcp\":[{\"HostPort\":\"8883\"}],\"443/tcp\":[{\"HostPort\":\"443\"}],\"1883/tcp\":[{\"HostPort\":\"1883\"}]}}}"
                  },
                  "env":{
                     "experimentalFeatures__mqttBrokerEnabled":{
                        "value":"true"
                     },
                     "experimentalFeatures__enabled":{
                        "value":"true"
                     },
                     "RuntimeLogLevel":{
                        "value":"debug"
                     }
                  }
               }
            },
            "modules":{

            }
         }
      },
      "$edgeHub":{
         "properties.desired":{
            "schemaVersion":"1.2",
            "routes":{
               "Upstream":"FROM /messages/* INTO $upstream"
            },
            "storeAndForwardConfiguration":{
               "timeToLiveSecs":7200
            },
            "mqttBroker":{
               "authorizations":[
                  {
                     "identities":[
                        "{{iot:identity}}"
                     ],
                     "allow":[
                        {
                           "operations":[
                              "mqtt:connect"
                           ]
                        }
                     ]
                  },
                  {
                     "identities":[
                        "{{iot:identity}}"
                     ],
                     "allow":[
                        {
                           "operations":[
                              "mqtt:publish",
                              "mqtt:subscribe"
                           ],
                           "resources":[
                              "test_topic"
                           ]
                        }
                     ]
                  }
               ]
            }
         }
      }
   }
}
Using AZ-CLI we need to deploy this deployment JSON to your IoT Edge and we can do this by running the following command. In the code below, I saved this json as mqttdeploy.json
az iot edge set-modules --device-id Pi-IOTEdge --hub-name Baldacchino-IOTHub --content .\mqttdeploy.jsonAfter you run this, IoT Hub will push a configuration change to your IoT Edge and you can validate this in the logs.
<6> 2021-10-19 21:56:28.231 +00:00 [INF] - Obtained Edge agent twin from IoTHub with desired properties version 7 and reported properties version 14500.
<6> 2021-10-19 21:56:29.066 +00:00 [INF] - Plan execution started for deployment 7
<6> 2021-10-19 21:56:29.074 +00:00 [INF] - Executing command: "Command Group: (\n  [Stop module edgeHub]\n  [Start module edgeHub]\n  [Saving edgeHub to store]\n)"
<6> 2021-10-19 21:56:29.087 +00:00 [INF] - Executing command: "Stop module edgeHub"
<6> 2021-10-19 21:56:29.145 +00:00 [INF] - Executing command: "Start module edgeHub"
<6> 2021-10-19 21:56:30.568 +00:00 [INF] - Executing command: "Saving edgeHub to store"
<6> 2021-10-19 21:56:30.616 +00:00 [INF] - Plan execution ended for deployment 7
But more specifically what the logs will confirm, is that MQTT is enabled and a telnet to 1833 picks up. Woot!
<6> 2021-10-20 23:58:33.873 +00:00 [INF] [EdgeHub] - Experimental features configuration: {"Enabled":true,"DisableCloudSubscriptions":false,"DisableConnectivityCheck":false,"EnableMqttBroker":true}Step 8: Define Local MQTT Device
We are almost there. Right now if you try and send messages to the IoT Edge via MQTT, it will pickup but you will receive an authorization error. We need to define each MQTT device within Azure IoT and also set the parent to child relationship. We can do this via AZ-CLI. In my example I am using the local device name of ‘IotEdge-DeviceChild’.
az iot hub device-identity children add -d Pi-IOTEdge --child-list IotEdge-DeviceChild-n Baldacchino-IOTHub
Step 9: Test Publishing
We are now done and are ready for testing and will use mosquitto_pub to simulate a device. Mosquitto_pub .To publish a MQTT message to Azure, you can not just any topic name. It must be in the following format
devices/{DeviceID}/messsages/events/In my example
- IotEdge-DeviceChild is my DeviceID
- I have obtained the SAS signature for the device
- My EdgeHub IP address is 10.0.0.150 (remember we are publishing locally)
mosquitto_pub -t "devices/IotEdge-DeviceChild/messages/events/" -i "IotEdge-DeviceChild" -u "Baldacchino-IOTHub.azure-devices.net/IotEdge-DeviceChild/?api-version=2018-06-30" -P "SharedAccessSignature sr=Baldacchino-IOTHub.azure-devices.net%2Fdevices%2FIotEdge-DeviceChild&sig=5oZbwgye99edq2%2Fc%2BWERB%2BeQukic9cTBuSDi%2BAYgd54%3D&se=1642568789" -h 10.0.0.150 -V mqttv311 -m '{"Message":"Hello World"}' -d

Client IotEdge-DeviceChild sending CONNECT
Client IotEdge-DeviceChild received CONNACK (0)
Client IotEdge-DeviceChild sending PUBLISH (d0, q0, r0, m1, 'devices/IotEdge-DeviceChild/messages/events/', ... (24 bytes))
Client IotEdge-DeviceChild sending DISCONNECT
We can validate the message has been received via Azure IoT Hub by monitoring incoming events on the end-point
az iot hub monitor-events --hub-name Baldacchino-IOTHub
Starting event monitor, use ctrl-c to stop...
{
"event": {
"origin": "IotEdge-DeviceChild",
"module": "",
"interface": "",
"component": "",
"payload": "'{Message:Hello World}'"
}
}
Conclusion
Thanks for sticking this one out. If you made it to here, well done as this was a long post!! 💪💪
We covered a lot of ground and hopefully this guide was helpful.
We learnt about Azure IoT Edge, a fully managed service built on Azure IoT Hub. It does a heap, one of those things it does is allows you to publish MQTT messages locally to it and those messages are replicated in to Azure IoT Hub. Today, MQTT and ARM64 is experimental so keep it for testing.
The challenge for my devices is the strict topic structure but does this mean I cant use this. Absolutely not, it just means reconfiguration, so please take this in to account.
Is this the only way we replicate our messages to Azure IoT Hub? Stay tuned as in part 3 I look at how we can leverage Azure SDK’s and the Paho-MQTT library as I build my own bridge before settling on a mechanism to replicate my houses telemetry in to Azure.
Think-big and happy automating.
Shane Baldacchino
I work for @Microsoft but opinions expressed are my own
Now, MOTT broker it’s still in preview. Do you know about a roadmap with actual planning dates?
Hey Martin,
MQTT Broker I led to believe will go GA in the coming quarter. Stay tuned to the MSFT IOT site for more details.