Recently I started working for a relatively new AWS partner (V2 Digital) leading a team of builders. I author this post 4 months after AWS Sydney Summit 2024. Our goal for summit was simple.
How do we differentiate ourselves from all of the other AWS partners out there?
We didn’t want to blend in to the sea of partners handing out swag, it cant just be swag. We are builders and what do builders do? We build of course, so in this post I want to peel back the curtain behind our hugely successful AWS Sydney Summit activation, but with a twist.
The twist being, in this post I am going to walk you through the challenges we faced in building our solution, with the hope of if you go down this path, you can avoid many of these pitfalls. Before I get started, this solution would not be complete without my peer, Director of Software Engineering at V2 Digital, Mark Tranter.
Let’s Work Backwards
As usual rather than building up to a solution. I want to work backwards and start with the end game before picking it apart.
The entire solution can be found on V2 Digital’s GitHub repository, its not super polished but should be easy enough to run by first installing the Python requirements (pip3 install -r requirements.txt) and running the shell script (start.sh). The configuration is set to use a USB webcam at present but this can be changed to a RTSP URL. If you have any questions please leave a comment.
Below is two examples of start.sh, one using the local USB webcam and another our RTSP camera. Note the RTSP URL will vary based on your camera.
With RTSP Camera
#! /usr/bin/env bash
python3 fast-api.py \
  -d CPU \
  -i "rtsp://user:pass@Ip_address_OfCamera:554/Streaming/Channels/101/" \
  -m ./object_detection/ssdlite_mobilenet_v2/FP32/ssdlite_mobilenet_v2.xml \
  -at ssd
With Webcam
#! /usr/bin/env bash
python3 fast-api.py \
  -d CPU \
  -i 0
  -m ./object_detection/ssdlite_mobilenet_v2/FP32/ssdlite_mobilenet_v2.xml \
  -at ssd
We thought what could we do? After iterating, we thought we would come up with a simple guessing game and we would ask two questions
- How many people do you think will walk past our stand during AWS Sydney Summit 2024?
- Technically, what are you looking to level up on this year?
Architecture & Limitations
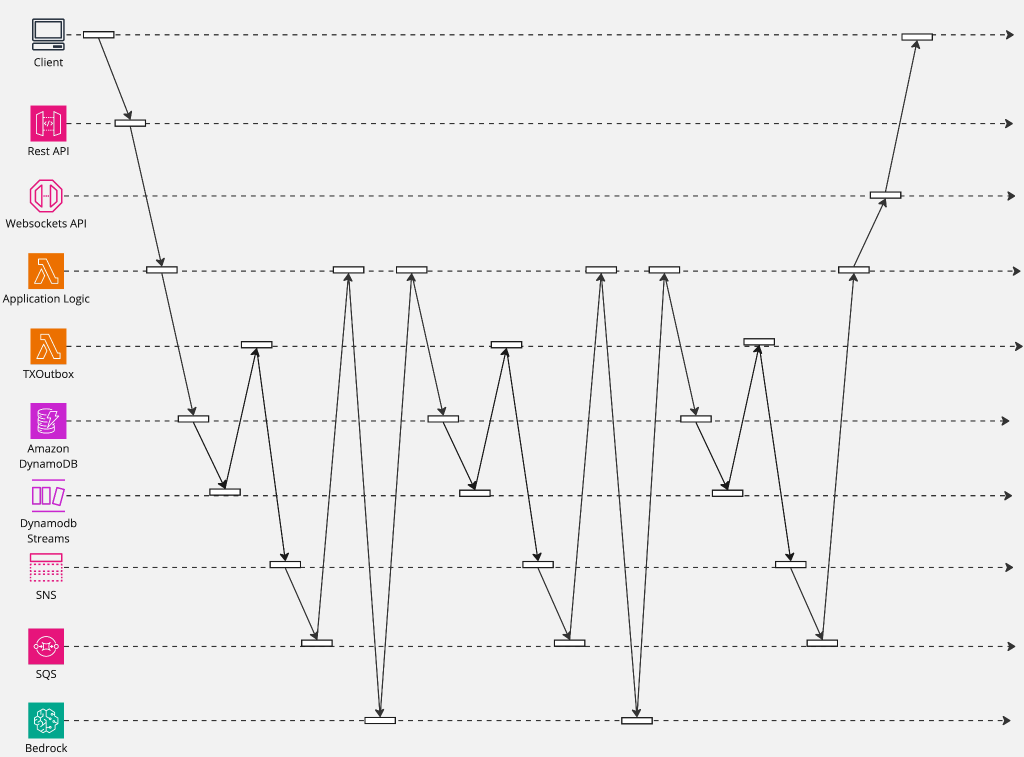
This post will focus purely on the challenges encountered in video detection, how ever in order to generate the word cloud and a bit of buzz we constructed a serverless event driven pipeline. This pipeline is scalable, decoupled and allowed us to vet user responses using queues/topics (Amazon SQS and SNS), Amazon Dynamo DB, AWS Lambda, Amazon Bedrock and various LLM (Large Language) Models). At a high level
- User inputted their guesses in to a SPA (Single Page Application) based on AWS PDK (Prototyping Development Kit)
- Amazon API Gateway is used to capture the guesses. A proxy pass through to AWS Lambda which contains basic log and commits the guesses to Amazon Dynamo DB
- Amazon Dynamo DB Streams and Lambda invoke Amazon SNS & SQS before sentiment analysis is performed on the guess using Claude 2 and Amazon Bedrock. The results of the sentiment analysis is committed back to Amazon DynamoDB
- If sentiment is negative, the result is stored in Amazon Dynamo DB and the process is terminated. How ever if sentiment is neutral or positive it is sent back to Amazon Bedrock and Claude 2 again to have the results classified. Classified results are stored in Amazon Dynamo DB
- Our front-end application reads in both the the video stream (an img tag) and renders the bubble chart based on the data in Amazon Dynamo DB.
This describes the user guessing experience but not our video detection, counting, logging and face obfuscation.
On the hardware front we has a limitation. We were limited to a M3 MacBook Pro, which would soon become a challenge given that most computer vision libraries are designed for NVIDA’s CUDA architecture.
Our Goals
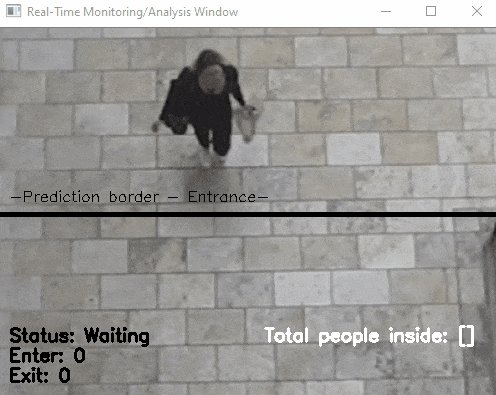
The goal in building this computer vision solution can be easily distilled by the following picture.
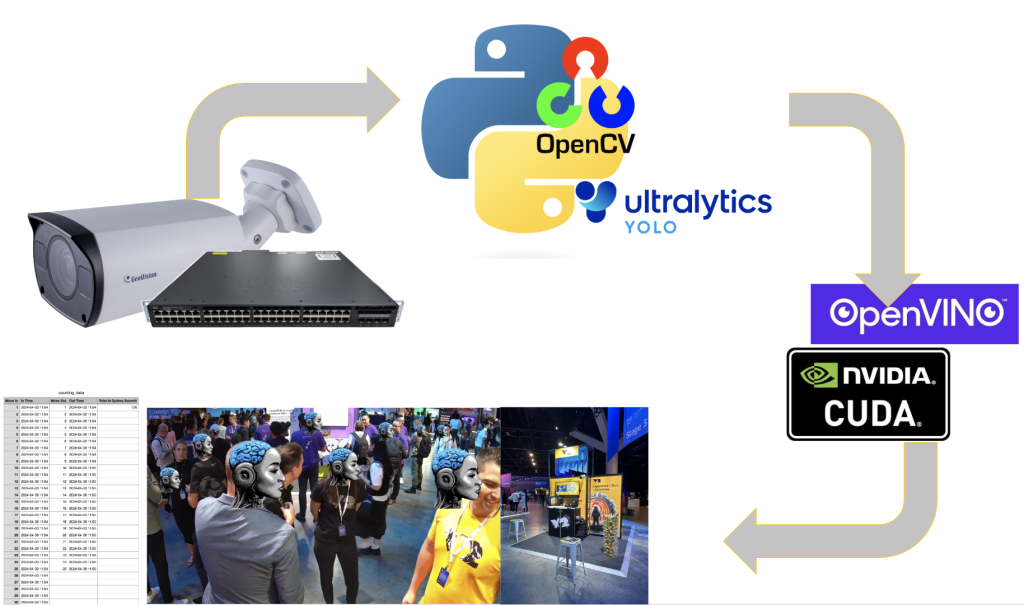
We start with our camera. It’s connected via POE (Power Over Ethernet) to an ethernet switch. The camera feed is read in to Python application using RTSP (Real Time Streaming Protocol). Using various Python computer vision libraries we draw an invisible line in the image and count people walking past our booth. We then dynamically size a image to obfuscate faces and log this encounter to a persistence store.
Simple enough right? Well yes but the devil as always is in the detail.
The Basics
The basics of this solution starts with an IP camera. Any camera will suffice, but for our purposes we settled on an 8 MP HikVision Camera (Hikvision DS-2CD2T85G1-I5 8MP Outdoor Bullet CCTV Camera 50M). We did have multiple cameras with different focal widths but this generic 2.8mm fixed lens captured a 110 degree field of view.
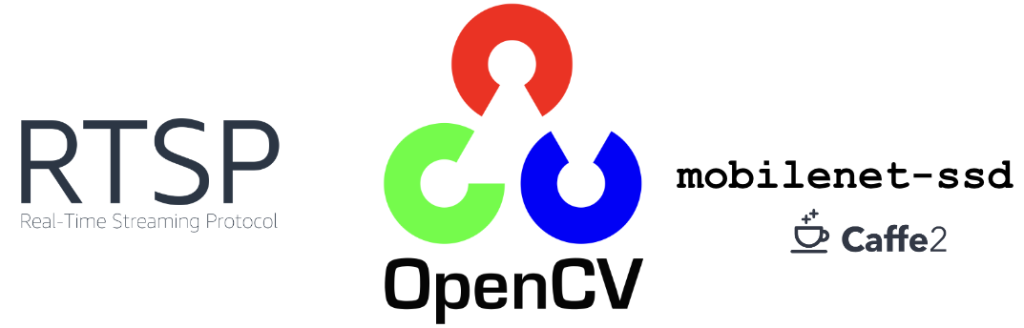
The important part here is the use of RTSP, whilst any camera will work it will need to support RTSP. We used a RTSP stream of 3840×2560 @ 30FPS over H.265 (High Efficiency Video Coding).
Python code then initialises the camera feed using Open CV (Open Computer Vision) and using the common mobilenet-ssd model we detected humans This is a single shot multi-box detection model that is very fast is based on the Caffe 2 (now part of pytorch) framework.
Building on a Base
How do you build? I like to think I am a pragmatist, I recognise when it is appropriate to build & engineer solutions, and when it is appropriate to leverage COTS (Consumer Off The Shelf) offerings.
You want to asses if it is viable to use something that’s already built or can you stand on the shoulders of giants. Is there commercial gain to hand rolling from scratch? Questions we should all ask.
I started this process and evaluated many solutions, they all had their share of problems. But are these problems that could be looked past, or are the deal breakers? How long would it take to build this from scratch versus forking an existing project?
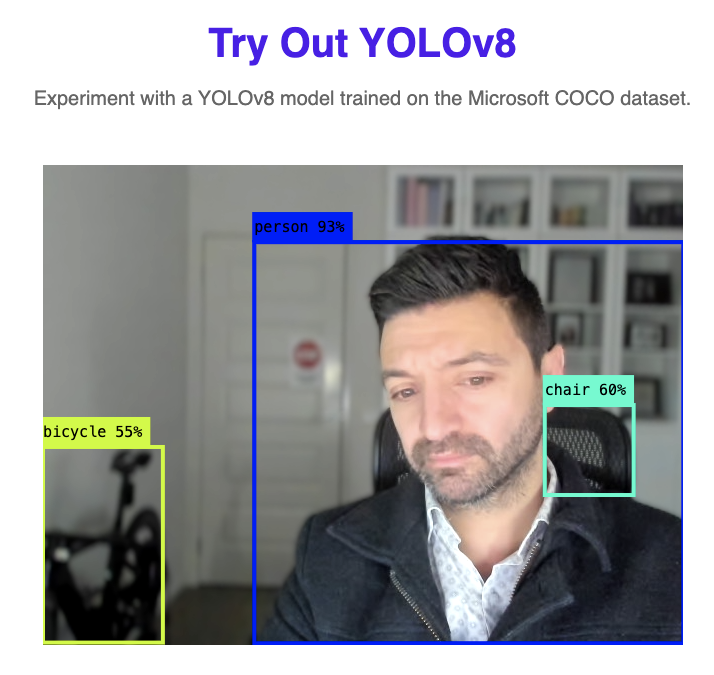
I even looked at the very popular Yolo V8. It’s really good, I mean really good but I couldn’t get the performance I need off my Mac. To be clear this is not Yolo’s fault, it’s the fact everything i was doing in Yolo was based on CPU inference as it uses Open CV under the hood and its accelerated by NVIDIA CUDA only.
We decided to build on the People-Counting-In-RealTime base before we started going mad scientist on the code. This code fundamentally ticked a lot of boxes for our needs. It tracked people, appeared to run okay on my Mac M3 Pro, but would it perform?
Lesson No 1 – Build A Test Harness
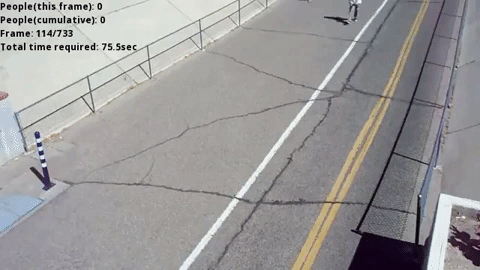
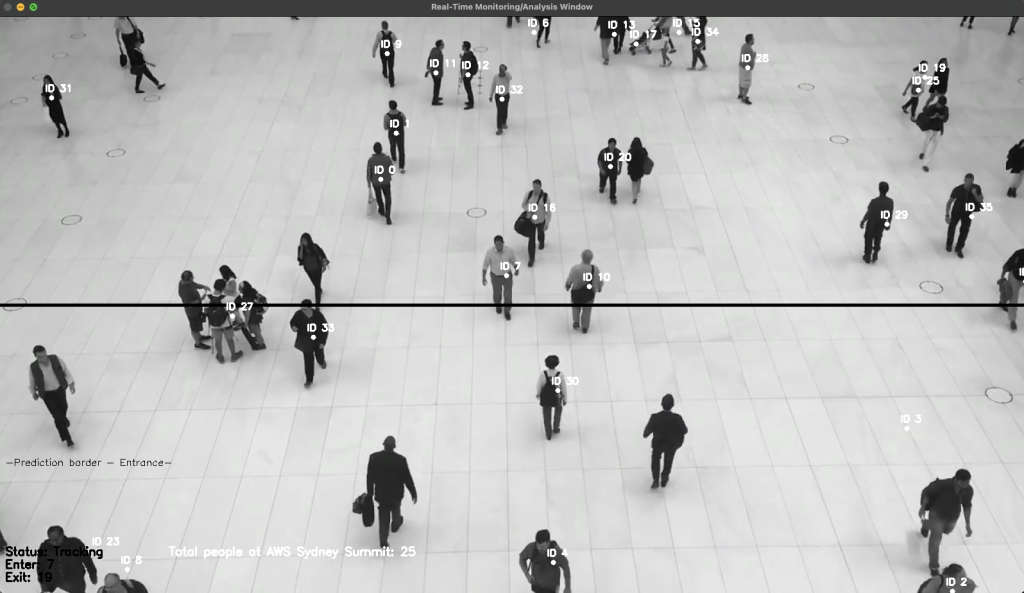
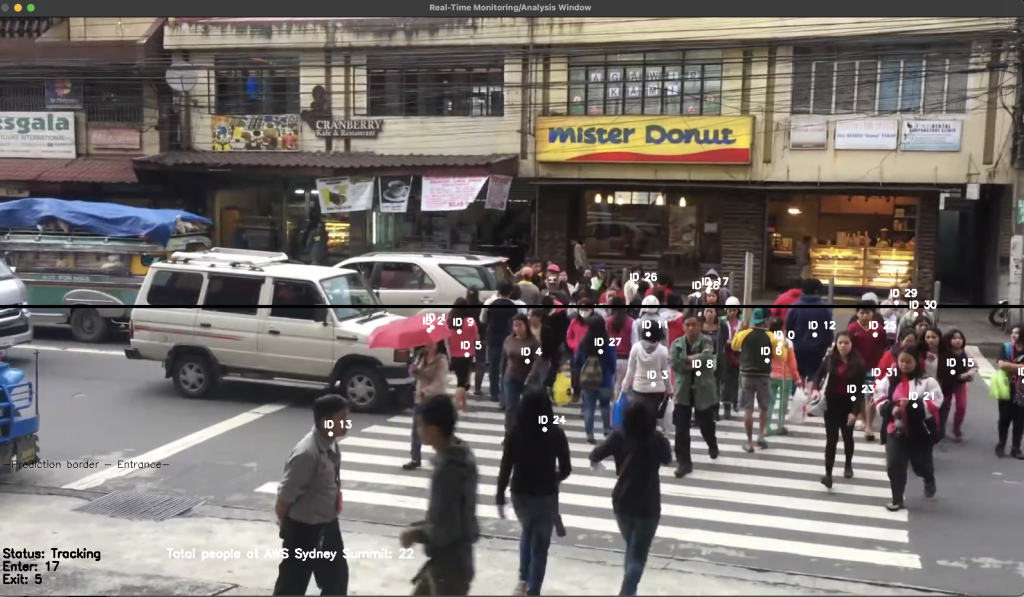
Testing with one person on camera is very different to testing with 10 people on camera vs 1000 people Lighting, angles, resolution etc etc. What did I do, I searched Youtube for stock footage of course amongst other things.
Look at the video below. This is stock footage recorded at 30FPS, but once we apply this modest 720P stream through our python script (People-Counting-In-RealTime), the results are un-acceptable. 10.21 FPS, that is never going to work.
The test harness really was the secret sauce of our success, it caught so many problems. Assume things will work, and you will be preparing yourself for failure. I used two different stock footages from YouTube.
Challenge 1 – 4K Video Is Expensive
My camera is set to deliver a 4K stream, 3840×2160 @ 30FPS. Even with H.265 that is a large amount of data in terms of bits and a high resolution to process. The core to almost all video processing solutions is OpenCV. Its the base of many projects
OpenCV is the world’s biggest computer vision library. Originally developed by Intel the library is cross-platform and OpenCV contains over 2500 algorithms, and is operated by the non-profit Open Source Vision Foundation.
Starting in 2011, OpenCV features GPU acceleration for real-time operations.
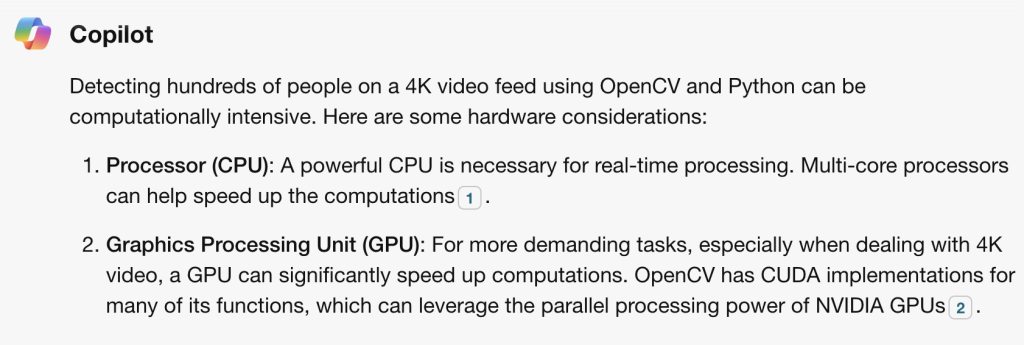
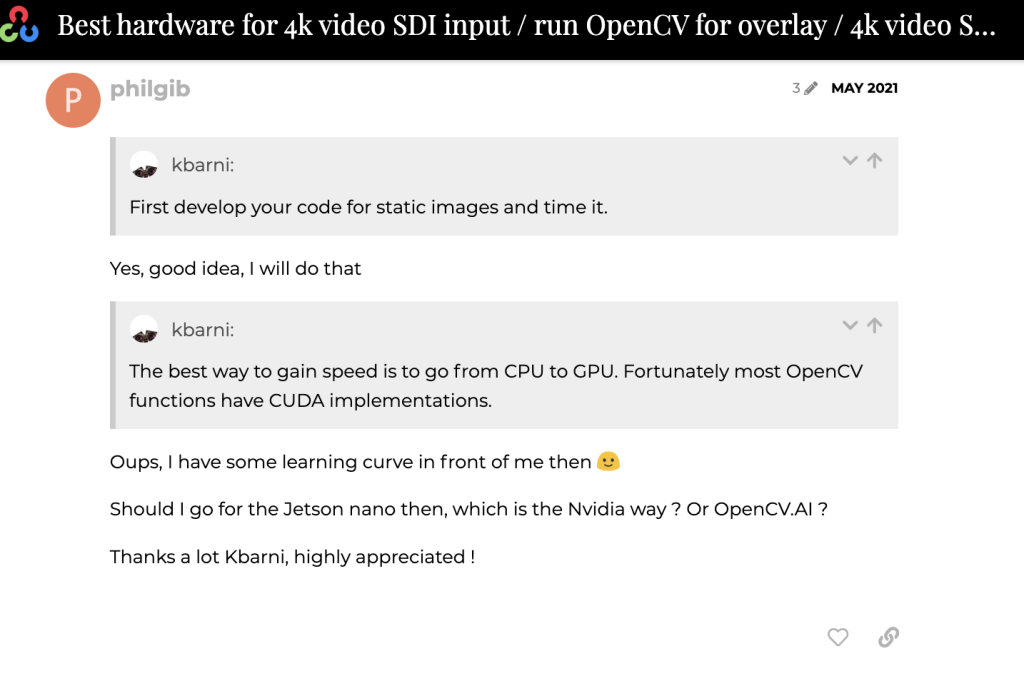
I searched forums and used AI and the easiest path of least resistance for performance is to use an NVIDIA GPU.
Running on a MAC M3 by default OpenCV will use CPU inference, which is slow and by default OpenCV is compiled for NVIDIA’s CUDA – https://opencv.org/platforms/cuda/. I ran the same test harness on an all new Raspberry Pi 5, my Macbook M3 Pro and a system with a NVIDA RTX 3600. The results speak for themself.
| Hardware Platform | FPS |
| Raspberry Pi 5 | 3 |
| MacBook M3 Pro (11 Core CPU + 14 Core GPU | 16 |
| AMD Ryzen 5600x + NVIDIA RTX 3060Ti to | 198 FPS |
In order to hardware accelerate this solution there is an answer and its called ‘OpenVino’.
OpenVINO is an open-source software toolkit for optimising and deploying deep learning models. It enables programmers to develop scalable and efficient AI solutions with relatively few lines of code. It supports several popular model formats and categories, such as large language models, computer vision, and generative AI.
Actively developed by Intel, it prioritises high-performance inference on modern (11th generation and beyond) Intel hardware but also supports ARM/ARM64 processors and encourages contributors to add new devices to the portfolio.
Given Apples M3 is based on ARMV8 cores we can use OpenVino as a means of hardware acceleration. The path of least resistance is to use a NVIDA based GPU because it provides hardware acceleration for OpenCV and Tensorflow and examples are simple to come by OpenVino can provide that speed increase that is considerably faster than plain CPU inference (but no where near CUDA performance).
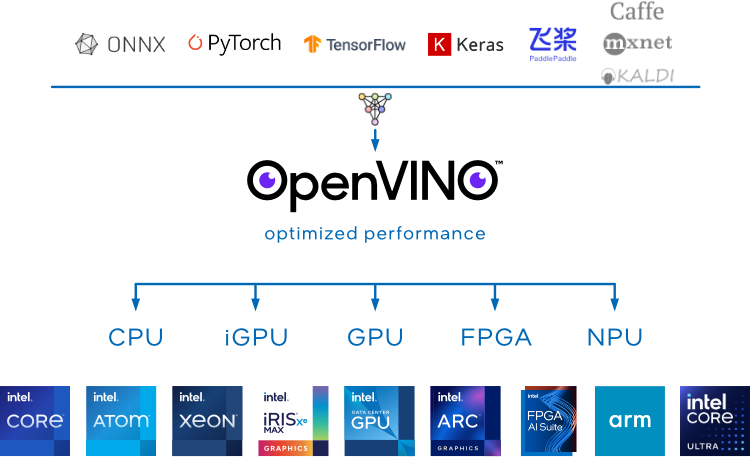
OpenVino is going to provide hardware accelerated inference for our solution. My MAC M3 has gone from 16 FPS to 30 FPS locked
Two other methods helped to ramp up performance
1. Inference is performed on a lower resolution. Whilst the camera can provide multiple RTSP streams, we can simply reduce the size of this in code and the python code below is performing inference on frames that are 25% of the size of the original frame, reducing load exponentially on the system.
 if detector_pipeline.is_ready():
                # Get new image/frame
                start_time = perf_counter()
                frame = cap.read()
                if frame is None:
                    if next_frame_id == 0:
                        raise ValueError("Can't read an image from the input")
                    break
                if next_frame_id == 0:
                    output_transform = OutputTransform(frame.shape[:2], args.output_resolution)
                    if args.output_resolution:
                        output_resolution = output_transform.new_resolution
                    else:
                        output_resolution = (frame.shape[1], frame.shape[0])
                    presenter = monitors.Presenter(args.utilization_monitors, 55,
                                                (round(output_resolution[0] / 4), round(output_resolution[1] / 8)))
                # Submit for inference
                detector_pipeline.submit_data(frame, next_frame_id, {'frame': frame, 'start_time': start_time})
                next_frame_id += 1
            else:
                # Wait for empty request
                detector_pipeline.await_any()
2. Asynchronous processing using threading. My laptop has lots of CPU cores, lets use them by using multi-threading.
  if args.adapter == 'openvino':
            plugin_config = get_user_config(args.device, args.num_streams, args.num_threads)
            self.model_adapter = OpenvinoAdapter(create_core(), args.model, device=args.device, plugin_config=plugin_config,
                                            max_num_requests=args.num_infer_requests, model_parameters = {'input_layouts': args.layout})
        elif args.adapter == 'ovms':
            self.model_adapter = OVMSAdapter(args.model)
Challenge 2 – From Python To The WebBrowser
Great okay thats detection, the part that we spent an awful amount of time was as simple as this problem statement. When I mean an awful amount of time, I dont want to admit how much time we spent. Lets say it was a lot
How can we get the video feed from our Python process in to our browser. We wanted that clean look. Without calculating the time spent but this was harder than you think. Of course we looked at what others were doing.
I used Microsoft Co-Pilot and its suggestions were pretty on the money, so rather than write the stream out to a python library, it is suggesting we write every frame to standard out and then pull it in the images on your webpage
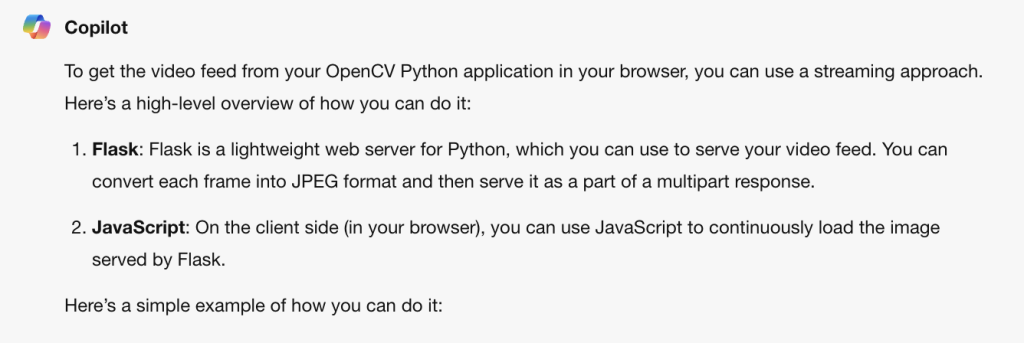
Sample code provided by Microsoft CoPilot / GPT 4 / Claude all looks similar to this snippet.
from flask import Flask, render_template, Response
import cv2

app = Flask(__name__)

@app.route('/')
def index():
    return render_template('index.html')

def gen():
    cap = cv2.VideoCapture(0)  # Capture video from webcam

    while True:
        ret, frame = cap.read()
        if not ret:
            break
        else:
            ret, buffer = cv2.imencode('.jpg', frame)
            frame = buffer.tobytes()
            yield (b'--frame\r\n'
                   b'Content-Type: image/jpeg\r\n\r\n' + frame + b'\r\n')

@app.route('/video_feed')
def video_feed():
    return Response(gen(),
                    mimetype='multipart/x-mixed-replace; boundary=frame')

if __name__ == '__main__':
    app.run(host='0.0.0.0', debug=True)
I thought this would work, using a Flask server and encoding the frames. Heck so did I. But here is the kicker. This worked. but then it didn’t. A pain to debug. It would run for 30-50 minutes flawlessly before an out of bounds exception, which resulted in the video footage pausing requiring for the web page to be refreshed.
You need to soak test what you build, catch those edge cases. We pointed a camera out the window of our building looking at cars and people move on Collins Street in Melbourne . I wont tell you why this code is wrong now, but I will show you my code shortly.
To solve the flakiness of this solution we tried to use FFMPEG, the Swiss army knife of video encoding.

We tried to write the output of OpenCV in to a file and have FFMPEG lock on the the stream and transcode it in to an MP4 live.
And it worked, well er kinda. We had a MP4 coming out. Two issues
Reliability, still issues. Something would happen, the browser would need to hit refresh. Rather than sending frames were sending an MP4. Secondly lag, lag, we are talking 500ms or so. People want to see them selves on camera.
The solution to this challenge is as follows
In people_counter.py, we build in a frame buffer, you can see this in the line self.frame_queue = Queue(maxsize=10), before having this function return the latest frame in get_latest_frame() function.
 def __init__(self, args):
        self.args = args
        args = self.args
        self.cap = open_images_capture(args.input, args.loop)

        if args.adapter == 'openvino':
            plugin_config = get_user_config(args.device, args.num_streams, args.num_threads)
            self.model_adapter = OpenvinoAdapter(create_core(), args.model, device=args.device, plugin_config=plugin_config,
                                            max_num_requests=args.num_infer_requests, model_parameters = {'input_layouts': args.layout})
        elif args.adapter == 'ovms':
            self.model_adapter = OVMSAdapter(args.model)

        configuration = {
            'resize_type': args.resize_type,
            'mean_values': args.mean_values,
            'scale_values': args.scale_values,
            'reverse_input_channels': args.reverse_input_channels,
            'path_to_labels': args.labels,
            'confidence_threshold': args.prob_threshold,
            'input_size': args.input_size, # The CTPN specific
            'num_classes': args.num_classes, # The NanoDet and NanoDetPlus specific
        }
        self.model = DetectionModel.create_model(args.architecture_type, self.model_adapter, configuration)
        self.model.log_layers_info()

        self.detector_pipeline = AsyncPipeline(self.model)
        self.palette = ColorPalette(len(self.model.labels) if self.model.labels else 100)
        self.metrics = PerformanceMetrics()
        self.render_metrics = PerformanceMetrics()
        self.frame_queue = Queue(maxsize=10)
        self.stop_event = threading.Event()
        self.thread = threading.Thread(target=self.count)
        self.thread.start()

    def get_latest_frame(self):
        try:
            return self.frame_queue.get(timeout=0.1)  # Adjust the timeout as needed
        except Empty:
            return None
The file fast-api.py listens on port 5001 on the local IP address and creates a jpg image to which you can embed in your webpage with an image tag. The image is generated by the get_latest_frame() function in people_counter,py.
import cv2
from fastapi import FastAPI, Response
from fastapi.responses import HTMLResponse
from fastapi.staticfiles import StaticFiles
from fastapi.responses import StreamingResponse
from object_detection.people_counter import PeopleCounter
from args import get_args

app = FastAPI()
# app.mount("/static", StaticFiles(directory="static"), name="static")

people_counter = PeopleCounter(get_args())

def frame_generator():
    while True:
        frame = people_counter.get_latest_frame()
        (flag, encodedImage) = cv2.imencode(".jpg", frame)
        if frame is not None:
            yield (b'--frame\r\n' b'Content-Type: image/jpeg\r\n\r\n' + bytearray(encodedImage) + b'\r\n')

@app.get("/video_feed")
async def video_feed():
    return StreamingResponse(frame_generator(), media_type="multipart/x-mixed-replace; boundary=frame")

@app.get("/", response_class=HTMLResponse)
async def index():
    return HTMLResponse(content=open("templates/index.html").read())

if __name__ == "__main__":
    import uvicorn
    try:
        uvicorn.run(app, host="0.0.0.0", port=5001)
    finally:
        people_counter.stop()
Summary & Lessons Learnt
This was a fun project, the barrier to effective Computer Vision projects are reducing by the day, so if you have yet to experiment, there is never a better time than now. But to summarise our learnings.
- FFMPEG is the WD40 of tools, you would be be surprised with how opopular it is.
- Without reinventing the wheel, OpenCV and Yolo probably have a use case out there that is going to work for you. Find some code, base it off an example and modify accordingly, if you need to
- Hardware acceleration is a must, unless you are prototyping its not possible to get decent inference performance without hardware acceleration
- A mac based on Apple Silicon falls in to that ARM64 category, giving you decent inference performance if you are using Open VIno for computer vision. Understand your constraints, how many calories in terms of GPU grunt do you have at your disposal
- But, by far the easiest way to run something thats performant and that has a huge catalog of software support is to use a Nvidia based hardware. A jetson, anything that will support CUDA and eat almost any MAC for breakfast. OpenVino is your get out of jail card if you have a modern Intel or Mac processor
- Test test and test. Find dataset that will be similar to your test case. Soak test, throw stones at your solution until it breaks
If this post saves you some time in your computer vision journey please let me know, or alternatively if there are better ways to achieve what we built, teach me.
Thanks
Shane Baldacchino
Enormously useful Shane…
Thanks Alex, offer is always there to help you build.
Reach out if i can help and thanks for taking the time to comment.